
Maintenance Manual

Entry Points 27
Subactivity: From the dropdown list, select Chat.
Routing type: From the dropdown list, select Cisco Interaction Manager.
CTI Strategy: The value in the field is set to AgentReserved and cannot be changed.
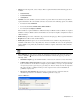
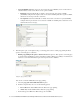
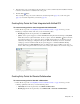
Queue: Select a standalone queue. This is required information. To select a queue, click the Assistance
button. From the Select Queue window, select a queue. The queues available in this window are
decided based on the subactivity and routing type configured for the queue. For example, when the
subactivity selected is chat and the routing type selected is Cisco Interaction Manager, only standalone
queues are displayed. The queues available can be active or inactive. If the entry point is marked as
active, then an active queue must be selected for the entry point.
Template: Select a template set created for chats. This is required information. To select a template,
click the Assistance
button. From the Select Template Set window, select a template set.
Enable Cobrowse: Select Ye s to enable cobrowse for the entry point. By default No is selected. If the
installation does not include Cobrowse, this field is disabled.
Customer console - Start page: This setting defines the first page to be displayed in the customer’s
viewport, when a chat session begins. If it is left blank, the customer's viewport shows the page from
which chat was invoked. If the installation does not include Cobrowse, the start page is displayed only
on the agent side, and not on the customer side. Type the URL of the page you want to set as the
customer console start page. For example, http://www.mycompany.com.
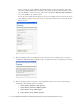
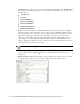
Customer console - Finish page: This setting defines the page to be displayed in the customer’s
viewport, when a chat session is completed. This page is displayed only when the viewport is already
open on the customer side and the customer clicks the Exit button on the exit page of the chat. Click the
Assistance button in the field and from the Finish page window, select from one of the following
options – Last browsed page, Referrer page, and Pre-configured URL. If you select the Pre-configured
URL option, type the URL of the page you want to set as the customer console finish page. For
example, http://www.mycompany.com. The default value is Last browsed page.
Console mode for agent: This setting defines the mode for the agent viewport. The options available
are – Popup window and Same window. If the Same window option is selected, the viewport opens in
the Cobrowse section of the Information pane of the Agent Console. If the Popup window option is
selected, a new window with the viewport opens for each chat session. By default Popup window is
selected.
Console mode for customer: This setting defines the mode for the customer viewport. The options
available are – Popup window and Same window. If the installation does not include Cobrowse, this
field is disabled and the value is set to Popup window. If the installation includes Cobrowse, and if
cobrowse is enabled for the entry point, then this field is enabled and the default value is set to Same
window.
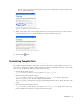
Enable auto login: From the dropdown list, select Ye s to enable auto login. By default No is selected.
Enable this feature to automatically log in users to chat sessions who have already been authenticated
once. The customer information is passed from the source page to Cisco Interaction Manager and the
user is not displayed the login page.
Important: An active entry point cannot be mapped to an inactive queue.
Important: When you change this setting, ensure that there are no active chats going on at that
moment, else it can result in errors in page pushing.