
Maintenance Manual

26 Cisco Unified Web and E-Mail Interaction Manager Administrator’s Guide to Chat and Collaboration Resources
This chapter will assist you in understanding how to set up chat and collaboration entry points.
About Entry Points
An entry point defines the starting point from which customers initiate chat, blended collaboration, and web
callback interactions. Every help link on a website is mapped to an entry point. Each entry point has a queue and
a template set associated with it. The queue is used to route chats to agents while the template set determines the
look and feel of the different pages displayed to chat customers. A default entry point is provided in each
department.
Creating Entry Points
Before creating an entry point, create the queues and template sets to be used for the entry points. For details on
creating queues, see Cisco Unified Web and E-Mail Interaction Manager Administrator’s Guide to Routing and
Workflows. For details on creating templates, see “Template Sets” on page 15.
You need to create separate entry points for each of the following types of activities:
Standalone chat activities (page 26)
Integrated chat activities (page 29)
Blended collaboration activities (page 29)
Callback activities (page 31)
Delayed callback activities (page 32)
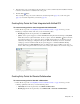
Creating Entry Points for Standalone Chats
To create an entry point for standalone chats:
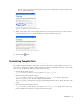
1. In the Tree pane, browse to Administration > Departments > Department Name > Chat > Entry Points.
2. In the List pane toolbar, click the New button.
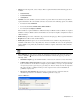
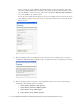
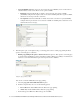
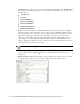
3. In the Properties pane, on the General tab, provide the following details.
Name: Type the name of the entry point. This is required information.
Description: Type a brief description.
Active: Select Yes to make the entry point active.
Important: Multiple chat help links on a website can point to the same entry point.
Important: Customers can initiate chats only from active entry points. If the entry point is
inactive, a no service available page is displayed to customers.