
User Guide


Assigning Tasks 73
5. Type a subject and the contents of the task.
a. In the Text box toolbar, click the Switch to HTML editor button, to set the content type of the task
to HTML. The Source tab displays the HTML source code of the content displayed in the Layout tab.
Click the Switch to Plain editor button to change from HTML editor to Plain editor. Once you
switch to the plain editor, the Source tab becomes unavailable and all formatting is lost.
b. Next, type the content of the task in the text box. Here you can use the various formatting tools
available to format the content of the task. In the HTML editor, you can also add hyperlinks to the
content.
c. To add hyperlinks to the task content, click the
Insert Hyperlink button in the Text box toolbar and
in the Explorer User Prompt window, type the hyperlink you want to add.
Type the web address
After creating the content, you can run the spelling checker on the content.
d. To run the spelling checker, in the Text box toolbar, click the Spell Check button.
e. To insert an image from an external location, click the Insert image button and provide the URL in
the Explorer User Prompt window. The images should be stored at a location that is accessible to
external user. If the image is removed from this external resource or the address is changed, the inserted
image will no longer be visible. Instead, a red X or a placeholder may appear in its place.
Type the URL of the image
f. To insert a table, click the Insert table button and specify the dimensions and properties of the table.
6. Attach files to the task by using the Attachment button.
7. Add, view, or delete notes from the task by using the Notes button.
8. Click Save to save your changes.
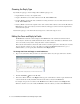
Assigning Tasks
An agent can assign tasks to queues or users only if they have permission to do so.
To assign a task:
1. Create a new activity with the Activity type as Task or select an existing task activity from the inbox.