
Installation Guide


Installation Guide for Cisco Unified Contact Center Management Portal 7.2(3) 36
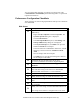
Version Select the required CallManager version
Endpoint Enter the URL used to access the CallManager AXL
interface. The default is the default URL for the CallManager
version selected
User Name Enter the name of the CallManager Administrator
user. This is the user name that the Management Portal Data
Import Server will use when connecting to the CallManager’s web
service.
Password Enter the CallManager Administrator user’s password
Test Connection Click to test the connection to the configured
CallManager
5. Open up the tree on the left, and double click on a tenant name to
bring up the Peripheral Association dialog box for that tenant
6. Select the checkbox of the required peripherals
Peripheral User Name Enter the name of a directory user on the
CallManager, with whom new phones will be associated with
when they are created through the Unified Contact Center
Management Portal user interface. In order for the CICM/ICM to
control the new phone it must be added to a specific user’s list of
controlled devices in the directory on the CallManager. You can
find a list of directory users by logging into Cisco Unified
CallManager Administration (normally
https://<SERVER>/ccmadmin, for example https://CCMSERV
ccmadmin).
7. Click OK
8. Select the associated tenant from the folder tree. This will associate the
CallManager to the tenant to which it belongs
9. For a new CallManager, a popup will appear requesting connection
details
■
User Name Enter the name of the CallManager Administrator
user. This is the user name that the Management Portal Data
Import Server will use when connecting to the CallManager’s web
service
■
Password Enter the CallManager Administrator user’s password
Test Click to test the connection to the configured CallManager
When you have finished adding CallManagers, restart the Management
Portal Data Import service.
Tab 7 – Connections
The Connections tab allows you to edit the settings of individual
connections, or to create any missing connections.
To set up all connections, click the Auto Create. You can also manually
create individual connections by clicking New, entering the Connection
Source and Connection Target, and clicking Create All Connections