
Installation Guide


.
46
Installation Guide for Cisco Unified Contact Center Management Portal 8.0(1)
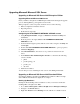
2. Click Database Setup and ensure the Database Name is ReportServer.
3. Click Upgrade and confirm.
It will also be necessary to delete the old encryption keys and set up new ones.
1. From the Reporting Services Configuration Manager select Encryption Keys.
2. Click Delete and confirm.
3. Click Initialization.
4. Check the box for the first key and click Remove.
5. Click Initialize and a new key will be created.
6. Restart the computer.
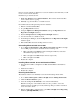
Configuring the NT AUTHORITY\
NETWORK SERVICE account
1. Using Management Studio, navigate to Databases > Portal > Security and
click Users.
2. From the panel on the right, delete the NT AUTHORITY\NETWORK
SERVICE account.
3. In the left-hand navigation panel, click the server name, navigate to Security and
click Logins.
4. Double click NT AUTHORITY\NETWORK SERVICE to open its properties.
5. Click User Mappings.
6. Check Portal Database and select it to see possible roles listed in the Database
Role Membership For: Portal box below.
7. In the Database Role Membership For: Portal box, ensure that the following
roles are checked:
• public
• portalreporting_role
• portalrs_role
• db.owner
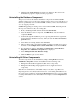
You can then proceed to installing the new version of the Management Portal
Installing the Portal
Install the new version of the Management Portal as described in Chapter 4
XXComponent InstallationXX. During installation of the Database Component, you must
select the option to upgrade an existing database rather than installing a new
database.
Configuration
Once the database has been upgraded you must configure the system using
Configuration Manager as described in Chapter 4 Component Configuration.