
Administrator's Guide


6-42
Cisco Unified Attendant Console Administration and Installation Guide
OL-27293-02
Chapter 6 Configuring and Licensing Cisco Unified Attendant Console Advanced Server
User Configuration Menu
Step 2 Click Add New.
Step 3 Under General, type a Template name (up to 50 alphanumeric characters and spaces; each name must
be unique), and then click Save.
Step 4 If you want to change the Template name, enter the new name and click Update.
You now need to define the out of hours date and time periods.
Step 5 Click Add New.
The Time Period Configuration page is displayed.
Step 6 Under General, select the Configuration type, either Day (of the week) or Date (specific calendar
date).
Note The following points:
• Your template can contain both configuration types, with multiple definitions of each. You define
each of these separately by repeating Step 5 to Step 12.
• If you specify a Date which matches a Day configuration, the Date overrides the Day. For example,
if you have break hour defined for every Monday, and a break hour for a specific date that happens
to be a Monday, the system uses the Date break hour information to forward calls to the destination.
Step 7 Depending on the selected Configuration type, do one of the following:
If you selected Day in Step 6:
a. Select the Day(s) of the week on which the out of hours period occurs. You must select at least one
day.
b. Select the From and To times marking the start and end of the out of hours period.
These time periods apply to all the days of the week selected, and an editable time period is created
for each day.
If you selected Date in Step 6:
a. Select or enter (in YYYY-MM-DD format) the Specific date on which the out of hours period
occurs.
b. Select the From and To times marking the start and end of the out of hours period.
These time periods apply to all the dates selected.
Step 8 Click Save.
Note The following points:
• You cannot change a saved Configuration type; if you made a mistake you must delete it and create
a new one.
• If you specify a date and time period that is already defined in the template, you are notified that
you must change it.
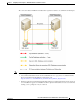
You are now prompted to define the destination—queue or device—to which calls are routed during the
specified time period.
Step 9 Select the Destination type; either Queue or Device (the default).