
Administrator's Guide


6-30
Cisco Unified Attendant Console Administration and Installation Guide
OL-27293-02
Chapter 6 Configuring and Licensing Cisco Unified Attendant Console Advanced Server
System Configuration Menu
Directory Synchronization
Use Directory Synchronization to configure the synchronizing of the contacts database with your chosen
directory source using LDAP.
Caution
Do not perform directory synchronization when the Subscriber server is not running. If you do, the
server must go through all the pending online requests when it comes back online, which may delay
the server becoming available.
To configure directory synchronization do the following:
Step 1 In the Directory Source Management page, click Directory Synchronization.
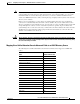
The Directory Synchronization page is displayed. The page contains the following Directory
Synchronization parameters:
• Directory Source—The type of directory chosen as the source.
• Auto Synchronization—Set the automatic synchronization preferences:
–
On start-up—Select this to start the synchronization when Cisco Unified Attendant Console
Advanced server starts.
–
On reconnect—Select this to start the synchronization when Cisco Unified Attendant Console
Advanced server reconnects with the LDAP plug-in after a connection failure.
• Route Partition—(Only displayed when the Cisco Unified Communications Manager directory is
used). This prioritizes which DN to import when there are identical DNs in different partitions.
Either Select a route partition or one of the following:
–
<None>—disregard the route partition field when synchronizing the directory.
–
CUCM <None> partition—picks up only those devices in the Cisco Unified Communications
Manager specified as (None).
• Schedule Settings—The synchronization schedule. Enter the following:
–
Type—The frequency of synchronization. Select one of:
- None
- Hourly
- Daily
- Weekly
- Monthly
–
Every [(Number)(Type)]—The data type changes according to the Type. For example, Every
2 Week(s) or Every 1 Day(s).
–
Start date—The date on which to start synchronizing.
–
Start time—The time on which to start synchronizing.
Step 2 Set the Directory Synchronization parameters.
Step 3 Click Save to save the changes.