
Manual


9
Configuring the Cisco TelePresence Content Server Release 5.x to Use an External Windows Media Streaming Server
How to Configure the Content Server to Use an External Windows Media Streaming Server
Step 6 In Server Push, enter either 80 or a port that the external Windows Media server listens to for incoming
push media.
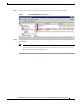
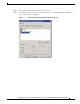
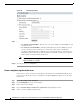
Step 7 Select Create new in the Publishing Points section, as shown in Figure 9.
Note You can create a new or use an existing publishing point. The key source formatting requirement
syntax is Push:*. This syntax means that the publishing point is triggered externally—by the
Content Server in this case.
Figure 9 Server Push Settings
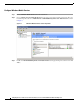
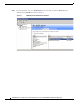
Step 8
In On Demand Settings, specify how the Content Server should move the media files to a location that
the external Windows Media server can access either by writing to an alternate media location via UNC
or using FTP to move the media.
a. Select Write movies to an alternate media location and enter a valid path that the Content Server
has access to write files to, as shown in Figure 10.
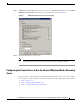
Note The Content Server must have WRITE access to the share that this path points to. This means
that either the share is fully open or the Content Server’s Windows machine account has the
appropriate access. The implication of this is that both the Content Server and the machine
hosting the share must be added to the same domain.
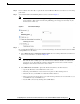
b. Select FTP movies to location to upload the finished media file to the final location.
• Specify the IP address or the DNS name for the server.
• Enter the port the FTP server uses to listen for requests on. The default port is 21.
• Enter the directory on the FTP server that files will be written to.
• Enter a user name and password for an account that has permissions for read and write access
to the FTP directory on the FTP server.
• Test the FTP connection by clicking the Test FTP button.