
Manual


8
Configuring the Cisco TelePresence Content Server Release 5.x to Use an External Windows Media Streaming Server
How to Configure the Content Server to Use an External Windows Media Streaming Server
Create a media server
The following steps will create a new media server on the Content Server with support for live unicast
and on-demand streaming from an external Windows Media streaming server. If you require support for
one type of streaming, complete the steps as needed to create only a live streaming or an on-demand
media server.
Step 1 Log in to the Content Server as administrator.
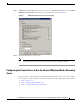
Step 2 Choose Management > Recording setup > Media server configurations.
Step 3 Click the Add Windows Media streaming server configuration to create a new Windows Media
streaming server.
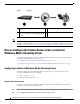
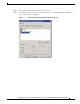
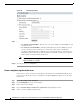
Step 4 Enter a name for your media server and then select Support live unicast streaming, Support on
demand, or both, as shown in Figure 7. In the Unicast and on demand server address field, enter the
IP address of the external Windows Media server that you configured.
Figure 7 Server Settings
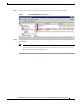
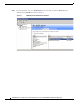
Step 5
In Live unicast streaming settings, enter the user name and password for the local account that you
created on the external Windows Media server.
Note You must enter the user name as follows:
External_WM_server_Machine_name\username. The example in Figure 8 shows the user name
WMS08\wmspush.
Figure 8 Live Unicast Streaming Settings