
Operation Manual


Advanced Options for Voice Services
Configuring Dial Plans
Administration Guide 138
1
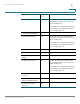
STEP 5 If faxes fail consistently, capture a copy of the configuration as described below. You can then
send this file to Technical Support.
a. In your web browser, enter the path for the configuration file:
http://<ATA_Local_IP_Address>/admin/config.xml&xuser=
<admin_user>&xpassword=<admin_password>
b. On the File menu, choose Save As, and save the file with a filename such as
MyConfiguration.xml.
STEP 6 To enable logging, go to the Voice > System page, and set the IP address of your syslog and/or
debug server. Set the Debug Level to 3. For more information, see System, page 47.
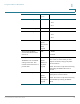
NOTE: You can also capture data using a sniffer trace.
STEP 7 Identify the type of fax machine connected to the ATA.
STEP 8 Contact technical support:
• If you are an end user of VoIP products, contact the reseller or service provider that
supplied the equipment.
• If you are an authorized Cisco partner, contact Cisco technical support. For contact
options, see: www.cisco.com/go/sbsc
Configuring Dial Plans
Dial plans determine how dialed digits are interpreted and transmitted. They also determine
whether the dialed number is accepted or rejected. You can use a dial plan to facilitate dialing
or to block certain types of calls such as long distance or international. This section includes
information that you need to understand dial plans, as well as procedures for configuring your
own dial plans.
To edit a dial plan, click Voice on the menu bar, and then click Line 1 or Line 2 in the
navigation tree. Scroll down to the Dial Plan section, and then enter the digit sequences in the
Dial Plan field. For more information and examples, see the following topics:
• Digit Sequences
• Acceptance and Transmission of the Dialed Digits
• Dial Plan Timer (Off-Hook Timer)
• Interdigit Long Timer (Incomplete Entry Timer)