
User Guide


3-11
Cisco AlarmTracker Client User Guide
OL-1501-01
Chapter 3 Getting Started
Navigating to Different Nodes
Navigating to Different Nodes
There are a number of ways to navigate to different nodes in AlarmTracker Client,
but perhaps the easiest is to select a different node in the Tree View. When the
selection is changed in the Tree View, the contents of the Main View are updated
to reflect the new node selection.
You can always move the parent node by selecting View > View Parent Node or
by selecting the View Parent Node Toolbar option icon.
When using Grid View, you can navigate to a specific customer node by double
clicking the name of customer in the view. This will immediately select that
customer's node in the Tree View and set the focus to that view.
You can also navigate to a node in the EventsBar by right-clicking an Event and
choosing the Jump to Node.
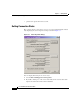
Displaying Alarms
Probably the most often used Main View setting is the Alarm Details View. You
can select this view via the View > Alarm Details, or via the equivalent Toolbar
icon.
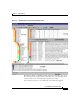
A sample of this view is shown in Figure 3-4.
This view shows Alarm objects for the currently selected Tree View node. There
are also filter options that allow you to include Alarms for all child nodes, and
options to show only open Alarms, display/hide Application Errors, display/hide
Excluded Alarms.
From this view, you can easily see the state and assignment status for the Alarms
associated with the selected node, and it allows you to view the constituent Events
for any of the Alarms seen in the view. It also allows you to easily manage the
state of these Alarms (i.e., change the assignment status). You can also select the
columns you want to see displayed