
Maintenance Manual


Managing the System
Administration
Cisco Small Business NSS300 Series Smart Storage Administration Guide 107
3
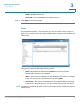
STEP 6 Click Next to import the users. A list of imported users is displayed, showing
username, password, group name, and quota setting, if applicable.
NOTE Any users with an abnormal status, highlighted in red, will not be imported.
STEP 7 Click Next to create the user accounts.
STEP 8 Click Finish after the user accounts have been created.
Supported File Formats
Supported file formats for importing users and user groups to the NAS are *.txt,
*.csv, and *.bin. When exporting users from NAS to NAS, only the *.bin file format is
supported.
To c r e a t e a t ex t f i l e :
STEP 1 Open a new file using a text editor.
STEP 2 Enter the user information in the following order and separate each entry with a
comma (“,”). No space is required, as shown in the following example:
Username,Password,Quota(MB),Group Name
STEP 3 Continue to the next line and repeat the previous step to create another user
account. Each line indicates one user’s information.
STEP 4 Save the file in .txt format. If the file contains double-byte characters, save the file
in UTF-8 encoding.
To c r e a t e a C S V f i l e :
STEP 1 Open a new file using Microsoft Excel.
STEP 2 Enter the user information in the same row and in the following order. Separate
each entry with a comma (“,”) and space, as shown in the following example:
Username, Password, Quota(MB), Group Name
STEP 3 Continue to the next row and repeat the previous step to create another user
account. Each row indicates one user’s information.