
Maintenance Manual


Managing the System
Administration
Cisco Small Business NSS300 Series Smart Storage Administration Guide 106
3
Export Users
To export users from the NAS:
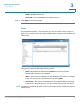
STEP 1 Choose Administration > Users from the Navigation menu. The Users window
opens.
STEP 2 Click Import/Export Users. The Import/Export Users window opens.
STEP 3 Select Export user and user group settings.
STEP 4 Click Next to download and save the account setting file (.bin) on a local drive. The
file can be imported to another NAS for account setup. The exported elements will
include the username, password, group name, and quota setting, if quota setting is
enabled.
NOTE If the quota setting is disabled, there will not be any quota values exported to the
.bin file.
STEP 5 Click Save and enter the path where you want to store the .bin file on a local drive.
The .bin file naming includes Accounts, NAS hostname, and date. For example,
“Accounts_Athen_20110820.
STEP 6 After the download is complete, click Close.
Import Users
NOTE Before you import users to the NAS, back up the user settings by exporting the
users. See Export Users, page 106.
To import users to the NAS:
STEP 1 Choose Administration > Users from the Navigation menu. The Users window
opens.
STEP 2 Click Import/Export Users. The Import/Export Users window opens.
STEP 3 Select Import user and user group settings. This is selected by default.
STEP 4 Select the option Overwrite duplicate users to overwrite existing users on the
NAS. If selected, the duplicate user and group accounts on the destination NAS
will be replaced by the source account settings.
STEP 5 Click Browse and select the file (*.txt, *.csv, *.bin) that contains the user information.
See Supported File Formats, page 107.