
Maintenance Manual


Managing the System
Administration
Cisco Small Business NSS300 Series Smart Storage Administration Guide 103
3
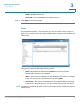
• Privilege—Privilege for the share folders. Privilege access options are read
only, read/write, and deny access.
STEP 3 Click Next to continue to User Information settings.
STEP 4 Enter the user information:
• User Name—User name. The user name must not exceed 32 characters. It
is case-sensitive and supports double-byte characters, such as Chinese,
Japanese, and Korean. The following characters are not supported:
" / \ [ ] : ; | = , + * ? < > ` ' %
• Password—Password. It is recommended to use a password with at least 6
characters.
• Verify Password—Enter the password again to verify the password.
STEP 5 Click Next to continue to Quota settings. The Quota settings are disabled by
default.
To enable quota settings for all users at a later date from Network Shares > Quota.
See Quota, page 157. When this feature is enabled and you add a new user
account, the quota settings will display as enabled. If quota settings are enabled
for all users and you need to set up a specific user, see Administration > Users
and click Edit Account to specify the quota limit.
STEP 6 Click Next to continue to Group Name.
STEP 7 Select a group from the following options:
• administrators—All members in this group have administration rights. You
cannot delete this group.
• everyone—All users, by default, belong to the everyone group. You cannot
delete this group.
STEP 8 Click Next to continue to Personal Share Folder.
STEP 9 Choose the default settings or configure the following parameters from the
Personal Share Folder window:
• Create Personal Share Folder—Select to create a personal share folder.
The default is No.
• New Folder Name—Enter a name for the new folder.
• Hide Folder—Select Yes to hide the folder. The default is No. If a personal
folder is selected Yes to hide, this personal folder will not be seen by any
other user accounts, including administrator accounts, when accessed from