Cisco ICM Release 6.0(0) Staging On Windows 2000 May 2004 Corporate Headquarters Cisco Systems, Inc.
Contents Contents 2 Tables 3 Figures 4 About This Guide 5 Purpose and Audience 5 Other Publications 5 Staging Prerequisites 6 ICM System Design Specification 6 Platform Hardware and Software 7 Staging Environment 7 Remote Monitoring Suite Support Change for ICM 6.
Tables Table 1 Sample Test 1-RTTEST 104 Table 2 Sample Test 2-ICM Process Logs 104 Table 3 Sample Test 3-Call Router Fault Tolerance 106 Table 4 Sample Test 4-PG Fault Tolerance 107 Release 6.
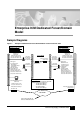
Figures Figure 1 Enterprise ICM Dedicated Forest/Domain Model- Central Controller Sites Figure 2 Enterprise ICM Dedicated Forest/Domain Model-Contact Center Site 10 Figure 3 Enterprise ICM Child Domain Model-Central Controller Sites 45 Figure 4 Enterprise ICM Child Domain Model-Call Center Site 46 Figure 5 NAM/CICM Model-NAM Dedicated/Forest Domain-Central Controller Sites 50 Figure 6 NAM/CICM Model-CICM Child Domain-Central Controller Sites 51 Figure 7 NAM/CICM Model-Customer AW Domain at
About This Guide Purpose and Audience This document is intended for the individuals responsible for staging new deployments of Cisco Enterprise ICM or Hosted NAM/CICM on Windows® 2000. Individuals should be trained on the use and functions of ICM as well as Windows 2000, Active Directory and DNS. This document does not provide detailed Enterprise ICM, Hosted NAM/CICM or Windows 2000 specific information. This information can be found elsewhere in specific documentation from Cisco and/or Microsoft.
Staging Prerequisites Staging Prerequisites ICM System Design Specification An ICM/NAM System Design Specification should be documented and accepted prior to every staging event. A System Design Specification consists of diagrams and records required to execute the Staging phase. An ICM 6.0(0) System Design Specification Template can be found at http://www.cisco.com/partner/WWChannels/technologies/IPCC/design2.
Staging Prerequisites o ICM Node Charts – entries/values for fields which are blank or different from defaults utilized during Setup of ICM Software Platform Hardware and Software During the System Design phase of an ICM deployment project, the Hardware specifications and 3rd Party Software requirements are defined. Cisco’s guide for Hardware and 3rd Party software is the Bill of Materials for Contact Center Software Applications contains Cisco’s recommendations for hardware and third party software.
Staging Prerequisites More information on RMS can be found on the web at http://www.cisco.com/en/US/partner/products/sw/custcosw/ps2068/ Release 6.
Enterprise ICM Dedicated Forest/Domain Model Sample Diagrams Enterprise ICM Dedicated Forest/Domain Model- Central Controller Sites Central Controller Side B Active Directory Site CCSide B Subnet 192.168.142.128/26 Configured on Forest Root DC Central Controller Side A Active Directory Site CCSide A Subnet 192.168.141.128/26 Configured on Forest Root DC AW1 Prim RTD/HDS/Webview Server domain: CUS FQDN: icmcusaw1.cus.icm icmcusaw1 192.168.141.138 IP Router/Default Gateway A 192.168.141.
Enterprise ICM Dedicated Forest/Domain Model Figure 2 Enterprise ICM Dedicated Forest/Domain Model-Contact Center Site Internet Call Manager Cluster1 CM D = Backup CM C Standalone Server icmcuscmd.cus.icm 172.31.4.40 Firewall PG Crossconnect Mask 255.255.255.0 100.100.100.3 icmcuspg1bp 100.100.100.4 icmcuspg1bph Media Blender domain: CUS FQDN: icmcuscmb1.cus.icm 172.31.4.42 Call Manager Cluster1 CM C = Active Subscriber 250 Agents Standalone Server icmcuscmc.cus.icm 172.31.4.39 (CTI Mgr.
Enterprise ICM Dedicated Forest/Domain Model Staging Tasks Step No. Task 1. Validate that Staging Prerequisites have been met 2. Install Windows 2000 SP4 on All Servers - Standalone 3. Apply Custom Settings on All Servers 4. Install Forest Root Domain Controller/DNS Server 5. Configure DNS Server on Forest Root Domain Controller 6. Install Additional Domain Controller 7. Install and Configure DNS on Additional Domain Controller 8. Configure Active Directory Sites 9.
Enterprise ICM Dedicated Forest/Domain Model Step No. Task 33. Install CTI OS Server 34. Start PG, CTI and CTIOS Services 35. Install and Start Blended Agent Dialer 36. Install and Start E-Mail Manager Servers 37. Install Collaboration Server 38. Install and Start Media Blender Server 39. Complete Staging Tests 40. Complete Settings for Production Environment 41. Complete Staging Issues Record Step 1.
Enterprise ICM Dedicated Forest/Domain Model 6. Under Windows 2000 Components, uncheck IIS unless this machine will host a Webview Server, Collaboration Server, Media Blender or any of E-Mail Manager Servers. In the case of these particular servers, highlight IIS and click on Details. Only check Common Files, Front Page 2000 Server Extensions, Internet Information Services Snap-In, Internet Services Manager, , and World Wide Web Server. 7. Enter the Correct Date/Time. 8. Date and Time Zone Settings.
Enterprise ICM Dedicated Forest/Domain Model 4. Right-click on the Visible icon and select Properties. Note: NETBEUI is required on systems that will have Phone Home enabled. Phone Home is typically enabled on Loggers that Phone Home events to Cisco TAC. 5. 6. View the components section and, if NETBEUI is required and does not appear, click Install. o Highlight Protocol and click Add. o Highlight NETBEUI Protocol and select OK. o After NETBEUI installs, you return to the Properties window.
Enterprise ICM Dedicated Forest/Domain Model Configure the Display 1. Open the Control Panel and select Display. 2. Verify that no Screen Saver is selected. 3. Set Display for at least 1024x768 resolution, 65K colors and at least 60 MHz. Set System Properties 1. Open the Control Panel and double-click on System. 2. Click the Advanced tab. 3. Click on Performance Options. 4. Set Virtual Memory as required. o If you have less than 2G RAM, set Virtual Memory to 1.5-times the physical size.
Enterprise ICM Dedicated Forest/Domain Model 2. • For the IP Tab, do not Enable IP Routing. • For the NETBEUI Tab, allow access to “This Computer Only”. Open Computer Management > Local User and Groups > Users. Double-click on the Administrator account. Select Allow Access on the Dial In tab. Note: Routing and Remote Access Service is not supported on Windows 2000 Professional. Any Peripheral Gateway used with RRAS must run Windows 2000 Server.
Enterprise ICM Dedicated Forest/Domain Model 1. Click Start > Run, enter DCPROMO and click OK. The Active Directory Installation wizard opens. 2. Under the “Domain Controller Type,” select the “Domain Controller for a New Domain.” The “Create Tree or Child Domain” screen appears. 3. Select “Create a new Domain Tree,” the “Create or Join Forest” screen appears. 4. Select “Create a New Forest of Domain Trees” “New Domain Name” screen opens. Type in the full DNS name for the new domain. 5.
Enterprise ICM Dedicated Forest/Domain Model o Highlight the Zone name under Reverse Lookup Zones, right–click and select Properties. o On the General Tab, for “Allow Dynamic Updates,” select “Only Secure Updates” from the menu. Manually complete DNS Host and PTR records Step 6. 1. Manually enter the hostnames for the machines that house ICM nodes, as well as all NIC’s and Peripherals for which ICM Setup requires hostname resolution, into the appropriate DNS Forward Lookup Zone. 2.
Enterprise ICM Dedicated Forest/Domain Model o 3. Step 9. For a geographically separated DC, right-click on Sites, select New Site and enter the site name of the additional domain controller as per the ICM System Diagram. Create subnets for each DC site: o Right-click on the Subnets folder and select New Subnet. o Enter the subnet address and mask, respective to the LAN at the Domain Controller Site. o Highlight the Site Name associated with that subnet. 4.
Enterprise ICM Dedicated Forest/Domain Model On the Server currently running the PDC Emulator, run the following command: Net time /setsntp: To synchronize a Server to the Time source: W32tm -s Step 10.
Enterprise ICM Dedicated Forest/Domain Model 3. Cancel the Welcome to Live Update window. 4. Skip Registration and click Finish. Click Yes to reboot. 5. Open PCAnyWhere (Skip Registration). 6. Step 14. o Double-click the Add a Host icon o On the Connections Tab, select TCP/IP. o On the Settings tab, check Launch with Windows, Run Minimized, Run as a Service. o On the Callers tab, select Active Directory from Authentication Type menu. o Under Caller List click on New Item icon.
Enterprise ICM Dedicated Forest/Domain Model 13. For Instance Name check Default. 14. Select CUSTOM for setup type. 15. Install Program Files to C: (the default). 16. For Components Screen accept defaults. 17. Under Services Accounts, select: 1. CUSTOMIZE 2. USE THE LOCAL SYSTEM ACCOUNT 3. AUTO START SERVICES 4. SQL SERVER AGENT 5. USE THE LOCAL SYSTEM ACOUNT 6. AUTO START SERVICE – Check OK for the window that appears. 18. On the Authentication Mode Screen, select “mixed mode” and check “blank password”.
Enterprise ICM Dedicated Forest/Domain Model o Step 16. • Uncheck the following: ANSI NULL default, Recursive triggers, Auto close, Auto shrink and Use quoted identifiers. • Check: Auto update statistics, Torn page detection and Auto create statistics. Close the Enterprise Manager. Install E-Mail Manager Database 1. Select STANDARD EDITION to start SQL Server setup program. 2. At the first screen select Install SQL 2000 Server Components. 3. Select Install Database Server. 4.
Enterprise ICM Dedicated Forest/Domain Model Step 17. o Select at least 20 for Concurrently Connected Users o Select Dedicated Server Mode. o Set Maximum Datafiles to 700. o Set Maximum Log Files to 70. o Set Maximum Log Members to 5. o Check Enable Archive Log. o Set Log Archive Buffers to 5. Install Collaboration Database 1. Run Setup from Oracle Media. 2. Click Next on the Welcome screen. 3. Accept the default file locations and click Next. 4. Accept the default Oracle8i 8.1.7.0.
Enterprise ICM Dedicated Forest/Domain Model 30. In the Enterprise Manager Login Dialog Box, select Connect Directly to a Database: o Enter Username “internal” o Enter Password “cisco” o Enter Service : example “ccsdb” o Connect As – select SYSDBA from pulldown Menu. Click OK. 31. In the SQLPlus Worksheet Application, delete the highlighted text. Copy the text below into this window. Note: That the text is one line, and that a semicolon indicates a new line.
Enterprise ICM Dedicated Forest/Domain Model 1. Check to see if you have the Jaguar 3.5 software already installed on your machine. If Jaguar 3.5 software is installed on your machine, use the control panel’s Add/Remove software program to remove that software. 2. Run Setup on the 3rd Party Installer CD 6.0. 3. Reboot the server when setup completes. 4. Use the following procedure to make sure that the cache will be updated at each new view of a realtime report.
Enterprise ICM Dedicated Forest/Domain Model Step 21. Create Logger Databases After running the ICM Logger setup program and applying all hot fixes, you need to use the ICMDBA tool to finish the SQL Server configuration and build the actual ICM databases on the machine. You also use this tool on the Admin Workstation to create the Historical Database Server database (HDS). For each Logger: 1. Click Start > Run, enter ICMDBA and click OK. 2.
Enterprise ICM Dedicated Forest/Domain Model Workstation(s) must be running. The ICM software loads an “ICM Service Control” tool on the desktop of each server used to control the services loaded on that machine. Start the services in the following order: • Logger A • CallRouter A • CallRouter B • Logger B Each service starts several process windows on the task bar of the local machine, each one an ICM program associated with the service.
Enterprise ICM Dedicated Forest/Domain Model 16. On the Data Files tab: o Check Autogrow and set the File Growth to 10% o Set the Maximum File Size to [use the following calculation] {80% of free disk space}/{number of ICM db files and aw logs on this disk}+{db file current size} example: {4GB * .80}/{2}+{.5GB}=2.1GB 17.
Enterprise ICM Dedicated Forest/Domain Model Step 27. Start AW (Distributor) Services Start the Distributor Service within Cisco Service Control. Verify that the ICM Processes have no errors: o o o Step 28. CallRouters: o Router: UP and synchronized with peer o Ccagent: [is inservice, but not connected to any peripheral gateways] o Rtsvr: feed activated to AW Loggers: o Logger: connected to its respective database and synchronized with peer.
Enterprise ICM Dedicated Forest/Domain Model 1. Start ICM Configuration Manager. 2. Step-by-step/Multimedia/Media Routing Domains. 3. Step 30.
Enterprise ICM Dedicated Forest/Domain Model Step 34. Start PG, CTI and CTIOS Services Once the ICM configuration database is set up with the appropriate peripherals, you can start the PG services from the Cisco Service Control application on the desktop of the PG. If the local peripheral (ACD/IVR/etc.) is not available to connect to the PG, disable it in the PG setup.
Enterprise ICM Dedicated Forest/Domain Model 4. Create the Blended Agent Database on Logger A. On Logger A, run ICMDBA. o Highlight Logger A, right-click and select “create” from the database menu. o Create the Database Screen. o The Database type is BA_SideA. o Add Device (see Cisco ICM Software Blended Agent Setup and Configuration Guide for database estimation information). For Data, highlight the D drive, enter 500MB and click OK. For Log, highlight the D drive, enter 100MB and click OK.
Enterprise ICM Dedicated Forest/Domain Model 4. Accept defaults on all file location screens. 5. Click Next. Install of 3rd Party Component(s) now completes 6. Information dialog box. The Installer now calls the CEM Services Installer. Click OK. 7. For Welcome, click Next. 8. Accept the defaults on the file location. 9. Select the Program Folder. Accept defaults and click Next. 10. Ready to Copy files screen, click Next. 11. Files now copy. 12.
Enterprise ICM Dedicated Forest/Domain Model Note: Sizing is based on information gathered during the Application Discovery Phase, based on expected number of e-mails received on a daily basis, size of the average e-mail, average size of attachments (if any), and the length of time e-mails should be preserved on the database. o Click OK to create Schema. o The Database Table Creation Dialog Box appears. –Click OK. o On the Logging tab, accept defaults. o On the Advanced tab, accept defaults.
Enterprise ICM Dedicated Forest/Domain Model o Media Routing Domain ID: 5003 o ICM Administration connection name: ConnName1 (use this default) o Service Name on Email Manager Server: CEM o Registry Port on Email Manager Server: 1099 o ICM Distributor AW Service Name: ICM o ICM Distributor AW Registry Port: 1099 o ICM Distributor AW Hostname: icmcusaw1 o Click Finish and click OK on the confirmation dialog box. o When setup completes, click Finish.
Enterprise ICM Dedicated Forest/Domain Model o Click Next. The Setup Status screen displays and the Application installs. Perform the following steps to confirm and finalize the installation: 1. Confirm that reporting was added to the Dialog Box. Choose whether or not you would like to add another application instance. Example: no 2. The Install Shield Wizard completes. Click Yes to restart the machine. Click Finish. The system reboots. 3. Click Start > Programs > New Atlanta > ServletExec 4.
Enterprise ICM Dedicated Forest/Domain Model On the Login Tab, confirm that Allow Service to Interact with Desktop is checked. On the General Tab, click Start and click OK. – Highlight CEM and right-click Properties. On the Login Tab, confirm that Allow Service to Interact with Desktop is checked. On the General Tab, click Start and then click OK. 3. Start the World Wide Web Publishing Services on UI Servers (this starts Webview and UI Servers).
Enterprise ICM Dedicated Forest/Domain Model 7. Enter the Customer Name and click Next. 8. Click Next for the ServletExec Install Shield Wizard. 9. Click Next on the License Screen. 10. Click Next on the Information Screen. 11. Accept the defaults for the Destination Location and click Next. 12. Click OK for the Warning dialog box. 13. Click Finish for the Install Shield Complete screen. 14. Cisco Collaboration Server 6.0 Java Installer indicates that the install completes. Close the window. 15.
Enterprise ICM Dedicated Forest/Domain Model Enter a new admin password (for example: ccsadmin) Enter the Collaboration Server Application Instance Name (refer to the ICM System Design Doc, Connection Parameters section, ICM Configuration Manager\Application Instance List table). For example: CCS. Click SUBMIT. o In the left frame, select Server Setup > Integrate with ICM. o The Wizard appears in the right frame. Click Integrate with ICM Web button. o Click OK on the dialog box.
Enterprise ICM Dedicated Forest/Domain Model Collab Server Password: cisco (must then verify). Media Blender hostname: icmcuscmb1. Registry Port on Media Blender: 1099. Media Blender Password: cisco (must verify). Make sure that Disable auto connect to Media Blender is checked. Close the second browser. o Click on the ICM Peripherals link.
Enterprise ICM Dedicated Forest/Domain Model Several command prompt process windows appear and the installation completes. Note: DO NOT REBOOT the machine now, you must install the license first. To install the license: 1. 2. 3. 4. Install FlexLM License o Go to the URL printed on the front of the CMB Install Media. o Enter the Product Code from the CD and an e-mail address and you are e-mailed a FlexLM License File. o Copy the File into C:\CiscoMB\license.
Enterprise ICM Dedicated Forest/Domain Model o Enter the Primary and Secondary CTI Server hostnames, which are indicated by: and o Enter the Primary and Secondary CTI Server ports, where indicated by and . o Save and Close the file. To start Media Blender: 1. Open the Browser, enter the URL http:\\. 2. For the User Name, enter Administrator (with capital A). 3.
Enterprise ICM Dedicated Forest/Domain Model Admin UI: under Collaboration Server\Server Setup\Connections\Monitor – all services will have an UP status Media Blender: o Admin UI: under Media Blender\Server\Startup Shutdown – media blender has been running for
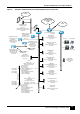
Enterprise ICM Child Domain Model Sample Diagrams Figure 3 Enterprise ICM Child Domain Model-Central Controller Sites P arent D om ain = corp .com Two-W ay Transitive Trust with IC M C hild D om ain cus.corp.com P rovides G lobal C atalog P rovides FS M O R oles: S chem a M aster, D om ain N am ing M aster, P D C E m ulator (Forest Tim e S ource) D N S S erver C onfiguration A D Integrated Foward Lookup Zone = corp.com S tandard S econdary Forward Lookup Zone = cus.corp.
Enterprise ICM Child Domain Model Figure 4 Enterprise ICM Child Domain Model-Call Center Site Internet Firewall Call Manager Cluster1 CM A = Publisher Standalone Server icmcuscma.cus.corp.com 172.31.4.37 Call Manager Cluster1 CM C = Active Subscriber 250 Agents Standalone Server icmcuscmc.cus.corp.com 172.31.4.39 Call Manager Cluster1 CM D = Backup CM C Standalone Server icmcuscmd.cus.corp.com 172.31.4.40 PG Crossconnect Mask 255.255.255.0 100.100.100.1 icmcuspg1ap 100.100.100.2 icmcuspg1aph 100.
Enterprise ICM Child Domain Model Staging Tasks In this model of deployment, the Enterprise or Parent Forest/Root Domain must already be in place and the customer must supply the Enterprise Forest administrator rights in order to create the ICM Child Domain. Staging of an Enterprise ICM Child Domain must be done on site, with full network access to the Parent Domain.
Enterprise ICM Child Domain Model Substitute Step 5 detailed below for Step 5 from the Enterprise ICM Dedicated Forest/Domain Model. 1. Click Start > Programs > Admin Tools > DNS > Configure Your Server. 2. From the left column, select the “Networking” menu and select DNS. o Select Setup DNS. You are prompted to insert the Windows 2000 CD. o DNS loads after you insert the Windows 2000CD. 3. Click Start > Programs > Admin Tools > DNS. 4. Expand the Hostname Tree. 5.
Enterprise ICM Child Domain Model Add an Enterprise Level Secondary Forward Lookup Zone 1. Highlight Forward Lookup Zones, right-click and select New Zone. 2. Within the New Zone wizard, select “Standard Secondary” zone and enter the full DNS name of the Parent Domain. 3. Enter the IP addresses of the Enterprise Level DNS Servers. The wizard completes. Access the enterprise Level DNS Servers and Add Child Domain as a Secondary Forward Lookup Zone 1.
Hosted NAM/CICM Model Sample Diagrams Figure 5 NAM/CICM Model-NAM Dedicated/Forest Domain-Central Controller Sites NAM Parent Domain = nsp.nam Two-Way Transitive Trust with CICM Child Domain cicm1.nsp.nam DNS Confguration AD Integrated Forward Lookup Zone = NSP.NAM AD Integrated Reverse Lookup Zones 141.168.192.in-addr.arpa 142.168.192.in-addr.arpa Standard Secondary Forward Lookup Zone = cicm1.nsp.nam Private ICM WAN icmnamrtrap 192.168.141.65 icmnamrtraph 192.168.141.66 icmnamlgrap 192.168.141.
Hosted NAM/CICM Model Figure 6 NAM/CICM Model-CICM Child Domain-Central Controller Sites CICM Child Domain = cicm1.nsp.nam Two-Way Transitive Trust with Parent Domain nsp.nam Two-Way External Non-Transitive Trust with Customer AW Domain cus1.cus DNS Server Configuration AD Integrated Foward Lookup Zone = cicm1.nsp.nam AD Integrated Reverse Lookup Zones 5.31.172.in-addr.arpa 6.31.172.in-addr.arpa 4.31.172.in-addr.arpa 100.100.100.in-addr.arpa Standard Secondary Forward Lookup Zone = nsp.
Hosted NAM/CICM Model Figure 7 NAM/CICM Model-Customer AW Domain at Call Center Site Internet Call Manager Cluster1 CM D = Backup CM C Standalone Server icmcuscmd.cus1.cus 172.31.4.40 PG Crossconnect Mask 255.255.255.0 100.100.100.1 icmcuspg1ap 100.100.100.2 icmcuspg1aph 100.100.100.3 icmcuspg1bp 100.100.100.4 icmcuspg1bph Contact Center Site #1 172.31.4.62 Firewall Call Manager Cluster1 CM A = Publisher Standalone Server icmcuscma.cus1.cus 172.31.4.37 Media Blender domain: CUS FQDN: icmcuscmb1.
Hosted NAM/CICM Model Staging Tasks All Servers Step No. Task 1. Validate that Staging Prerequisites have been met 2. Install Windows 2000 SP4 on All Servers - Standalone 3. Apply Custom Settings on All Servers 4. Install PCAnywhere Step 1. Validate that Staging Prerequisites have been met Step 2. Install Windows 2000 Servers and Service Pack 4 on All Servers – Standalone Install Windows 2000 Server CD.2.
Hosted NAM/CICM Model Note: All central controller systems must be in the same time zone, regardless of physical location. 8. Under Network Settings, select Custom Settings. Refer to system diagram and/or 3rd party host form for each server’s respective information required in IP and DNS sections. 9. For the Visible Ethernet Card, set the properties for File and Printer Sharing to Microsoft Networks to maximize the data throughput for network applications. 10.
Hosted NAM/CICM Model o 4. Configure the network speed and duplex mode. Do not set to Auto Mode. Right-click on the Visible icon and select Properties. Note: NETBEUI is required on systems that will have Phone Home enabled. Phone Home is typically enabled on Loggers that Phone Home events to Cisco TAC. 5. 6. View the components section and, if NETBEUI is required and does not appear, click Install. o Highlight Protocol and click Add. o Highlight NETBEUI Protocol and select OK.
Hosted NAM/CICM Model Configure the Display 1. Open the Control Panel and select Display. 2. Verify that no Screen Saver is selected. 3. Set the display for at least 1024x768 resolution, 65K colors and at least 60 MHz. Set System Properties 1. Open the Control Panel and double-click on System. 2. Click the Advanced Tab. 3. Click on the Performance Options. 4. Set Virtual Memory as required: o If you have less than 2G RAM, set Virtual Memory to 1.5 time physical size.
Hosted NAM/CICM Model 2. • For the IP Tab, do not Enable IP Routing. • For the NETBEUI Tab, allow access to “This Computer Only”. Open Computer Management and select Local User and Groups > Users. o Double-click on Administrator account. o Select Allow Access on the Dial In tab. Note: Routing and Remote Access Service is not supported on Windows 2000 Professional. Any Peripheral Gateway used with RRAS must run Windows 2000 Server.
Hosted NAM/CICM Model 3. Cancel the Welcome to Live Update window. 4. Skip Registration and click Finish. Click Yes to reboot. 5. Open PCAnyWhere (Skip Registration). 6. o Double-click the Add a Host icon o On the Connections Tab, select TCP/IP. o On the Settings Tab, check Launch with Windows, Run Minimized, and Run as a Service. o On the Callers Tab, select Windows from the Authentication Type menu. o Under the Caller List, click on the New Item icon.
Hosted NAM/CICM Model Step No. Task 23. Start AW (Distributor) Services 24. Configure NIC’s, Peripheral Gateways and Peripherals 25. Install ICM Software on Peripheral Gateways 26. Start PG Services Step 5. Install NAM Forest Root Domain Controller/DNS Server 1. Click Start > Run, enter DCPROMO and click OK. The Active Directory Installation wizard opens. 2. Under the “Domain Controller Type,” select the “Domain Controller for a New Domain.” The “Create Tree or Child Domain” screen appears.
Hosted NAM/CICM Model o To configure the required Reverse Lookup Zones, perform the steps below for each NAM domain level network within the Forward Lookup Zone. Note: Networks within a Forward Lookup Zone include all visible and private networks used within a DNS Zone. These networks define Reverse Lookup Zones relative to the Forward Lookup Zone. o Under Server Name, right-click on Reverse Lookup Zones and select New Zone. o Within the New Zone wizard, select “Active Directory Integrated.
Hosted NAM/CICM Model Step 9. Configure Active Directory Sites On the NAM Root Domain Controller: 1. Click Start > Programs > Admin Tools > AD Sites and Services. 2. Rename the default first site name as per the AD Site Plan in the ICM System Diagram. o 3. 4. Step 10. For geographically separated DC, right click on Sites, select New Site and enter the site name of the additional domain controller as per the ICM System Diagram. Create subnets for each DC site.
Hosted NAM/CICM Model 3. Enter the Domain Administrator’s username and password. 4. Restart the server and login to the domain. 5. Create shortcuts on desktop, as detailed on the 3rd Party Host Form. 6. Configure the command prompt: 7. Step 13. o Open the command prompt from the desktop shortcut. o Right-click in the title bar and select Default. o On the Options Tab, uncheck Quick Edit Mode and Insert Mode. o Click on the font tab and set the Command Prompt font size to 7x12.
Hosted NAM/CICM Model 17. Under the Services Accounts, select: o o o o o o CUSTOMIZE USE THE LOCAL SYSTEM ACCOUNT AUTO START SERVICES SQL SERVER AGENT USE THE LOCAL SYSTEM ACOUNT AUTO START SERVICE – Check OK for the window that appears. 18. On the Authentication Mode Screen, select “mixed mode” and check “blank password”. 19. Set Collation Designator to Latin1_General and Check Binary for Sort Order. 20. Under Network Libraries deselect all choices except for NAMED PIPES. 21.
Hosted NAM/CICM Model o Step 15. • Uncheck - ANSI NULL default, Recursive triggers, Auto close, Auto shrink and Use quoted identifiers • Check – Auto update statistics, Torn page detection and Auto create statistics Close Enterprise Manager. Install Webview 3rd Party Software Print and read the Read Me file on the “Webview 3rd Party Installer CD 6.0.” This file describes the software and provides installation instructions.
Hosted NAM/CICM Model When the ICM Logger and Admin Workstation software loads using ICM Setup, it creates specific domain level groups and accounts in the ICM domain it is loaded into. Cisco provides specific hot fixes to major releases and service packs of the ICM software to address service-impacting issues. You can download these hot fixes from Cisco’s Web site (http://www.cisco.com/). You should apply them after the initial load of the software.
Hosted NAM/CICM Model Cisco provides specific hot fixes to major releases and service packs of the ICM software to address service-impacting issues. You can download hot fixes from Cisco’s Web site (http://www.cisco.com/). Apply the hot fixes after the initial load of the software. The hot fix installation process only applies fixes required for the specific software module (CallRouter, Logger, type of PG, etc.). Step 20. Start Logger and Router Services The ICM is set up with an empty database.
Hosted NAM/CICM Model 9. Select Log (the C drive is automatically highlighted). 10. Expand the Log to 200MB. Click OK. 11. Click Start on Expand Database window. Click OK and close the window. 12. Close ICMDBA. 13. Click Start > Programs > Microsoft SQL Server > Enterprise Manager. 14. Expand the Server Tree and Highlight the Databases Folder under the Server name. 15. Double-click on the ICM Database in right panel. You are now in the Properties Window.
Hosted NAM/CICM Model The Node Form worksheet lists the NIC interfaces first, although, for the Sprint and MCI NIC, there is no additional platform or specific services to start (they are co-resident in the ICM CallRouter). The ICM Setup program requires the ID values when the CallRouter is set up. When the services start on the CallRouter, these ID values are validated against the ICM configuration database and rejected if they do not match.
Hosted NAM/CICM Model Step No. Task 33. Configure Trust Relationships 34. Join Standalone Servers to Domain 35. Validate IP Connectivity and Remote Access 36. Install SQL Server on Loggers 37. Install E-Mail Manager database 38. Install Collaboration database 39. Install ICM Software on Loggers 40. Create Logger Databases 41. Install ICM Software on CallRouters 42. Start Logger and Router Services 43. Install ICM Software on Admin Workstations 44. Expand AW Database 45.
Hosted NAM/CICM Model 4. Enter the username, password and fully qualified domain name for the Parent (Forest Root) domain (the NAM Domain) on the Network Credentials Screen. 5. For Child Domain Installation: o Enter full DNS name of Parent (NAM) Domain. o Under Child Domain, enter the NETBIOS name for the Child and the full DNS name automatically enters at the bottom of the screen. 6. Accept Database and Log Locations defaults. 7. Accept the Shared System Volume default. 8.
Hosted NAM/CICM Model 6. Within the New Zone wizard, select “Active Directory Integrated.” 7. In the Reverse Lookup Zone screen, select the radio button “Network ID” and enter the required number of octets for the Reverse Lookup Zone. The Reverse Lookup Zone Name automatically enters. 8. Repeat the steps below for each CICM domain name under the Reverse Lookup Zone. 9. Right-click the Zone name under the Reverse Lookup Zones and click Properties. 10.
Hosted NAM/CICM Model Step 30. Step 31. Step 32. Install and Configure DNS on Additional Domain Controller 1. Click Settings > Control Panel > Add/Remove Programs. 2. On the Add\Remove Windows Components, check Networking Services and select Details. 3. Check only DNS and click OK. Click Next. 4. Browse to Windows 2000 CD. DNS installs. 5. Validate that all DNS Zones were replicated from the 1st DNS Server in the AD Domain to this DNS Server. 6.
Hosted NAM/CICM Model 4. Restart the Server and login to the Domain. 5. Create shortcuts on the desktop, as detailed on the 3rd Party Host Form. Configure the Command Prompt. 1. Open the Command Prompt from the desktop shortcut. 2. Right-click in title bar and select Default. 3. On the Options Tab, uncheck Quick Edit Mode and Insert Mode. 4. Click on the font tab and set the Command Prompt font size to 7x12. 5. Click on the layout tab and set the Command Prompt screen buffer to 200x9999.
Hosted NAM/CICM Model 16. For the Components Screen, accept the defaults. 17. Under Services Accounts, select: 7. CUSTOMIZE 8. USE THE LOCAL SYSTEM ACCOUNT 9. AUTO START SERVICES 10. SQL SERVER AGENT 11. USE THE LOCAL SYSTEM ACOUNT 12. AUTO START SERVICE – Check OK for the window that appears. 18. For the Authentication Mode Screen, select “mixed mode” and check “blank password”. 19. Set the Collation Designator to Latin1_General and Check Binary for Sort Order. 20.
Hosted NAM/CICM Model • o Step 37. Check – Auto update statistics, Torn page detection and Auto create statistics Close Enterprise Manager. Install E-Mail Manager Database 1. Select STANDARD EDITION to start the SQL Server setup program. 2. At the first screen, select Install SQL 2000 Server Components. 3. Select Install Database Server. 4. Click NEXT at Welcome Screen. 5. In the Computer Name screen, use the default Local Computer. 6.
Hosted NAM/CICM Model Step 38. o Select Dedicated Server Mode. o Set Maximum Datafiles to 700. o Set Maximum Log Files to 70. o Set Maximum Log Members to 5. o Check Enable Archive Log. o Set Log Archive Buffers to 5. Install Collaboration Database Run setup from the Oracle Media. Click Next on the Welcome Screen. Accept the default file locations and click Next. Accept the default Oracle8i 8.1.7.0.0 in the Available Products screen and click Next.
Hosted NAM/CICM Model 22. In the Enterprise Manager Login dialog box, select Connect Directly to a Database. o Enter “internal” for the Username. o Enter “Cisco” for the Password. o Enter the for the Service. Example “ccsdb”. o For the Connect As screen, select SYSDBA from the menu. Click OK. 23. In the SQL Plus Worksheet Application, delete the highlighted text. Copy the text below into this window. The text is one line, and that a semicolon indicates a new line.
Hosted NAM/CICM Model Cisco provides specific hot fixes to major releases and service packs of the ICM software to address service-impacting issues. You can download hot fixes from Cisco’s Web site (http://www.cisco.com/) and apply them after the initial load of the software. The hot fix installation process only applies fixes required for the specific software modules (CallRouter, Logger, type of PG, etc.). Step 40.
Hosted NAM/CICM Model Apply the hot fixes after the initial load of the software. The hot fix installation process only applies fixes required for the specific software module (CallRouter, Logger, type of PG, etc.). Step 42. Start Logger and Router Services The ICM is set up with an empty database. You need to add configuration information to complete the basic testing components. In order to add configuration data, the Central Controller and Admin Workstation(s) must be running.
Hosted NAM/CICM Model 7. Click Start on Expand DB window. Click OK. Close the window when it is complete. 8. Select Expand from the Database menu. 9. Select Log (C drive is automatically highlighted). 10. Expand Log to 200MB. Click OK. 11. Click Start on Expand DB window. Click OK. Close when complete. 12. Close ICMDBA. 13. Click Start > Programs > Microsoft SQL Server > Enterprise Manager. 14. Expand Server Tree and Highlight the Databases Folder under the Server name. 15.
Hosted NAM/CICM Model Peripheral Gateway node.
Hosted NAM/CICM Model Step 49. Install ICM Software on Peripheral Gateways Complete setup on all Peripheral Gateways (see System Design Specification). Cisco provides specific hot fixes to major releases and service packs of the ICM software to address service-impacting issues. You can download hot fixes from Cisco’s Web site (http://www.cisco.com/) and apply them after the initial load of the software.
Hosted NAM/CICM Model Pgagent: in service and active to one side of central controller [peripheral] PIMs: enabled in setup – and therefore, is cycling between activating and idle o o Step 53. CTI Server: o Cg[#]ctisvr: active with configured port number CTIOS Server: o Ctios Server: active with configured port number – driver online o Ctidriver: active Install and Start Blended Agent Dialer 1. Configure Blended Agent Dialer in the ICM Configuration Manager.
Hosted NAM/CICM Model Pgagent: in service and active to one side of central controller [peripheral] PIMs: disabled on node form – PIM windows do not exist o MR PG Mdsproc: in service Pgagent: in service and active to one side of central controller [peripheral] PIMs: enabled in setup – Blended Agent PIM is now ACTIVE – EMail Manager and Media Blender PIM’s are still cycling. o o o Step 54.
Hosted NAM/CICM Model o Select a Database: SQL 2000 o Enter the following database information: For Database Name enter “cemdb” For Login name enter “cemuser” For Login password enter “cisco” For Confirm password enter “cisco” For Database Hostname enter the name of the E-Mail Manager database – icmcuscemdb1 For Database port enter “1433” o Run now o The Database Administration Login Dialog Box appears: Enter the database Admin Login Name (sa). Enter the database Admin password (leave blank). Login.
Hosted NAM/CICM Model 12. The Database Files Dialog Box appears. Enter the data and log sizes: Enter the Database file size (minimum 500MB) Enter the Log file size (minimum 300MB) Note: Sizing is based on information gathered during the Application Discovery Phase based on the expected number of e-mails received on a daily basis, size of the average e-mail, average size of attachments (if any), and the length of time e-mails are preserved on the database. 13.
Hosted NAM/CICM Model 16. For the Information dialog box, click OK and the installer calls the Webview Installer. 17. On the Install Shield Wizard for Webview, click Next. 18. Select English for the Language and click Next. 19. For CIR Connection Information: Select the database type and version. Forexample: MS SQL Server 2000. Enter the Database Server Hostname. For example: icmcuscemdb1. Enter the Database Name. For example: cemdbc. Enter the Port. For example: 1433. Enter the Username.
Hosted NAM/CICM Model 11. Click Next for Tserver Properties. 12. Accept the default for the UI Server Destination Location and click Next. 13. The application installs. 14. Click Yes for the Question dialog box to restart IIS services. 15. Click Finish when the Install Shield Wizard completes. Reboot the machine. 16. Click Start > Programs > New Atlanta > ServletExec 4.1 ISAPI > ServletExec Admin. 20. Internet Explorer Browser Opens to the ServletExec Admin page. 21.
Hosted NAM/CICM Model [peripheral] PIMs: enabled in setup. The BA PIM is now active. E-Mail Manager PIM is active, but the Media Blender PIM is still cycling o o o o Step 55. CTI Server: o Cg[#]ctisvr: active with configured port number CTIOS Server: o Ctios Server: active with configured port number.
Hosted NAM/CICM Model o Click Next to confirm the JDBC driver. o For Database Connection Data: Enter the Host: . For example: icmcusdb1. Enter the Port. The default is 1521 (default). Enter the SID: . For example: CCSDB. Enter the Database Login Name: . For example: ccsuser. Enter the Password: . For example: Cisco.
Hosted NAM/CICM Model 15. Click Submit. 16. Close the second browser. 17. Click Apply. 18. Close the browser and reboot the Collaboration Server. After the server reboots, launch the browser. 19. Before proceeding with the next steps, validate that the Distributor associated with the ICM Connection is started and that cms_jserver and cmsnode are running. 20. Type in the following URL: http:\\icmcusccs1\admin and Return. 21. Cisco Collaboration Server Admin Login Window. Enter the login name and password.
Hosted NAM/CICM Model Step 56. Install and Start Media Blender Server 1. Run setup from the CMB Install Media. 2. On the Welcome screen, click Next. 3. Enter the company user information. 4. Accept the default destination location and click Next. Allow the installation to complete. 5. For the Servlet Exec 4.1.1 ISAPI setup, click Next. 6. Click Yes for the License Agreement. 7. Click Next at the Information screen. 8. Accept the defaults for the destination location and click Next. 9.
Hosted NAM/CICM Model 8. o Enter peripheral.hostport=42027 o Enter peripheral.hostname2=icmcuspg1b (be sure to uncomment) o Enter peipheral.hostport2=43027 (be sure to uncomment) o SAVE and CLOSE file Open the blender.properties file (from the directory C:\CiscoMB\servlet\Properties\Blender) with a text editor and make the following edits: Note: these setting vary according to peripheral types. [example] o 9. Uncomment “service1=service.fwgw.properties” Open the firewallgatewayFG.
Hosted NAM/CICM Model Pgagent: in service and active to one side of central controller [peripheral] PIMs: disabled on node form. PIM windows do not exist o MR PG Mdsproc: in service Pgagent: in service and active to one side of the central controller [peripheral] PIMs: enabled in setup. The Blended Agent PIM is now ACTIVE. E-Mail Manager PIM is ACTIVE and the Media Blender PIM is ACTIVE.
Hosted NAM/CICM Model Step 57. Install 1st Customer AW as Forest Root Domain Controller/DNS Server 1. Click Start > Run, enter DCPROMO and click OK. The Active Directory Installation wizard opens. 2. Under “Domain Controller Type,” select “Domain Controller for a New Domain.” The “Create Tree or Child Domain” screen appears. 3. Select “Create a new Domain Tree.” The “Create or Join Forest” screen appears. 4. Select “Create a New Forest of Domain Trees.” 5.
Hosted NAM/CICM Model Add the CICM Level Secondary Forward Lookup Zone Step 59. Step 60. 1. Right-click the Forward Lookup Zones and select New Zone. 2. Within the New Zone wizard, select “Standard Secondary” Zone and enter the full DNS name of the CICM Domain. 3. Enter the IP addresses of the CICM Level DNS Servers and let the wizard complete. 4. Access the CICM Level DNS Servers and add the AW Domain as a Secondary Forward Lookup Zone. 5.
Hosted NAM/CICM Model Step 63. Complete IP Configuration and Connectivity Testing On each machine, validate the settings on each network card (TCP/IP Properties), including the DNS settings. Referring to the System Diagram, validate that the machine can ping every machine on the visible network and, if applicable, that it can ping to all its private connections. Validate the Host and PTR records on the DNS Server to make sure that it contains all required zones and records.
Hosted NAM/CICM Model Install SQL Server Service Pack 2 1. Run the setup.bat file. 2. For the Computer Name, select Local Computer. 3. Accept the license agreement. 4. For the Instance Name, accept the default. 5. Connect to the Server using the SQL Server System Administrator login. Select “leave sa password blank”. 6. Complete setup and reboot the server. 7. Expand the database sizes and logs using SQL Enterprise Manager. Click START > Programs > Microsoft SQL Server > Enterprise Manager.
Hosted NAM/CICM Model Step 66. o In the Settings dialog box, enable the “Every Visit to the Page” option, then click OK. o Click OK in the Internet Options dialog box. Install Infomaker on AW’s Infomaker is only installed on AWs (Real Time Distributors and Real Time Clients) for the purpose of creating Custom Reports. 1. Run setup from Media for Sybase Powerbuilder (Common Installer). 2. In the Welcome to 8.0 Installer screen, click Next. 3. Accept the License Agreement and click Next. 4.
Hosted NAM/CICM Model 16. On the Data Files tab: Check Autogrow andset the File Growth to 10% Set the Maximum File Size to [use the following calculation] {80% of free disk space}/{number of ICM database files and AW logs on this disk}+{database file current size} Example: {4GB * .80}/{2}+{.5GB}=2.1GB 17.
Hosted NAM/CICM Model Step 70. Start AW (Distributor) Services Verify that the ICM Processes have no errors: o CallRouters: o Router: running and synchronized with peer o Ccagent: connected to all configured peripheral gateways o Rtsvr: feed activated to AW o Loggers: o Logger: connected to its respective database and synchronized with peer.
Hosted NAM/CICM Model Step 71. Change Domain Controllers to Native Mode Cisco ICM functions with Active Directory in both “Mixed” and “Native” modes. Microsoft recommends that you change an AD domain to native mode if an implementation does not and will not have any future NT domain controllers. You can only change the mode from mixed to native. Once the domain is running in native mode, you cannot change it back to mixed mode. On NAM, CICM and Customer AW Domains Controllers: Step 72. 1.
Hosted NAM/CICM Model Step 75. Complete Staging Issues Record Assure that the System Design Specification has been filled out as accurate records of the Staging event. Detail and note any test cases that were run as pass/fail/exceptions. Document any outstanding action items from the Staging event and share them with the team and project manager(s) associated with this project Release 6.
ICM Process Testing In The Staging Environment The sample test cases in this section allow you to validate the ICM inter-process communications and fault tolerance in the Staging Environment. When you install the system in the Production Environment, the Routing Application and Scripting are configured. At that time, begin Application Testing.
ICM Process Testing In The Staging Environment Test Number: 2 Test Title: ICM Process Logs Test Purpose: Verify that Process Windows on each Server display no errors. Test Setup: All ICM Services start in full Duplex Mode Procedure: 1. Do a visual check of all process windows on each ICM Server. 2. Never close an ICM Process window, as that stops the process. Minimize all windows after examination. Expected Results: 1. Pass: Fail: Pass: Fail: 3.
ICM Process Testing In The Staging Environment Table 3 Sample Test 3-Call Router Fault Tolerance Test Number: 3 Test Title: CallRouter Fault Tolerance Test Purpose: Verify that CallRouters function in Simplex Mode Test Setup: All ICM Services start in full Duplex Mode Procedure: 1. Stop Router Service on CallRouter A. 2. On CallRouter B, open Router process and check for any messages that indicate Router A processes are down. 3. Start Router Service on CallRouter A. 4.
ICM Process Testing In The Staging Environment Table 4 Sample Test 4-PG Fault Tolerance Test Number: 4 Test Title: PG Fault Tolerance Test Purpose: Verify that PG’s communicate with Central Controller in Simplex Mode and that PIM’s remain active. Test Setup: All PG Services start in Duplex Mode Procedure: 1. Ensure that PGA is Active. 2. Ensure that PGB is Idle. 3. Stop Service on PGA. 4. Observe PGB change of state from Idle to Active. 5. Start Service on PGA. 6.