Contents Introduction Prerequisites Requirements Components Used Configure High Level Flow Diagram Configure Qualys Cloud and Scanner Step 1. Deploy Qualys Scanner Step 2. Configure Qualys Scanner Configure ISE Step 1. Tune Qualys Cloud Settings for Integration with ISE Step 2. Enable TC-NAC Services Step 3. Configure Qualys Adapter Connectivity to ISE VA Framework Step 4. Configure Authorization Profile to trigger VA Scan Step 5.
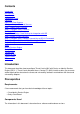
● ● ● ● Cisco Identity Service Engine version 2.1 Wireless LAN Controller (WLC) 8.0.121.0 Qualys Guard Scanner 8.3.36-1, Signatures 2.3.364-2 Windows 7 Service Pack 1 Configure High Level Flow Diagram This is the flow: 1. Client connects to the network, limited access is given and profile with Assess Vulnerabilities checkbox enabled is assigned 2. PSN node sends Syslog message to MNT node confirming authentication took place and VA Scan was the result of Authorization Policy 3.
- All Vulnerabilities (QID, title, CVEIDs) 8. TC-NAC updates PAN with all the data from the step 7. 9. CoA is triggered if needed according to Authorization Policy configured. Configure Qualys Cloud and Scanner Caution: Qualys configuration in this document is done for the lab purposes, please consult with Qualys engineers for design considerations Step 1. Deploy Qualys Scanner Qualys scanner can be deployed from OVA file.
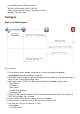
To get Activation Code you can go to Scans > Appliances and select New > Virtual Scanner Appliance and select I Have My Image After entering scanner name you are given Authorization Code which you will use later. Step 2. Configure Qualys Scanner Deploy OVA on the virtualization platform of your choice.
● ● ● WAN interface settings (if you are using two interfaces) Proxy settings (if you are using proxy) Personalize this scanner Afterwards scanner connects to Qualys and downloads the latest software and signatures.
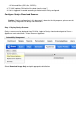
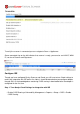
To verify the scanner is connected you can navigate to Scans > Appliances. Green connected sign on the left indicates that scanner is ready, you can also see LAN IP, WAN IP, version of Scanner and Signatures. Configure ISE Though you have configured Qualys Scanner and Cloud, you still have to tune Cloud settings to make sure integration with ISE works fine.
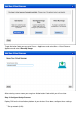
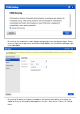
● ● Ensure that user credentials used in adapter configuration have manager privileges. Select your user from the left top corner and click on User Profile. You should have Manager rights in the User Role.
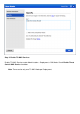
Step 2. Enable TC-NAC Services Enable TC-NAC Services under Administration > Deployment > Edit Node. Check Enable Threat Centric NAC Service checkbox. Note: There can be only one TC-NAC Node per Deployment.
Step 3. Configure Qualys Adapter Connectivity to ISE VA Framework Navigate to Administration > Threat Centric NAC > Third Party Vendors > Add. Click on Save. When Qualys Instance transitions to Ready to configure state, click on Ready to configure option in the Status.
REST API host should be the one you use for Qualys Cloud, where your account is located. In this example - qualysguard.qg2.apps.qualys.com Account should be the one with Manager privileges, click on Next. ISE downloads information about Scanners which are connected to Qualys Cloud, you can configure PSN to Scanner Mapping on this page. It ensures that selected scanner is picked based on PSN which authorizes the endpoint.
Advanced settings are well documented in ISE 2.1 Admin Guide, link can be found in the References section of this document. Click on Next and Finish. Qualys Instance transitions to Active state and knowledge base download starts. Note: There can be only one Qualys instance per deployment. Step 4. Configure Authorization Profile to trigger VA Scan Navigate to Policy > Policy Elements > Results > Authorization > Authorization Profiles. Add new profile.
They are sent to network devices within Access-Accept packet, although the real purpose of them is to tell MNT Node that Scan should be triggered. MNT instructs TC-NAC node to communicate with Qualys Cloud. Step 5. Configure Authorization Policies ● ● Configure Authorization Policy to use the new Authorization Profile configured in step 4. Navigate to Policy > Authorization > Authorization Policy, locate Basic_Authenticated_Access rule and click on Edit.
Verify Identity Services Engine The first connection triggers VA Scan. When the scan is finished, CoA Reauthentication is triggered to apply new policy if it is matched. In order to verify which vulnerabilities were detected, navigate to Context Visibility > Endpoints. Check per endpoints Vulnerabilities with the Scores given to it by Qualys.
When selecting particular endpoint, more details about each Vulnerability appears, including Title and CVEID's.
In Operations > TC-NAC Live Logs, you can see Old vs New authorization policies applied and details on CVSS_Base_Score. Note: Authorization conditions are done based on CVSS_Base_Score, which equals to the highest Vulnerability Score detected on the endpoint.
Once the Scan is done it transitions to Finished state. You can view results at Scans > Scans, select required scan and click on View Summary or View Results. In the Report itself you can see Detailed Results, where detected Vulnerabilities are shown.
Troubleshoot Debugs on ISE In order to enable debugs on ISE navigate to Administration > System > Logging > Debug Log Configuration, select TC-NAC Node and change the Log Level va-runtime and va-service component to DEBUG Logs to be checked - varuntime.log. You can tail it directly from ISE CLI: ISE21-3ek/admin# show logging application varuntime.log tail TC-NAC Docker received instruction to perform Scan for particular endpoint. 2016-06-28 19:06:30,823 DEBUG [Thread-70][] va.runtime.admin.mnt.
199fb81a4b99","psnHostName":"ISE21-3ek","heartBeatTime":0,"lastScanTime":0} Once the result is received it stores all Vulnerability data in the Context Directory. 2016-06-28 19:25:02,020 DEBUG [pool-311-thread-8][] va.runtime.admin.vaservice.VaServiceMessageListener -:::::- Got message from VaService: [{"macAddress":"C0:4A:00:14:8D:4B","ipAddress":"10.62.148.
NAC.MACAddress","C0:4A:00:14:8D:4B","TC-NAC.IpAddress","10.62.148.63","TCNAC.AdapterInstanceUuid","796440b7-09b5-4f3b-b611-199fb81a4b99","TCNAC.VendorName","Qualys","TC-NAC.AdapterInstanceName","QUALYS_VA"]}] AdapterMessageListener checks each 5 minutes the status of the scan, until it is finished. 2016-06-28 17:09:43,459 DEBUG [SimpleAsyncTaskExecutor-2][] cpm.va.service.processor.
NAC.VendorName","Qualys","TC-NAC.AdapterInstanceName","QUALYS_VA"]}] Typical Issues Issue 1. ISE gets Vulnerability Report with CVSS_Base_Score of 0.0 and CVSS_Temporal_Score of 0.0, while Qualys Cloud report contains Vulnerabilities detected. Problem: While checking the Report from Qualys Cloud you can see detected Vulnerabilities, however on ISE you do not see them. Debugs seen in vaservice.log: 2016-06-02 08:30:10,323 INFO [SimpleAsyncTaskExecutor-2][] cpm.va.service.processor.
NAC.ServiceName","Vulnerability Assessment Service","TC-NAC.Status","VA Failure","TCNAC.Details","Error triggering scan: Error while trigering on-demand scan code and error as follows 1904: none of the specified IPs are eligible for Vulnerability Management scanning.","TC-NAC.MACAddress","24:77:03:3D:CF:20","TC-NAC.IpAddress","10.201.228.102","TCNAC.AdapterInstanceUuid","796440b7-09b5-4f3b-b611-199fb81a4b99","TCNAC.VendorName","Qualys","TC-NAC.