
Manual


Chapter 2 ICM-to-ICM Gateway Configuration
Server Configuration
2-20
ICM-to-ICM Gateway User Guide for Cisco ICM Enterprise & Hosted Editions Release 7.0(0)
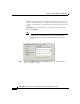
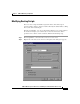
Step 4 In the Client ICM section of this screen, enter the following information for each
client for which this system is a server.
• Enable. Check the Enable box to enable the client.
• Description. Enter a description of the client (optional).
• Client ID. Enter the same value that you entered for NAM ID during client
machine router setup on the Router Properties screen (see the “Identify the
Client for the Server” section on page 2-2).
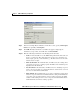
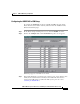
• Application Gateway ID. Enter the application gateway ID. This must
match the application gateway ID as shown on the Calls > Application
Gateway All list screen (see the “Create or Configure the Gateway Process on
the Router” section on page 2-4).
• Side A Address, Side B Address. If you are using the Signaling Access
Network, enter the Signaling Access Network IP address for the client.
Otherwise, enter the Public Network IP address.
Step 5 Click OK.
Setting Up Translation Route Labels
From the ICM-to-ICM Gateway server’s point of view it is doing a translation
route to one of its peripheral targets. When you set up a translation route on the
Server ICM, you must set up a label for the original routing client for a call to
access each of the peripheral targets associated with the translation route. For
example, if the routing client is an interexchange carrier (IXC), you must set up a
label to the targets with the IXC. This allows the call to be initially sent to the
translation route at the peripheral.
For instructions on how to run Translation Route Wizard and how to define
translation route labels, refer to the ICM Configuration Guide for Cisco ICM
Enterprise Edition.