
User Guide


How to Import a Custom Function
Importing Custom Functions
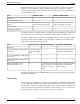
Step 1
In Script Editor, from the Script menu, select Custom Functions. The Custom Functions dialog
box opens, listing all the custom functions currently defined.
Step 2
Click Import. The Import Custom Function dialog box opens
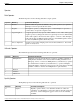
Step 3
Choose a file name with an ICMF extension (.ICMF) and click Open. The Script Editor examines
the file for naming conflicts. If a conflict is found, a dialog box appears listing options for
resolving the conflict.
Step 4
Choose one of the options and click OK.
Note: If you choose to rename the function, the new name must begin with user.
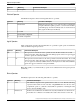
The Script Editor performs automapping and the following happens:
•
If all imported objects were successfully auto-mapped, a message window appears prompting
you to review the mappings. Click OK to access the Object Mapping dialog box.
•
If some imported objects were not successfully auto-mapped, the Object Mapping dialog
box appears, with all unmapped objects labeled Unmapped.
The Object Mapping dialog box contains three columns:
•
Object Types. The type of imported objects.
–
Imported Object. Name of imported object.
Mapped To. What this imported object will be mapped to.
•
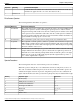
(Optional.) Click an Imported Object value. The Mapped To column displays all the valid
objects on the target system.
•
(Optional.) Select an object from the Mapped To columns drop-down list on the target system
that you want to map the imported object to.
Note: Multiple objects may be mapped to the same target. Objects may be left unmapped;
however, the resulting custom function will not be valid until all objects are mapped.
When the mapping is complete, click Apply and Finish.
Scripting and Media Routing Guide Cisco Unified ICM/Contact Center Enterprise & Hosted Release 7.5(1)
145
Chapter 7: Using Formulas
How to Import a Custom Function