
Installation Guide

Complete the following steps to configure the PG:
1. From the Configuration Manager, select Tools > Explorer Tools > PG Explorer.
2. In the Logical Controller tab in the Name field enter the name of the PG.
3. In the Client Type field select IPCC Express Gateway.
4. Click Save. In the bottom left pane of the PG Explorer the PG name appears. Also,
additional tabs appear under the Logical Controller tab. On the Logical Controller tab you
see the Logical Controller ID and the Peripheral ID.
5. On the Peripheral tab, be sure to check the Enable Post-Routing check box and the
Peripheral Auto Configured check box.
6. On the Routing Client tab, add the name of the PG in the Name field and complete the
other fields.
7. Click Save.
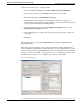
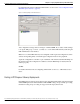
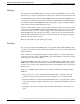
The following figure shows the Unified ICME PG Explorer with the configured PG and
Peripheral Tab fields.
Note: The Logical Controller ID on the Logical Controller tab is a unique identifier used to
reference the PG's Logical Interface Controller table. This is a read-only field. When you create
a new PG, the system places UNASSIGNED in this field and automatically creates an ID when
you save your edits. See the ICM configuration Guide for Cisco ICM Enterprise Edition and
the ICM Installation Guide for Cisco ICM Enterprise Edition for more details.
Figure 10: Unified ICME PG Explorer
Cisco IPCC Gateway Deployment Guide for Unified ICME, Unified CCE, and Unified CCX, Enterprise Releases 7.2(1) and Express Release 5.0(1)
37
Chapter 3: Deploying IPCC Gateway with Unified CCX
Installation and Configuration Checklist