
White Paper

© 2016 Cisco and/or its affiliates. All rights reserved. This document is Cisco Public. Page 5 of 20
Conversion Procedure
The conversion procedure consists of four basic tasks: creation of the distributed switches, configuration of the
switch settings, migration to the new switches, and testing and cleanup activities.
Create the Distributed Switches
The first step in the conversion process is to create the distributed switches to which the standard vSwitches will be
migrated. In this document, two vDS are created: one to replace the default standard vSwitch named vswitch-hx-
vm-network, which carries guest virtual machine network traffic, and one to replace the default standard vSwitch
named vmotion, which carries vMotion traffic. To create the two vDSs, complete the following steps:
1. Open and log in to the vCenter web client of the vCenter server that is managing the Cisco HyperFlex cluster.
2. Choose vCenter Inventory Lists > Distributed Switches.
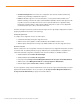
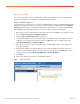
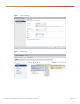
3. Click the Create a New Distributed Switch icon (Figure 1).
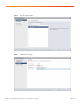
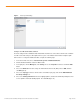
4. In the wizard that appears, enter the desired name of the new distributed switch, click the data center object
on which the Cisco HyperFlex cluster resides, and then click Next (Figure 2). For example, name the two
vDSs DSwitch-VMNetworks and DSwitch-VMotion.
5. Select the version of the new switch to match the version of VMware ESXi running on the Cisco HyperFlex
hosts. Then click Next.
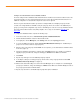
6. Set the number of uplinks to 2. Network I/O Control can be enabled or disabled as desired. Leave the box
checked to create a default port group and enter the name of the port group. Then click Next (Figure 3). For
example, name the port group DPortGroup-VMNetwork or DPortGroup-VMotion.
7. Click Finish.
8. Repeat steps 3 through 7 to create the second distributed switch.
Figure 1. Add Distributed Switch