
User Guide


31-2
AsyncOS 9.1.2 for Cisco Email Security Appliances User Guide
Chapter 31 Spam Quarantine
Setting Up the Local Spam Quarantine
• You want a centralized location to store and manage spam from multiple Email Security appliances.
• You want to store more spam than the Email Security appliance can hold.
• You want to regularly back up the spam quarantine and its messages.
Related Topics
• Disk Space for the Spam Quarantine, page 31-24
• Working with an External Spam Quarantine, page 42-2
Setting Up the Local Spam Quarantine
Related Topics
• Enabling and Configuring the Spam Quarantine, page 31-3
• Configuring the IP Interface for Browser Access to the Spam Quarantine, page 31-4
• Configuring Administrative User Access to the Spam Quarantine, page 31-4
• Configuring a Mail Policy to Quarantine Spam, page 31-5
• Limiting Which Recipients Have Mail Quarantined, page 31-5
• Ensuring That Message Text Displays Correctly, page 31-6
• Spam Quarantine Language, page 31-6
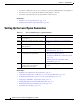
Table 31-1 How to Send Messages to a Spam Quarantine
Do This More Info
Step 1
Enable the Anti-Spam feature if you have
not yet done so.
Chapter 13, “Anti-Spam”
Step 2
Enable and configure quarantine settings. Enabling and Configuring the Spam Quarantine,
page 31-3
Step 3
Adjust the disk space allocated to the
spam quarantine
Managing Disk Space, page 33-16
Step 4
Enable browser access to the quarantine. Configuring the IP Interface for Browser Access to
the Spam Quarantine, page 31-4
Step 5
Configure the Email Security appliance
to send spam to the quarantine.
• How to Configure the Appliance to Scan
Messages for Spam, page 13-2
• Configuring a Mail Policy to Quarantine Spam,
page 31-5
• Limiting Which Recipients Have Mail
Quarantined, page 31-5
Step 6
Specify a default character encoding for
messages that do not have this
information in the heading.
Ensuring That Message Text Displays Correctly,
page 31-6