
User Guide


3-14
AsyncOS 9.1.2 for Cisco Email Security Appliances User Guide
Chapter 3 Setup and Installation
Using the System Setup Wizard
If you are connecting multiple factory-configured content security appliances to your network, add them
one at a time, reconfiguring each appliance’s default IP address as you go.
Accessing the Web-Based Graphical User Interface (GUI)
To access the web-based Graphical User Interface (GUI), open your web browser and point it to
192.168.42.42.
Log in to the appliance by entering the username and password below.
Related Topics
• Factory Default Username and Password, page 3-15
Factory Default Username and Password
• Username: admin
• Password: ironport
Note If your session times out, you will be asked to re-enter your username and password. If your session
times out while you are running the System Setup Wizard, you will have to start over again.
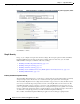
Defining Basic Configuration Using the Web-Based System Setup Wizard
Procedure
Step 1 Launch the System Setup Wizard
• Log in to the graphical user interface as described in Accessing the Web-Based Graphical User
Interface (GUI), page 3-15.
• On brand new (not upgraded from previous releases of AsyncOS) systems, your browser will
automatically be redirected to the System Setup Wizard.
• Otherwise, on the System Administration tab, click System Setup Wizard in the list of links on the
left.
Step 2 Start. See Step 1: Start.
• Read and accept the license agreement
Step 3 System. See Step 2: System.
• Setting the hostname of the appliance
• Configuring alert settings, report delivery settings, and AutoSupport
• Setting the system time settings, and NTP server
• Resetting the admin password
• Enabling SenderBase Network participation
Step 4 Network. See Step 3: Network.
• Defining the default router and DNS settings