
User Guide

3-8
AsyncOS 9.1.2 for Cisco Email Security Appliances User Guide
Chapter 3 Setup and Installation
Preparing for System Setup
Preparing for System Setup
• Determine Method for Connecting to the Appliance, page 3-8
• Determining Network and IP Address Assignments, page 3-9
• Gathering the Setup Information, page 3-11
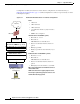
Determine Method for Connecting to the Appliance
To successfully set up the Email Security appliance in your environment, you must gather important
network information from your network administrator about how you would like to connect the Email
Security appliance to your network.
Related Topics
• Connecting to the Appliance, page 3-9
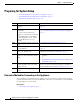
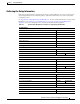
Do This More Information
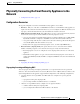
Step 1
Determine how you will connect to the
appliance.
See Determine Method for Connecting to the Appliance,
page 3-8
Step 2
Determine network and IP address
assignments.
If you have already cabled your
appliance to your network, ensure that
the default IP address for the Email
Security appliance does not conflict
with other IP addresses on your
network.
Determining Network and IP Address Assignments,
page 3-9Determine Method for Connecting to the Appliance,
page 3-8
Step 3
Gather information about your system
setup.
See Gathering the Setup Information, page 3-11.
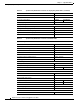
Step 4
Review the latest product release notes
for your appliance.
Release notes are available from the link in Documentation,
page 1-2.
Step 5
Unpack the appliance, physically install
it in a rack, and turn it on.
See Quickstart Guide for your appliance. This guide is
available from the link in Documentation, page 1-2.
Step 6
Access the appliance using the web
interface or the command line interface
(CLI)
• Launch a web browser and enter the IP address of the
appliance.
or
• See Running the Command Line Interface (CLI) System
Setup Wizard, page 3-25)
Step 7
If you are setting up a virtual Email
Security appliance, load your virtual
appliance license.
Use the loadlicense command. For more information, see
the Cisco Content Security Virtual Appliance Installation
Guide available from the link in Documentation, page 1-2.
Step 8
Configure basic settings for your
system.
See Using the System Setup Wizard, page 3-14