
User Guide

20-16
AsyncOS 9.1.2 for Cisco Email Security Appliances User Guide
Chapter 20 Email Authentication
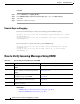
How to Verify Incoming Messages Using DKIM
Procedure
Step 1 Choose Mail Policies > Signing Profiles.
Step 2 In the DKIM Signing of System Generated Messages section, click Edit Settings.
Step 3 Select On.
Step 4 Submit and commit your changes.
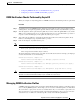
Domain Keys and Logging
Lines such as the following are added to the mail logs upon DomainKeys signing:
Lines such as these are added to the mail logs upon DKIM signing:
How to Verify Incoming Messages Using DKIM
Related Topics
• DKIM Verification Checks Performed by AsyncOS, page 20-17
• Managing DKIM Verification Profiles, page 20-17
Tue Aug 28 15:29:30 2007 Info: MID 371 DomainKeys: signing with dk-profile - matches
user123@example.com
Tue Aug 28 15:34:15 2007 Info: MID 373 DomainKeys: cannot sign - no profile matches
user12@example.com
Tue Aug 28 15:29:54 2007 Info: MID 372 DKIM: signing with dkim-profile - matches
user@example.com
Tue Aug 28 15:34:15 2007 Info: MID 373 DKIM: cannot sign - no profile matches
user2@example.com
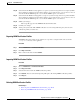
Table 20-1 How to Verify Incoming Messages Using DKIM
Do This More Info
Step 1
Create a profile for verifying messages using
DKIM.
Creating a DKIM Verification Profile, page 20-18.
Step 2
(Optional) Create a custom mail flow policy to
use for verifying incoming messages using
DKIM.
Defining Rules for Incoming Messages Using a Mail Flow
Policy, page 7-15
Step 3
Configure your mail flow policies to verify
incoming messages using DKIM.
Configuring DKIM Verification on the Mail Flow Policy,
page 20-20
Step 4
Define the action that the Email Security
appliance takes on verified messages.
Configuring an Action for DKIM Verified Mail,
page 20-21
Step 5
Associate the action with groups of specific
senders or recipients.
Configuring Mail Policies, page 10-7