
User Guide


17-5
AsyncOS 9.1.2 for Cisco Email Security Appliances User Guide
Chapter 17 Data Loss Prevention
RSA Email DLP
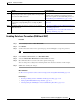
Enabling Data Loss Prevention (RSA Email DLP)
Procedure
Step 1 Select Security Services > RSA Email DLP.
Step 2 Click Enable.
Step 3 Scroll to the bottom of the license agreement page and click Accept to accept the agreement.
Note If you do not accept the license agreement, RSA Email DLP is not enabled on the appliance.
Step 4 Under Data Loss Prevention, select RSA Email DLP.
Step 5 Select the Enable RSA Email Data Loss Prevention check box.
Step 6 (Recommended) For now, deselect the other options on this page.
You can change these settings later, following instructions discussed elsewhere in this chapter.
Step 7 Submit and commit your changes.
What To Do Next
See How to Set Up Data Loss Prevention for Deployments Using RSA Email DLP, page 17-4.
Related Topics
• Showing or Hiding Sensitive DLP Data in Message Tracking, page 17-38
• Setting Up RSA Email DLP Using a Wizard, page 17-7
• About Updating the DLP Engine and Content Matching Classifiers, page 17-39
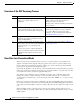
Step 5
Ensure that you have created Outgoing Mail Policies for
each group of senders and recipients whose messages will
be scanned for DLP violations.
See Chapter 10, “Mail Policies.”
To further refine permitted and restricted message
senders and recipients in individual DLP policies, see
Filtering Messages for DLP Policies, page 17-20.
Step 6
Specify which DLP policies apply to which senders and
recipients by assigning DLP policies to Outgoing Mail
Policies.
Associating DLP Policies with Outgoing Mail Policies,
page 17-22
Step 7
Configure settings for storage of and access to sensitive
DLP information.
• Showing or Hiding Sensitive DLP Data in Message
Tracking, page 17-38
• Controlling Access to Sensitive Information in
Message Tracking, page 32-5
Do This More Information