
User Guide

13-17
AsyncOS 9.1.2 for Cisco Email Security Appliances User Guide
Chapter 13 Anti-Spam
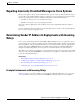
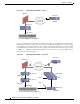
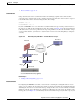
Determining Sender IP Address In Deployments with Incoming Relays
Configuring the Appliance to Work with Incoming Relays
Related Topics
• Enabling the Incoming Relays Feature, page 13-17
• Adding an Incoming Relay, page 13-17
• Message Headers for Relayed Messages, page 13-18
Enabling the Incoming Relays Feature
Note You should only enable the incoming relays feature if a local MX/MTA relays mail to your Cisco
appliance.
Procedure
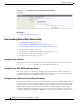
Step 1 Select Network > Incoming Relays.
Step 2 Click Enable.
Step 3 Commit your changes.
Adding an Incoming Relay
Add incoming relays to identify:
• Each machine on your network that will relay incoming messages to your Email Security appliance,
and
• The header that will label the IP address of the original external sender.
Before You Begin
For information needed to complete these prerequisites, see Message Headers for Relayed Messages,
page 13-18.
• Determine whether you will use custom or received headers to identify the IP address of the original
external sender.
• If you will use custom headers:
–
Determine the exact header that will label the originating IP address of relayed messages.
–
For each MX, MTA, or other machine that connects to original external senders, set up that
machine to add the header name and the IP address of the original external sender to incoming
messages.
Procedure
Step 1 Select Network > Incoming Relays.
Step 2 Click Add Relay.
Step 3 Enter a name for this relay.