
User Guide

13-8
AsyncOS 9.1.2 for Cisco Email Security Appliances User Guide
Chapter 13 Anti-Spam
Defining Anti-Spam Policies
Before You Begin
• Complete all steps to this point in the table in How to Configure the Appliance to Scan Messages
for Spam, page 13-2.
• Familiarize yourself with the following:
–
Understanding Positive and Suspect Spam Thresholds, page 13-10
–
Configuration Examples: Actions for Positively Identified versus Suspected Spam, page 13-11
–
Unwanted Marketing Messages From Legitimate Sources, page 13-11
–
If you have enabled more than one anti-spam solution: Enabling Different Anti-Spam Scanning
Engines in Different Mail Policies: Configuration Example, page 13-12
–
Headers Added During Anti-Spam Scanning, page 13-14
• If you will archive spam into the “Anti-Spam Archive” log, see also Logging, page 38-1.
• If you will send messages to an alternate mailhost, see also Alter Delivery Host Action, page 9-66.
Procedure
Step 1 Navigate to the Mail Policies > Incoming Mail Policies page.
Or
Step 2 Navigate to the Mail Policies > Outgoing Mail Policies page.
Step 3 Click the link under the Anti-Spam column for any mail policy.
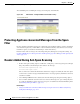
Step 4 In the Enable Anti-Spam Scanning for This Policy section, select the anti-spam solution you want to
use for the policy.
Options you see depend on the anti-spam scanning solution(s) that you have enabled.
For mail policies other than the default: If you use settings from the default policy, all other options on
the page are disabled.
You can also disable anti-spam scanning altogether for this mail policy.
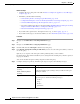
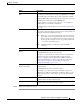
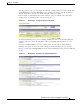
Step 5 Configure settings for positively identified spam, suspected spam, and marketing messages:
Option Description
Enable Suspected Spam
Scanning
Enable Marketing Email
Scanning
Choose an option.
Positively-identified spam scanning is always enabled if anti-spam
scanning is enabled.
Apply This Action to Message Choose which overall action to take on positively identified spam,
suspected spam, or unwanted marketing messages:
• Deliver
• Drop
• Bounce
• Quarantine