
Instruction manual

Administrator Procedures
INTER-TEL
®
5000 ADMINISTRATOR GUIDE – Issue 2.3, September 2007
System Programming
Page 37
• Program new extension numbers for endpoints: The extension number for any end-
point can be changed by an Administrator. The new extension number cannot conflict
with an existing number.
• Swap extensions: An extension number can be relocated (swapped) to another end-
point. To swap extensions, the two affected endpoints must meet the following criteria:
– Both devices must reside on the same node as the Administrator performing the
swap.
– Both devices must be the same type (i.e., both digital, both Inter-Tel Protocol (ITP)
mode, both SIP mode, or both single line endpoints).
– Neither device can be the administrator endpoint performing the swap.
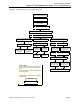
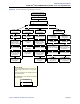
The System-Wide DB Programming process is summarized in the flowchart shown on
page 41. For Program Planning Sheets, turn to page 309.
If necessary, you can press or the
Speaker button to cancel programming and discard any
unsaved changes, at any time during the following procedure. If you want to change the Japa-
nese DND or reminder message settings, make sure your endpoint is set in Japanese mode. For
an explanation of the Change Language feature, see “Secondary Language Selection” on
page 160
.
To program the system database:
1. While on-hook, enter the Program Database feature code 9932 [9132 in Europe].
2. If a password is required, the display shows ENTER PASSWORD. Use the dialpad to
enter your 1–8 digit password and press . If you enter an incorrect password, the dis-
play shows
INVALID PASSWORD.
If a password is not required, skip this step.
3. The display shows ENTER DATABASE OPTION. Display endpoints show the options:
ENDPOINT, SYSTEM, and TRUNK. Press or the SYSTEM menu button.
4. The display shows ENTER SYSTEM OPTION. Select one of the following:
• Do-Not-Disturb Messages: This option allows you to program the DND messages
used by the endpoints. To select it, press or the
DND MESSAGES menu but-
ton. Then do the following:
– The display shows
SELECT DND MESSAGE #. Enter a message number or
scroll to the message you want. To scroll to the correct message, press the
Volume button or the SCROLL plus NEXT and PREVIOUS menu buttons.
– When the display shows the correct DND message, enter the new message as
described on page 31.
– Press or
ACCEPT to save the new message. The display shows DATA-
BASE UPDATED
and then returns to the SELECT DND MESSAGE prompt.
To cancel your entry, press or
CANCEL. The display shows NO UPDATE
PERFORMED
.
– To program another message, scroll to the message you want and repeat
these steps.
– Press again to exit to the
ENTER SYSTEM OPTION prompt.
#
2
1
#
#