
Data Sheet


White Paper
© 2009 Cisco Systems, Inc. All rights reserved. This document is Cisco Public Information. Page 7 of 11
CLI Configuration
Step 1. Enable DNS client
6
on ASA so the dynamic filter updater client can resolve the address of CSIO.
dns domain-lookup outside
dns server-group DefaultDNS
name-server
10.2.1.1
domain-name mydomain.cisco.com
Step 2. Enable dynamic-filter updater-client
dynamic-filter updater-client enable
Step 3. Enable the use of the database downloaded from the update server
dynamic-filter use-database
Step 4. Classify traffic for dynamic-filter on traffic for all protocols
access-list dynamic-filter_acl extended permit ip any any
Step 5. Enable dynamic-filter classification on outside interface
dynamic-filter enable interface outside classify-list dynamic-filter_acl
Step 6. Enable dynamic DNS snooping on outside interface
class-map dynamic-filter_snoop_class
match port udp eq domain
policy-map dynamic-filter_snoop_policy
class dynamic-filter_snoop_class
inspect dns dynamic-filter-snoop
service-policy dynamic-filter_snoop_policy interface outside
Step 7. Add entries to local blacklists and whitelists
dynamic-filter blacklist
name bad1.example.com
name bad2.example.com
address 10.1.1.1 255.255.255.0
dynamic-filter whitelist
name good.example.com
name great.example.com
name awesome.example.com
address 10.1.1.2 255.255.255.255
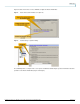
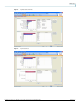
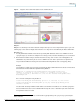
Cisco ASDM Configuration
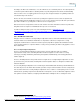
The Botnet Traffic Filter is configured in Cisco ASDM through the use of the Botnet Traffic Filter tab (Configuration >
Firewall >Botnet Traffic Filter).
Note: It is still necessary to explicitly configure the DNS inspection for your external interface, through the firewall
service policy rules.
6
We are using an imaginary domain name server as an example. You must enter your own DNS server information here.