
Installation guide


4-3
Cisco ASA 5500-X Series Hardware Installation Guide
OL-32129-01
Chapter 4 Maintenance and Upgrade Procedures for the ASA 5500-X
Install an Expansion I/O Card
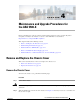
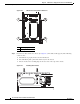
Figure 4-2 Replacing the Chassis Cover
Step 3
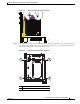
Re-install the chassis on a rack.
Step 4 Re-install the network interface cables.
Step 5 Power on the chassis.
Install an Expansion I/O Card
You can add or replace an expansion I/O card in the ASA 5500-X series chassis. These cards provide six
additional GigabitEthernet copper or small form-factor pluggable (SFP) ports.
• Install an I/O Card in the Cisco ASA 5512-X, 5515-X, and 5525-X Chassis, page 4-3
• Install an I/O Card in the Cisco ASA 5545-X and 5555-X Chassis, page 4-7
Install an I/O Card in the Cisco ASA 5512-X, 5515-X, and 5525-X Chassis
To remove an existing I/O card and install a new one, perform the following steps.
Procedure
Step 1 Power off the chassis, remove the power cable from the chassis, and remove the chassis from the rack.
Step 2 Locate a grounding strap, and fasten it to your wrist so that it contacts bare skin. Attach the other end to the
chassis. See the “Preventing Electrostatic Discharge Damage” section on page 2-2 for more information.
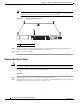
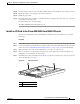
Step 3 With a Phillips head screwdriver, loosen the captive installation screw on the rear of the chassis.
Step 4 Remove the chassis cover by placing your hand on top of the chassis lid, pressing down firmly, and
pushing the cover toward the rear of the chassis.
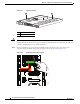
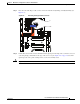
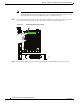
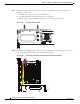
Step 5 Determine the location of the I/O card. (See Figure 4-3.) If you are adding a new card to the expansion
slot for the first time, go to Step 9.
1 Thumbscrew
282616
1