
Installation guide


3-10
Cisco ASA 5500-X Series Hardware Installation Guide
OL-32129-01
Chapter 3 Installing and Connecting the ASA 5500-X
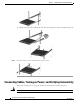
Rack Mount the Chassis
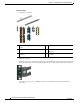
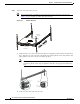
Step 4 Attach the outer slide rail to the rack.
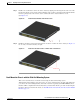
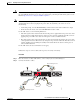
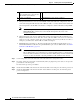
Note We recommend that you install the chassis with the front bezel facing the cold aisle. (See
Figure 3-3 for an example of air flow from front to back.)
Figure 3-8 Airflow Direction
a.
Align the front of one of the outer slide rails with the rack upright, push it forward, and click it into
place. Align the rear of the outer slide rail with the rack upright, pull the release tab, push the slide
rail toward the rack, release the tab, and click it into place.
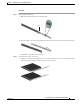
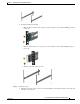
Note For racks shorter than 24 inches in depth, remove the rear bracket with a Phillips head
screwdriver, pull the release tab, and adjust the slide rail to the appropriate length for the
rack.
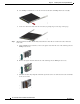
b. Secure the other outer slide rail to the rack.
330840
Cisco ASA 5545
Adapative Security Appliance
BOOT
ACTIVE
PS1
PS0
ALARM
VPN
HD1
HD0
1
0
COLD AISLE
Front Bezel
HOT AISLE
AIR FLOW DIRECTION
Rear I/O
Front of
Rack
Rear of
Bracket
Rear of
Rack
330901