
Installation guide


3-2
Cisco ASA 5500-X Series Hardware Installation Guide
OL-32129-01
Chapter 3 Installing and Connecting the ASA 5500-X
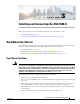
Rack Mount the Chassis
• If the rack is partially filled, load the rack from the bottom to the top, with the heaviest component
at the bottom of the rack.
Rack Mount the ASA 5512-X, 5515-X, and 5525-X With Brackets
The ASA 5512-X, 5515-X, and 5525-X chassis ship with rack mount brackets installed on the front of
the chassis. If you want to mount the chassis to the back of the rack, you can move the brackets from the
front to the back of the chassis.
Procedure
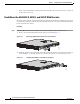
Step 1 (Optional) Move the brackets to the back of the chassis to install it in the back of the rack.
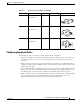
a. Remove the rack-mount brackets from the chassis as shown in Figure 3-1.
Figure 3-1 Removing the Brackets from the Front of the Chassis
b.
Install the brackets on the back of the chassis by attaching the brackets to the holes in the chassis as
shown in Figure 3-2. After the brackets are secured to the chassis, you can mount it in a rack.
Figure 3-2 Installing the Brackets on the Back of the Chassis
334560
334561