Quick Start Guide Cisco AS5300 Universal Access Server 1 Documents, Equipment, and Tools 2 Install the Cisco AS5300 3 Gather Configuration Information 4 Configure the Cisco AS5300 5 Obtaining Documentation 6 Obtaining Technical Assistance
1 Documents, Equipment, and Tools User Documentation All of the documents described here are available online and on the documentation CD-ROM that you received with your Cisco AS5300. To be sure of obtaining the latest information, you should access the online documentation. To print a document in its original page format, access the online document, and click on the PDF icon. To access online user documentation (PDF and HTML formats): From Cisco.com at http://www.cisco.
Release Notes Cisco IOS release notes for the Cisco AS5300 provide up-to-date information about specific Cisco IOS software releases used on Cisco AS5300s.
Release Notes Cisco IOS release notes for all platforms provide up-to-date information about specific Cisco IOS software releases. You can access these documents at: Cisco Product Documentation > Cisco IOS Software Configuration > Cisco IOS Software Release you are using > Release Notes Supporting Documents and Related Documentation Debug commands and other support documents provide additional information about specific Cisco IOS software releases, platforms, and applications.
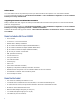
• Serial 12-in-1 cable (serial to WAN access) • Slot cover for unused slots • 19-in. telco rack-mount brackets 2 Install the Cisco AS5300 Warning This unit is intended for installation in restricted access areas. A restricted access area is where access can only be gained by service personnel through the use of a special tool, lock and key, or other means of security, and is controlled by the authority responsible for the location.
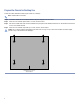
Prepare the Chassis for Desktop Use Attach the rubber feet before installing the chassis on a desktop. Note Rubber feet are included. Step 1 Locate the rubber feet on the black adhesive strip that shipped with the chassis. Step 2 Place the Cisco AS5300 upside-down on a flat, smooth surface. Step 3 Peel off the rubber feet from the black adhesive strip and place them adhesive-side down on the dotted circles at each corner of the chassis bottom.
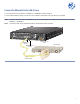
Connect the Ethernet Port for LAN Access You can connect the Cisco AS5300 to a 10BASE-T or 100BASE-T Ethernet network. You will need an Ethernet cable to connect the Cisco AS5300 to an Ethernet hub. This cable is not included. Step 1 Connect an Ethernet cable to the 10BASE-T port or the 10/100BASE-T port, depending on whether your network is 10BASE-T or 100BASE-T. Step 2 Connect the other end of the Ethernet cable to an Ethernet hub (not included).
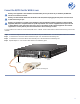
Connect the T1/PRI Card for WAN Access Warning Do not work on the system or connect or disconnect cables during periods of lightning activity. Warning The ISDN connection is regarded as a source of voltage that should be inaccessible to user contact. Do not attempt to tamper with or open any public telephone operator (PTO)-provided equipment or connection hardware.
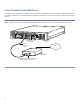
Connect the E1/PRI Card for WAN Access Warning This equipment is to be installed and maintained by service personnel only as defined by AS/NZS 3260 Clause 1.2.14.3 Service Personnel. Warning The telecommunications lines must be disconnected 1) before unplugging the main power connector and/or 2) while the housing is open. Warning The E1 interface card may only be installed in an ACA-permitted customer equipment or a Data Terminal Equipment (DTE) that is exempted from ACA's permit requirements.
Connect the Serial Port for WAN Access Use a serial 12-in-1 cable (DTE if connecting to a DSU or DCE if connecting to a CSU) to connect one of the four synchronous serial ports on the E1 or T1 PRI cards (with serial support) to a modem or a CSU or DSU. The CSU or DSU provides access to a WAN. Step 1 Connect the serial 12-in-1 cable connector on the serial cable to the serial port on the rear panel of the Cisco AS5300. Step 2 Connect the EIA/TIA-232, EIA/TIA-449, EIA/TIA-530A, EIA-530, V.35, or X.
Connect a Console for Local Administrative Access To configure the Cisco AS5300 from a locally-connected PC or terminal, you will need an RJ-45-to-RJ-45 rollover cable and a terminal adapter (RJ-45-to-DB-9 or RJ-45-to-DB-25). The cable and adapter are included. Step 1 Connect one of the adapters, labeled TERMINAL, to the communications port (usually labeled COM) on your PC or terminal. (This communications port is also known as a console port.
Connect a Modem for Remote Administrative Access (Optional) To configure the Cisco AS5300 from a remote location, you will need an RJ-45-to-RJ-45 rollover cable and a modem adapter (RJ-45-to-DB-25) for connecting a modem. If you will not be using a modem to configure the Cisco AS5300 remotely, skip this procedure and go to Connect Power, page 13. Note The cable and adapter are included. The modem is not included. Step 1 Connect the adapter labeled MODEM to your modem.
Connect Power The access server is available with either an AC or DC power supply. You can also order a power supply as a spare if you decide later that you need a different type of power supply or the power supply fails. Warning Do not touch the power supply when the power cord is connected. For systems with a power switch, line voltages are present within the power supply even when the power switch is off and the power cord is connected.
Warning The illustration shows the DC power supply terminal block. Wire the DC power supply using the appropriate wire terminations at the wiring end, as illustrated. The proper wiring sequence is ground to ground, positive to positive, and negative to negative. Note that the ground wire should always be connected first and disconnected last. Caution In a DC power supply installation do not connect the -48 VDC return to chassis ground at the Cisco AS5300.
3 Gather Configuration Information Use this section to help gather and organize the information you need to run the setup script to configure your Cisco AS5300. The information in the table is not an exhaustive list, but provided only as a starting point when using the setup script. Note If you do not have this information, you can get it from your network administrator. Item Ask Your Network Administrator 1.
Item Ask Your Network Administrator 6. Do you want to configure the modems for: Default chat script? Dial-in IP SLIP/PPP access? Dynamic IP address? Default IP address? TCP header compression? Routing updates on async lines? Async IPX? ARA? • ARA clients? • Zone name for ARA clients? 7.
4 Configure the Cisco AS5300 Use any of the following options for configuring your Cisco AS5300: • Cisco Fast Step Software • Cisco IOS Release Setup Script • Initial Configuration Using the CLI (Manual Configuration) • Configuring VoIP The option you select depends on how you want to configure your Cisco AS5300. Use the following information to help you decide which option to select. Using Cisco Fast Step Software Cisco Fast Step is a setup utility with a graphical user interface.
Configure the Cisco AS5300 After installation, the Cisco Fast Step setup program starts automatically. Follow the onscreen instructions to guide you through configuring and testing the Cisco AS5300. Cisco IOS Release Setup Script Timesaver Section 3, “Gather Configuration Information,” is provided to help you gather the appropriate information before you begin to configure the Cisco AS5300 using the setup script.
--- System Configuration Dialog --- Step 2 When the following prompt appears, enter yes to continue: Would you like to enter the initial configuration dialog? [yes]: yes At any point you may enter a question mark '?' for help. Use ctrl-c to abort configuration dialog at any prompt. Default settings are in square brackets '[]'.
Configuring VoIP The actual configuration procedure depends entirely upon the topology of your voice network, but, in general, you need to complete the following configuration tasks: 1. Configure IP Networks for Real-Time Voice Traffic. 2. Configuring Voice Ports for ISDN PRI. 3. Configuring the D Channels. 4. Configuring the Dial Peers. 5. Configuring Voice Network Data. For detailed procedures, see the Cisco AS5300 Universal Access Server Software Configuration Guide.
5 Obtaining Documentation The following sections provide sources for obtaining documentation from Cisco Systems. World Wide Web You can access the most current Cisco documentation on the World Wide Web at the following sites: • http://www.cisco.com • http://www-china.cisco.com • http://www-europe.cisco.com Documentation CD-ROM Cisco documentation and additional literature are available in a CD-ROM package, which ships with your product.
6 Obtaining Technical Assistance Cisco provides Cisco.com as a starting point for all technical assistance. Customers and partners can obtain documentation, troubleshooting tips, and sample configurations from online tools. For Cisco.com registered users, additional troubleshooting tools are available from the TAC website. Cisco.com Cisco.
Contacting TAC by Telephone If you have a priority level 1 (P1) or priority level 2 (P2) problem, contact TAC by telephone and immediately open a case. To obtain a directory of toll-free numbers for your country, go to the following website: http://www.cisco.com/warp/public/687/Directory/DirTAC.shtml P1 and P2 level problems are defined as follows: • P1—Your production network is down, causing a critical impact to business operations if service is not restored quickly. No workaround is available.
Corporate Headquarters Cisco Systems, Inc. 170 West Tasman Drive San Jose, CA 95134-1706 USA www.cisco.com Tel: 408 526-4000 800 553-NETS (6387) Fax: 408 526-4100 European Headquarters Cisco Systems Europe 11 Rue Camille Desmoulins 92782 Issy-les-Moulineaux Cedex 9 France www-europe.cisco.com Tel: 33 1 58 04 60 00 Fax: 33 1 58 04 61 00 Americas Headquarters Cisco Systems, Inc. 170 West Tasman Drive San Jose, CA 95134-1706 USA www.cisco.