
Administration Manual


4-7
Cisco Unified IP Conference Station 7937G Administration Guide for Cisco Unified Communications Manager 6.0
OL-11560-01 Rev. B0
Chapter 4 Configuring Settings on the Conference Station
Network Configuration Menu
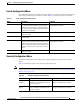
Operational
VLAN ID
Auxiliary Virtual Local Area
Network (VLAN) configured on a
Cisco Catalyst switch in which the
conference station is a member.
If the conference station has not
re
ceived an auxiliary VLAN, this
option indicates the Admin.
VLAN.
If neither the auxiliary VLAN nor
th
e Administrative VLAN are
configured, this option is blank.
The conference station obtains its Operational VLAN ID via
Ci
sco Discovery Protocol (CDP) from the switch to which the
c
onference station is attached. To assign a VLAN ID manually, use
the Admin VLAN ID option.
Admin. VLAN
ID
Auxiliary VLAN in which the
conference station is a
member.
Used only if the conference station
do
es not receive an auxiliary
VLAN from the switch.
1. Unlock network configuration options. For more information,
see the “Unlocking and Locking Options” section on page 4-3.
2. Choose Applications > Settings > Network Configuration >
Admin. VLAN ID.
3. Enter a new Admin. VLAN ID.
4. Press Validate, and then press Save.
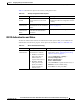
TFTP Server 1 Primary Trivial File Transfer
Prot
ocol (TFTP) server used by the
conference station. If you are not
using DHCP in your network and
you want to change this server, you
must use the TFTP Server 1 option.
If you set the Alternate TFTP
op
tion to yes, you must enter a
non-zero value for the TFTP Server
1 option.
1. If DHCP is enabled, set the Alternate TFTP option to Yes . For
more information, see the Alternate TFTP option in this table.
2. Choose Applications > Settings > Network Configuration >
TFTP Server 1.
3. Enter a new TFTP server IP address.
4. Press Validate, and then press Save.
TFTP Server 2 Optional backup TFTP server that
the
conference station uses if the
primary TFTP server is
unavailable.
1. Unlock network configuration options. For more information,
see the “Unlocking and Locking Options” section on page 4-3.
2. Enter an IP address for the TFTP Server 1 option. For more
information, see the TFTP Server 1 option in this table.
3. Choose Applications > Settings > Network Configuration.
4. Choose the TFTP Server 2 option, and then press Select.
5. Enter a new backup TFTP server IP address.
6. Press Validate, and then press Save.
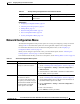
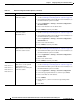
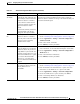
Table 4-3 Network Configuration Menu Options (continued)
Option Description To Change