About This Guide This preface discusses the objectives, audience, organization, and conventions of this network module hardware installation guide. Objectives This publication provides hardware installation information for Cisco network modules used in Cisco 3600 series and Cisco 2600 series modular access routers, referred to as Cisco modular routers. This publication describes a variety of router models that are similar in functionality, but differ in the number of interfaces supported.
Audience Refer to the Software Configuration Guide (for Cisco 3600 series and Cisco 2600 series routers) for an overview of network module configuration procedures and information on configuring specific network modules. Audience This guide is designed for the person installing the modular router, who should be familiar with electronic circuitry and wiring practices and have experience as an electronic or electromechanical technician.
Organization Chapter Title Description Chapter 7 Connecting ISDN BRI Network Modules to a Network Discusses basic hardware installation information for connecting the various Integrated Services Digital Network (ISDN) Basic Rate Interface (BRI) network modules to a network, and describes the network module LEDs.
Conventions Conventions This publication uses the following conventions to convey instructions and information: Convention Description boldface font Commands and keywords. italic font Variables for which you supply values. [ Keywords or arguments that appear within square brackets are optional. ] {x | y | z} A choice of required keywords appears in braces separated by vertical bars. You must select one. screen font Examples of information displayed on the screen.
Conventions Convention Description Varoitus Tämä varoitusmerkki merkitsee vaaraa. Olet tilanteessa, joka voi johtaa ruumiinvammaan. Ennen kuin työskentelet minkään laitteiston parissa, ota selvää sähkökytkentöihin liittyvistä vaaroista ja tavanomaisista onnettomuuksien ehkäisykeinoista. Tässä julkaisussa esiintyvien varoitusten käännökset löydät laitteen mukana olevasta Regulatory Compliance and Safety Information -kirjasesta (määräysten noudattaminen ja tietoa turvallisuudesta).
Cisco Connection Online Convention Description Aviso Este símbolo de aviso indica perigo. Encontra-se numa situação que lhe poderá causar danos físicos. Antes de começar a trabalhar com qualquer equipamento, familiarize-se com os perigos relacionados com circuitos eléctricos, e com quaisquer práticas comuns que possam prevenir possíveis acidentes.
Ordering Documentation Xmodem, FTP, and Internet e-mail, and it is excellent for quick access to information over lower bandwidths. The WWW version of CCO provides richly formatted documents with photographs, figures, graphics, and video, as well as hyperlinks to related information. You can access CCO in the following ways: • • • • • WWW: http://www.cisco.com WWW: http://www-europe.cisco.com WWW: http://www-china.cisco.com Telnet: cco.cisco.
Ordering Documentation single package or as an annual subscription. You can also access Cisco documentation on the World Wide Web at http://www.cisco.com, http://www-china.cisco.com, or http://www-europe.cisco.com. If you are reading Cisco product documentation on the World Wide Web, you can submit comments electronically. Click Feedback in the toolbar and select Documentation. After you complete the form, click Submit to send it to Cisco. We appreciate your comments.
C H A PT E R 1 Overview of Cisco Network Modules This chapter provides an overview of Cisco network modules used in Cisco modular access routers. Cisco modular routers include: • • Cisco 3600 Series Routers on page 1-1 Cisco 2600 Series Routers on page 1-7 Cisco 3600 Series Routers Table 1-1 lists the network module options available for Cisco 3600 series routers with their minimum software requirements for Cisco IOS Releases 11.1, 11.2, 11.3, and 11.3 T.
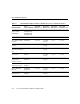
Cisco 3600 Series Routers Table 1-1 Network Module Options with Cisco IOS Releases for Cisco 3600 Series Routers Cisco Product Number Cisco IOS Release 11.1 Cisco IOS Release 11.2 Cisco IOS Release 11.3 Cisco IOS Release 11.3 T 1-Port Fast Ethernet 1-Port or 2-Port E1/ISDN PRI NM-1FE1CE1B NM-1FE1CE1U NM-1FE2CE1B NM-1FE2CE1U – – – 11.3(4)T 4-Port Ethernet NM-4E – 11.2(6)P 11.3(1) 11.3(1)T 1-Port Ethernet 2 WAN card slots NM-1E2W 11.1(7)AA 11.2(4)XA, 11.2(5)P 11.3(1) 11.
Cisco 3600 Series Routers Table 1-1 Network Module Options with Cisco IOS Releases for Cisco 3600 Series Routers Cisco Product Number Cisco IOS Release 11.1 Cisco IOS Release 11.2 Cisco IOS Release 11.3 Cisco IOS Release 11.3 T 1-Port/2-Port Channelized T1/ISDN PRI NM-1CT1 NM-2CT1 11.1(7)AA 11.2(4)XA, 11.2(5)P 11.3(1) 11.3(1)T 1-Port/2-Port Channelized T1/ISDN PRI with CSU7 NM-1CT1-CSU NM-2CT1-CSU 11.1(7)AA 11.2(4)XA, 11.2(5)P 11.3(1) 11.
Cisco 3600 Series Routers Table 1-1 Network Module Options with Cisco IOS Releases for Cisco 3600 Series Routers Network Module Cisco Product Number Cisco IOS Release 11.1 Cisco IOS Release 11.2 Cisco IOS Release 11.3 Cisco IOS Release 11.3 T 1-Port HSSI9 NM-1HSSI – – – 11.3(3)T Compression NM-COMPR – 11.2(7a)P 11.3(1) 11.3(1)T 1 2 3 4 5 6 7 8 9 ISDN = Integrated Services Digital Network. PRI = Primary Rate Interface. BRI = Basic Rate Interface.
Cisco 3600 Series Interface Numbering Figure 1-1 Cisco 3600 Series Module Card Slots Slot 2 Slot 3 2 BRI NT1 WO 2E W1 DO NOT INSTALL WAN INTERFACE CARDS WITH POWER APPLIED 2W SERIAL ETHERNET 1 ACT ACT ETHERNET 0 LNK STP AUI EN LNK LNK ACT SERIAL ETHERNET 1 AUI EN ETHERNET 0 INPUT 100-240VAC 50/60HZ 3.0-1.5 AMPS Slot 1 Slot 0 Power supply Some modules have two small slots, labeled W0 and W1, for WAN interface cards.
Cisco 3600 Series Routers Unit Numbering Cisco 3600 series routers unit numbers identify the interfaces on the modules and WAN interface cards installed in the router. Unit numbers begin at 0 for each interface type, and continue from right to left and (if necessary) from bottom to top. Modules and WAN interface cards are identified by interface type, slot number, followed by a forward slash (/), and then the unit number; for example, Ethernet 0/0.
Cisco 2600 Series Routers • • Slot 1, serial interface 0, referred to as serial 1/0 Slot 1, BRI interface 0, referred to as BRI 1/0 Note The 2E 2-slot module described in this example provides both an attachment unit interface (AUI) and 10BaseT port. Only one of these ports can be used at a time. The module automatically detects which port, AUI or 10BaseT, is in use.
Cisco 2600 Series Routers Table 1-2 Network Module Cisco Product Number Cisco IOS Release 11.3 T 1-Port Ethernet NM-1E 11.3(4)T 4-Port Ethernet NM-4E 11.3(4)T 4-Port/8-Port Asynchronous/Synchronous Serial NM-4A/S NM-8A/S 11.3(3)T, 11.3(2) XA 16-Port/32-Port Asynchronous Serial NM-16A NM-32A 11.3(3)T, 11.3(2) XA 1-Port/2-Port Voice NM-1V NM-2V 11.3(3)T, 11.3(2) XA 4-Port/8-Port ISDN BRI S/T1 NM-4B-S/T NM-8B-S/T 11.3(4)T 4-Port/8-Port ISDN BRI2 with NT1 NM-4B-U NM-8B-U 11.
Cisco 2600 Series Interface Numbering Cisco 2600 Series Interface Numbering Each individual network interface on a Cisco 2600 series router is identified by a slot number and a unit number. Slot and Unit Numbering The Cisco 2600 series router chassis contains one slot in which you can install a network module. This is always slot 1. Unit numbers identify the interfaces on the modules and WAN interface cards installed in the router.
Cisco 2600 Series Routers Figure 1-4 shows the following unit numbers: • • • • • • • • First Ethernet interface, referred to as Ethernet 0/0 Token ring interface, referred to as Token Ring 0/0 Slot W0, serial interface 0, referred to as serial 0/0 Slot W1, serial interface 1, referred to as serial 0/1 Slot 1, Ethernet interface 0, referred to as Ethernet 1/0 Slot 1, Ethernet interface 1, referred to as Ethernet 1/1 Slot 1, serial interface 0, referred to as serial 1/0 Slot 1, BRI interface 0, referred to
C H A PT E R 2 Preparing to Install Network Modules This chapter describes important information to consider before you begin to install network modules in Cisco modular routers, and includes the following sections: • • Safety Information on page 2-1 Required Tools and Equipment on page 2-4 Safety Information This section contains safety warnings that you should be aware of before installing a network module in the router.
Safety Information Safety Warnings Safety warnings appear throughout this publication in procedures that, if performed incorrectly, may harm you. A warning symbol precedes each warning statement. Safety with Electricity Warning Before working on equipment that is connected to power lines, remove jewelry (including rings, necklaces, and watches). Metal objects will heat up when connected to power and ground and can cause serious burns or weld the metal object to the terminals.
Preventing Electrostatic Discharge Damage Follow these guidelines when working on equipment powered by electricity: • Locate the emergency power-off switch in the room in which you are working. Then, if an electrical accident occurs, you can quickly shut the power OFF. • • Before working on the router, turn OFF the power and unplug the power cord.
Required Tools and Equipment ESD voltages to ground. To properly guard against ESD damage and shocks, the wrist strap and cord must operate effectively. If no wrist strap is available, ground yourself by touching the metal part of the chassis. Caution For safety, periodically check the resistance value of the antistatic strap, which should be between 1 and 10 megohm (Mohm).
C H A PT E R 3 Installing Network Modules in Cisco Modular Routers This chapter describes how to install network modules in Cisco modular routers, and includes the following sections: • • Installing a Network Module in a Modular Router Chassis Slot on page 3-1 Installing a WAN Interface Card in a Network Module Slot on page 3-3 Installing a Network Module in a Modular Router Chassis Slot Caution Network modules do not support online insertion and removal (hot swap).
Installing a Network Module in a Modular Router Chassis Slot The following warning applies to routers that use a DC power supply: Warning Before performing any of the following procedures, ensure that power is removed from the DC circuit. To ensure that all power is OFF, locate the circuit breaker on the panel board that services the DC circuit, switch the circuit breaker to the OFF position, and tape the switch handle of the circuit breaker in the OFF position.
Blank Network Module Panels The following warning applies to routers that use a DC power supply: Warning After wiring the DC power supply, remove the tape from the circuit breaker switch handle and reinstate power by moving the handle of the circuit breaker to the ON position. Blank Network Module Panels If the router is not fully configured with network modules, make sure that blank panels fill the unoccupied chassis slots to provide proper airflow. (See Figure 3-2.
Installing a WAN Interface Card in a Network Module Slot Warning Do not insert a WAN interface card into a base module slot while power is ON or network cables are connected. Warning Before opening the chassis, disconnect the telephone-network cables to avoid contact with telephone-network voltages. Warning Do not work on the system or connect or disconnect cables during periods of lightning activity.
Installing a WAN Interface Card in a Network Module Slot You need either a number 1 Phillips screwdriver or a flat-blade screwdriver. To install a WAN interface card, follow this procedure: If you are installing the card directly into a base module in the router, turn OFF power to the router. However, to channel ESD voltages to ground, do not unplug the power cable. Remove all network interface cables, including telephone cables, from the rear panel.
Installing a WAN Interface Card in a Network Module Slot Step 5 Secure the captive mounting screws into the holes of the module faceplate, using a Phillips or flat-blade screwdriver. Step 6 If the router was previously running, reinstall the network interface cables and power ON the router. WAN Interface Card Filler Panels If the base module is configured with only one WAN interface card, secure a slot filler panel into the open base module slot to ensure proper airflow. (See Figure 3-4.
WAN Interface Card Filler Panels • • • Chapter 12, “Connecting ATM Network Modules to a Network” Chapter 13, “Connecting HSSI Network Modules to a Network” Chapter 14, “Connecting Compression Network Modules to a Network” Installing Network Modules in Cisco Modular Routers 3-7
Installing a WAN Interface Card in a Network Module Slot 3-8 Cisco Network Modules Hardware Installation Guide
4 C H A PT E R Connecting Ethernet Network Modules to a Network This chapter describes how to connect and configure Ethernet network modules in Cisco modular routers, and describes the following modules: • • 1-Port and 4-Port Ethernet Modules on page 4-1 1-Port Fast Ethernet Module on page 4-5 1-Port and 4-Port Ethernet Modules This section provides information about the following network modules for Cisco modular routers: • • 1-port Ethernet network module—(Cisco product number NM-1E).
1-Port and 4-Port Ethernet Modules Figure 4-2 4-Port Ethernet Network Module ETHERNET 4E ETH 3 ETH 2 ETH 0 ETH 1 0 3 2 1 LINK EN H9252 ACT 10BaseT port AUI port Ethernet Network Module Connectors The 1-port Ethernet network module has a single port (Ethernet port 0) for one Ethernet connection. The 4-port Ethernet network module has ports for four Ethernet connections. (See Figure 4-2.
Connecting Ethernet Ports AUI Connections Use an Ethernet AUI cable to connect the AUI port on the 1-port or 4-port Ethernet network module to an Ethernet transceiver. The female end of the AUI cable mates with the slide-latch connector of the transceiver cable. Figure 4-3 shows a thin Ethernet transceiver as an example, but you can use any type of Ethernet transceiver.
1-Port and 4-Port Ethernet Modules Figure 4-4 Connecting an Ethernet 10BaseT Port to a Hub ETHERNET 4E ETH 3 ETH 2 ETH 1 ETH 0 3 2 1 0 LINK EN ACT Ethernet 10BaseT port (RJ-45) H9256 10BaseT cable 10BaseT hub 1-Port and 4-Port Ethernet Network Module LEDs This section describes the LEDs for the 1-port and 4-port Ethernet network module. Figure 4-5 shows the 4-port Ethernet network module’s LEDs, however these apply to the 1-port Ethernet network module as well.
1-Port Fast Ethernet Module Figure 4-5 Ethernet Network Module LEDs (Typical) ETHERNET 4E ETH 3 ETH 2 ETH 0 ETH 1 0 3 2 1 LINK LEDs EN H9254 ACT Enable LED 1-Port Fast Ethernet Module This section provides information about the 1-port Fast Ethernet network module (Cisco product number NM-1FE-TX) for Cisco modular routers. (See Figure 4-6.) This module enables the router to connect to 100-Mbps Ethernet networks and create high-speed communication links between network devices.
1-Port Fast Ethernet Module Connecting Fast Ethernet Ports Use a two-pair Category 5 or unshielded twisted-pair (UTP) straight-through RJ-45 cable to connect the RJ-45 port on a 1-port Fast Ethernet network module to a switch, hub, repeater, server, or other network device. Figure 4-7 shows the RJ-45 port connected to a hub. Note RJ-45 cables are not available from Cisco Systems. These cables are widely available and must be Category 5 cables.
1-Port Fast Ethernet Network Module LEDs 1-Port Fast Ethernet Network Module LEDs Figure 4-8 shows the 1-port Fast Ethernet network module’s LEDs. Figure 4-8 1-Port Fast Ethernet Network Module LEDs FAST ETHERNET 1FE EN H9982 FULL DPLX 100 MBPS LINK COL 10/100 bTX LEDs Enable LED All network modules have an enable (EN) LED. The enable LED indicates that the module has passed its self-tests and is available to the router.
1-Port Fast Ethernet Module 4-8 Cisco Network Modules Hardware Installation Guide
C H A PT E R 5 Connecting Fast Ethernet PRI Network Modules to a Network Note Fast Ethernet network modules are supported in Cisco 3600 series routers only.
1-Port Fast Ethernet and 1-Port or 2-Port Channelized T1/ISDN PRI Network Modules 1-Port Fast Ethernet and 1-Port or 2-Port Channelized T1/ISDN PRI Network Modules This section provides information about the following network modules for Cisco 3600 series modular routers. • 1-port Fast Ethernet 1-port channelized T1/ISDN PRI network module—Cisco product number NM-1FE1CT1. (See Figure 5-1.) • 1-port Fast Ethernet 2-port channelized T1/ISDN PRI network module—Cisco product number NM-1FE2CT1.
Connecting Fast Ethernet Channelized T1 Modules to the Network Connecting Fast Ethernet Channelized T1 Modules to the Network In order to connect Fast Ethernet channelized T1 modules to the network, complete the following: • • Connecting the Fast Ethernet Port on page 5-3 Connecting the PRI Ports on page 5-4 Connecting the Fast Ethernet Port Use a straight-through two-pair Category 5 unshielded twisted-pair (UTP) cable to connect the RJ-45 port on the Fast Ethernet PRI network module to a switch, hub, r
1-Port Fast Ethernet and 1-Port or 2-Port Channelized T1/ISDN PRI Network Modules Figure 5-3 Connecting a Fast Ethernet RJ-45 Port to a Hub FE–PRI COLL LINK EN Fast Ethernet RJ-45 H9984 Category 5 or UTP cable FDX 10/100BaseT CTRLR 0 100Mbps CARRIER DETECT REMOTE ALARM LOCAL ALARM LOOP BACK 1FE-1CT1 Fast Ethernet hub Connecting the PRI Ports This section describes how to connect channelized T1 and channelized E1 ISDN PRI ports to the network. These ports are color-coded tan.
1-Port Fast Ethernet and 1-Port or 2-Port Channelized T1/ISDN PRI with CSU Network Modules Figure 5-4 Connecting a CT1/PRI Port to a T1 CSU FE–PRI 100Mbps COLL FDX 10/100BaseT CTRLR 0 LINK CARRIER DETECT REMOTE ALARM LOCAL ALARM LOOP BACK 1FE-1CT1 EN H7468 CT1/PRI port (DB-15) T1 serial cable T1 CSU CT1/PRI port (DB-15) 1-Port Fast Ethernet and 1-Port or 2-Port Channelized T1/ISDN PRI with CSU Network Modules This section provides information about the following network modules for Cisco
1-Port Fast Ethernet and 1-Port or 2-Port Channelized T1/ISDN PRI with CSU Network Modules Figure 5-5 1-Port Fast Ethernet 1-Port Channelized T1 with CSU Network Module FE–PRI 5-6 EN 15229 FDX 100Mbps 10/100BaseT LINK RX MON COLL TX IN CTRLR 0 RX OUT CTRLR 1 CARRIER DETECT Cisco Network Modules Hardware Installation Guide EN 10977 FDX 10/100BaseT 100Mbps RX MON LINK TX IN COLL RX OUT CTRLR 0 CARRIER DETECT LOOP BACK LOOP BACK LOCAL ALARM 1-Port Fast Ethernet 2-Port Channelized
Connecting Fast Ethernet with Channelized T1 and CSU Modules to the Network Connecting Fast Ethernet with Channelized T1 and CSU Modules to the Network Use a straight-through RJ-48C-to-RJ-48C cable to connect a CT1/PRI-CSU port to an RJ-48C jack. (See Figure 5-7.
1-Port Fast Ethernet and 2-Port Channelized E1/ISDN PRI Balanced (120-ohm) or Unbalanced (75-ohm) Figure 5-8 1-Port Fast Ethernet 1-Port Channelized E1 Network Module FE-PRI 1FE-1CE1-B/U EN 15230 FDX 100Mbps LINK COLL CARRIER DETECT LOOP BACK LOCAL ALARM REMOTE ALARM 10/100BaseT CTRLR 0 For information on connecting these modules to a network, see the “Connecting Fast Ethernet Channelized E1 Modules to the Network” section on page 5-9.
Connecting Fast Ethernet Channelized E1 Modules to the Network Connecting Fast Ethernet Channelized E1 Modules to the Network In addition to the Fast Ethernet connection (see Figure 5-3), connect one of the following: • • CE1/PRI-B Port on page 5-9 CE1/PRI-U Port on page 5-11 CE1/PRI-B Port Use the appropriate cable to connect a CE1/PRI-B (120-ohm) port to an E1 CSU. (See Figure 5-10, Figure 5-11, and Figure 5-12, showing DB-15, twinax, and RJ-45 CSUs respectively.
1-Port Fast Ethernet and 2-Port Channelized E1/ISDN PRI Balanced (120-ohm) or Unbalanced (75-ohm) Figure 5-11 Connecting a CE1/PRI-B Port to an E1 CSU (DB-15-to-Twinax Connectors) FE-PRI COLL LINK FDX 10/100BaseT CTRLR 0 100Mbps CARRIER DETECT REMOTE ALARM LOCAL ALARM LOOP BACK 1FE-1CE1-B/U EN H7473 CE1/PRI port (DB-15) E1 cable for 75-ohm balanced connections with twinax connectors at the network end E1 CSU Twinax connectors 5-10 Cisco Network Modules Hardware Installation Guide
Connecting Fast Ethernet Channelized E1 Modules to the Network Figure 5-12 Connecting a CE1/PRI-B Port to an E1 CSU (DB-15-to-RJ-45 Connectors) FE-PRI COLL LINK FDX 10/100BaseT CTRLR 0 100Mbps CARRIER DETECT REMOTE ALARM LOCAL ALARM LOOP BACK 1FE-1CE1-B/U EN CE1/PRI port (DB-15) H7472 E1 cable for 120-ohm balanced connections with an RJ-45 connector at the network end RJ-45 jack CE1/PRI-U Port Use the appropriate cable to connect a CE1/PRI-U (75-ohm) port to an E1 CSU.
Fast Ethernet PRI Module LEDs Figure 5-13 Connecting a CE1/PRI-U Module to an E1 CSU (DB-15-to-BNC Connectors) FE-PRI COLL LINK FDX 10/100BaseT CTRLR 0 100Mbps CARRIER DETECT REMOTE ALARM LOCAL ALARM LOOP BACK 1FE-1CE1-B/U EN CE1/PRI-U H7471 E1 cable for 75-ohm unbalanced connections with BNC connectors at the network end E1 CSU BNC connectors Fast Ethernet PRI Module LEDs All network modules have an enable (EN) LED.
Fast Ethernet PRI Module LEDs Figure 5-14 Fast Ethernet and ISDN PRI LEDs CARRIER DETECT LOOP BACK CTRLR 1 CARRIER DETECT LOCAL ALARM FE-PRI 1FE-2CE1-B/U REMOTE ALARM ISDN PRI LEDs CTRLR 0 Fast Ethernet LEDs ISDN PRI LEDs EN 15231 FDX 100Mbps LINK COLL LOOP BACK LOCAL ALARM REMOTE ALARM 10/100BaseT Enable LED Table 5-1 describes Fast Ethernet LEDs. Table 5-2 describes ISDN PRI LEDs.
Fast Ethernet PRI Module LEDs Table 5-2 5-14 ISDN PRI LEDs LED Color Meaning REMOTE ALARM Yellow A remote source is indicating an error at its end of the connection. LOCAL ALARM Yellow Incoming signal shows loss of signal, loss of frame, or excessive errors. LOOPBACK Yellow Line or local loopback state is set or detected. CARRIER DETECT Green DS-1 carrier to the network is detected.
C H A PT E R 6 Connecting Serial Network Modules to a Network This chapter describes how to connect and configure serial network modules in Cisco modular routers, and describes the following: • • • • • • About Serial Connections on page 6-1 Connecting Asynchronous Network Modules to Asynchronous Devices on page 6-4 Asynchronous Network Modules Interface Numbering on page 6-5 4-Port Serial Network Module on page 6-10 16-Port and 32-Port Asynchronous Serial Network Module on page 6-13 4-Port and 8-Port As
About Serial Connections Serial DTE or DCE Devices A device that communicates over a synchronous serial interface is either a DTE or DCE device. A DCE device provides a clock signal that paces the communications between the device and the router. A DTE device does not provide a clock signal. DTE devices usually connect to DCE devices. The documentation that accompanied the device should indicate whether it is a DTE or DCE device. (Some devices have a jumper to select either DTE or DCE mode.
Distance Limitations The synchronous serial port can be configured as DTE or DCE (except EIA-530, which is DTE only), depending on the attached cable. To order a shielded cable, contact customer service. (See the Cisco Information Packet publication that came with your router.) Note All serial ports configured as DTE require external clocking from a CSU/DSU or other DCE device.
Connecting Asynchronous Network Modules to Asynchronous Devices Table 6-2 Serial Interace Speeds and Distances (continued) EIA/TIA-232 Distance EIA/TIA-449, X.21, V.35, EIA-530 Distance Rate (bps) Feet Meters Feet Meters 38400 12 3.7 256 78 56000 8.6 2.6 102 31 1544000 (T1) – – 50 15 Balanced drivers allow EIA/TIA-449 signals to travel greater distances than EIA/TIA-232 signals. The recommended distance limits for EIA/TIA-449 shown in Table 6-2 are also valid for V.35, X.
Asynchronous Network Modules Interface Numbering Ports are numbered from right to left and from bottom to top, as labeled on the module’s rear panel. (See the “Asynchronous Network Modules Interface Numbering” section on page 6-5.) Octal cables are not provided with the network module. For ordering information, see the “Cisco Connection Online” section on page xiv.
Asynchronous Network Modules Interface Numbering Cisco 3600 Series 16-Port and 32-Port Interface Numbering Cisco 3600 series routers slot numbers begin at 0 at the bottom right of the chassis, as viewed from the rear. For example, Cisco 3620 router slots are numbered 0 and 1, as shown in Figure 6-2. In Cisco 3640 routers, the bottom row of slots is numbered 0 and 1 and the top row is numbered 2 and 3, as shown in Figure 6-3.
Cisco 3600 Series 16-Port and 32-Port Interface Numbering Ports in the 16-port and 32-port asynchronous network modules correspond to the outputs of the octal cables that connect the module to the network. These ports are numbered in the same pattern as slot numbers, beginning at 0 at the lower right and continuing from right to left and (in the 32-port module) from bottom to top.
Asynchronous Network Modules Interface Numbering Cisco 2600 Series Asynchronous Port Interface Numbering Interface numbering for Cisco 2600 series routers differs from Cisco 3600 series interface numbering in the following ways: • WAN interface card slot numbers always appear as slot 0, even if the interface card is installed in the slot labeled W1. • WAN interface cards are numbered dynamically, starting with the first card installed.
4-Port and 8-Port Interface Numbering Table 6-4 4-Port and 8-Port Asynchronous Network Module Interface Numbering (continued) Slot Number Interface Numbers (4-Port Module) Interface Numbers (8-Port Module) 21 33–36 33–40 1 49–52 49–56 3 1 Cisco 3640 router only. To prevent this conflict, Cisco IOS Release 11.
4-Port Serial Network Module 4-Port Serial Network Module This section provides information about the 4-port serial network module (Cisco product number NM-4T) for Cisco modular routers. With the appropriate serial transition cable, each port on this module can provide a EIA/TIA-232, EIA/TIA-449, V.35, X.21, DTE/DCE, EIA-530 DTE, or nonreturn to zero/nonreturn to zero inverted (NRZ/NRZI) serial interface, in any combination.
Connecting the 4-Port Serial Module to a Network • • • V.35 Serial Cable Assembly X.21 Serial Cable Assembly EIA-530 Serial Cable Assembly All serial cables provide a universal plug at the network module end. The network end of each cable provides the physical connectors most commonly used for the interface. For example, the network end of the EIA/TIA-232 serial cable is a DB-25 connector, the most widely used EIA/TIA-232 connector.
4-Port Serial Network Module Figure 6-5 Connecting a 4-Port Serial Module to a CSU/DSU SERIAL 4T CN/LP RXC RXD TXC TXD SERIAL 2 CN/LP RXC RXD SERIAL 1 SERIAL 0 EN TXC TXD CN/LP RXC RXD TXC TXD CN/LP RXC RXD TXC TXD H9598 SERIAL 3 Serial port (DB-60) Serial transition cable CSU/DSU or other DCE EIA/TIA-232, EIA/TIA-449, V.35, X.21, or EIA-530 connector 4-Port Serial Network Module LEDs All network modules have an enable (EN) LED.
16-Port and 32-Port Asynchronous Serial Network Module Figure 6-6 4-Port Serial Network Module LEDs SERIAL 4T SERIAL 2 SERIAL 1 SERIAL 0 EN CN/LP RXC RXD TXC TXD CN/LP RXC RXD TXC TXD CN/LP RXC RXD TXC TXD Serial port LEDs Table 6-6 CN/LP RXC RXD TXC TXD H9599 SERIAL 3 Enable LED 4-Port Serial Network Module LEDs LED Meaning CN/LP Connect when green, loopback when yellow RXC Receive clock RXD Receive activity TXC Transmit clock TXD Transmit activity 16-Port and 32-Po
16-Port and 32-Port Asynchronous Serial Network Module Figure 6-7 16-Port Asynchronous Network Module ASYNC 11 7 3 14 10 6 2 13 9 5 1 12 8 4 0 ASYNC 0-7 EN H9996 ASYNC 8-15 15 68-pin connectors Figure 6-8 32-Port Asynchronous Network Module ASYNC 27 23 19 30 26 22 18 29 25 21 17 28 24 20 16 15 11 7 3 14 10 6 2 13 9 5 1 12 8 4 0 ASYNC 8-15 ASYNC 16-23 ASYNC 0-7 EN H9997 ASYNC 24-31 31 68-pin connectors Asynchronous Network Module LEDs All networ
4-Port and 8-Port Asynchronous/Synchronous Serial Network Module Figure 6-9 16-Port Asynchronous Network Module LEDs ASYNC 11 7 3 14 10 6 2 13 9 5 1 12 8 4 0 Status LEDs Figure 6-10 ASYNC 0-7 EN H9994 ASYNC 8-15 15 Status LEDs Enable LED 32-Port Asynchronous Network Module LEDs Status LEDs Status LEDs ASYNC 27 23 19 30 26 22 18 29 25 21 17 28 24 20 16 15 11 7 3 14 10 6 2 13 9 5 1 12 8 4 0 Status LEDs ASYNC 8-15 Status LEDs ASYNC 16-23 ASYNC 0-
4-Port and 8-Port Asynchronous/Synchronous Serial Network Module • 4-port asynchronous/synchronous serial network module—(Cisco product number NM-4A/S). (See Figure 6-11.) • 8-port asynchronous/synchronous serial network module—(Cisco product number NM-8A/S). (See Figure 6-12.) With the appropriate serial transition cable, the ports on these modules can provide an EIA/TIA-232, EIA/TIA-449, V.35, X.21, DTE/DCE, EIA-530 DTE, or NRZ/NRZI serial interface.
Asynchronous/Synchronous Serial Module LEDs Asynchronous/Synchronous Serial Module LEDs Figure 6-13 shows LEDs for the 4-port asynchronous/synchronous serial network module. Figure 6-14 shows LEDs for the 8-port asynchronous/synchronous serial network module.
4-Port and 8-Port Asynchronous/Synchronous Serial Network Module Each port on an asynchronous/synchronous serial network module also has the additional LEDs shown in Table 6-7.
C H A PT E R 7 Connecting ISDN BRI Network Modules to a Network This chapter describes how to connect Integrated Services Digital Network (ISDN) Basic Rate Interface (BRI) network modules in Cisco modular routers, and describes the following: • • • Upgrading ISDN BRI Network Modules on page 7-1 4-Port and 8-Port ISDN BRI S/T Network Modules on page 7-3 4-Port and 8-Port ISDN BRI U Network Modules on page 7-6 Unless specifically identified, references to BRI modules in this chapter include all ISDN BRI
Upgrading ISDN BRI Network Modules Table 7-1 ISDN BRI Network Module Upgrade Versions Module Minimum Version NM-4B-S/T 800-01236-03 NM-4B-U 800-01238-06 NM-8B-S/T 800-01237-03 NM-8B-U 800-01239-06 If the BRI module is the wrong revision, you see a message similar to this one when the router boots: The BRI network module in slot 0 is incompatible with the digital modems installed in the router.
4-Port and 8-Port ISDN BRI S/T Network Modules 4-Port and 8-Port ISDN BRI S/T Network Modules This section provides information about the following network modules for Cisco modular routers: • 4-port ISDN BRI network module—(Cisco product number NM-4B-S/T or CPANM-4B-S/T). Connects to an ISDN WAN through an external Network Termination 1 (NT1) device (also known as an S/T interface). (See Figure 7-1.) This module is also referred to as the 4-port BRI S/T network module.
4-Port and 8-Port ISDN BRI S/T Network Modules Connecting BRI S/T Modules to a Network To connect a BRI S/T network module to a network, use a straight-through RJ-45-to-RJ-45 cable to connect the ISDN BRI port to an NT1. (See Figure 7-3.
BRI S/T Module LEDs Figure 7-4 4-Port ISDN BRI S/T Network Module LEDs BRI S/T BRI 2 BRI 1 BRI 0 EN B1 B2 B1 B2 B1 B2 B1 B2 H7267 BRI 3 Enable LED BRI S/T LEDs Figure 7-5 8-Port ISDN BRI S/T Network Module LEDs BRI S/T BRI 6 BRI 5 BRI 4 BRI 3 BRI 2 BRI 1 BRI 0 EN B1 B2 B1 B2 B1 B2 B1 B2 B1 B2 B1 B2 B1 B2 B1 B2 H7266 BRI 7 Enable LED BRI S/T LEDs BRI S/T LEDs All network modules have an enable (EN) LED.
4-Port and 8-Port ISDN BRI U Network Modules 4-Port and 8-Port ISDN BRI U Network Modules This section provides information about the following network modules for Cisco modular routers: • 4-port ISDN BRI with NT1 network module—(Cisco product number NM-4B-U or CPANM-4B-U). Connects to an ISDN WAN using a built-in NT1 device (also known as a U interface). (See Figure 7-6.) This module is also referred to as the 4-port BRI U network module.
4-Port and 8-Port ISDN BRI U Network Modules Figure 7-7 8-Port ISDN BRI with NT1 Network Module (U Interface) B1 BRI 4 B1 B2 B2 BRI 3 BRI 2 BRI 1 BRI 0 B1 B2 B1 B2 B1 B2 NT1 B2 NT1 B2 B1 B2 EN H7264 BRI 5 NT1 B1 NT1 BRI 6 NT1 B1 NT1 BRI 7 NT1 BRI U NT1 NT1 LEDs Enable LED ISDN BRI LEDs Connecting ISDN BRI Network Modules to a Network 7-7
4-Port and 8-Port ISDN BRI U Network Modules Connecting BRI U Modules to a Network To connect a BRI U module to a network, use a straight-through RJ-45-to-RJ-45 cable to connect the ISDN BRI port to an RJ-45 jack. (See Figure 7-8.
BRI U Modules LEDs Figure 7-9 4-Port ISDN BRI U Network Module LEDs NT1 LEDs B2 BRI 1 B1 B2 BRI 0 B1 NT1 B1 B2 EN H7265 B2 BRI 2 NT1 B1 NT1 BRI 3 NT1 BRI U Enable LED ISDN BRI LEDs Figure 7-10 8-Port ISDN BRI U Network Module LEDs B1 BRI 4 B1 B2 B2 BRI 3 BRI 2 BRI 1 BRI 0 B1 B2 B1 B2 B1 B2 NT1 B2 NT1 B2 B1 B2 EN H7264 BRI 5 NT1 B1 NT1 BRI 6 NT1 B1 NT1 BRI 7 NT1 BRI U NT1 NT1 LEDs Enable LED ISDN BRI LEDs All network modules have an enable (EN) LED.
4-Port and 8-Port ISDN BRI U Network Modules In addition, BRI U modules have three LEDs for each port. Two of these LEDs indicate call activity on the two ISDN BRI B channels, as listed in Table 7-3. The third LED, labeled NT1, indicates synchronization status of the NT1.
C H A PT E R 8 Connecting ISDN PRI Network Modules to a Network This chapter describes how to connect Integrated Services Digital Network (ISDN) Primary Rate Interface (PRI) network modules used in Cisco modular routers, and describes the following modules: • • • 1-Port and 2-Port Channelized T1/ISDN PRI Network Modules on page 8-2 • 1-Port and 2-Port Channelized E1/ISDN PRI Unbalanced (75-ohm) Network Modules on page 8-14 1-Port and 2-Port Channelized T1/ISDN PRI with CSU Network Modules on page 8-5
1-Port and 2-Port Channelized T1/ISDN PRI Network Modules The CT1/PRI and CT1/PRI-CSU modules receive and transmit data bidirectionally at the T1 rate of 1.544 Mbps. 1-Port and 2-Port Channelized T1/ISDN PRI Network Modules This section provides information about the following network modules for Cisco modular routers: • 1-port channelized T1/ISDN PRI network module—(Cisco product number NM-1CT1 or CPANM-1CT1). (See Figure 8-1.) This module is also referred to as the 1-port CT1/PRI network module.
Connecting CT1/PRI Modules to the Network CARRIER DETECT LOOPBACK REMOTE ALARM cT1 PRI 2-Port Channelized T1/ISDN PRI Network Module LOCAL ALARM Figure 8-2 EN EN CTRLR 0 H7461 CARRIER DETECT LOOPBACK LOCAL ALARM REMOTE ALARM CTRLR 1 CT1/PRI-U ports (DB-15) Connecting CT1/PRI Modules to the Network To connect a CT1/PRI module to the network, use a DB-15-to-DB-15 T1 serial cable to connect the CT1/PRI port to a T1 channel service unit (CSU). (See Figure 8-3.
1-Port and 2-Port Channelized T1/ISDN PRI Network Modules CT1/PRI Module LEDs Figure 8-4 and Figure 8-5 show CT1/PRI network module LEDs.
1-Port and 2-Port Channelized T1/ISDN PRI with CSU Network Modules Table 8-1 ISDN PRI Network Module LEDs LED Meaning REMOTE ALARM Local alarm at remote end of connection LOCAL ALARM Loss of signal, loss of frame, or unavailability because of excessive errors LOOPBACK Controller local loopback CARRIER DETECT Carrier received on telco link 1-Port and 2-Port Channelized T1/ISDN PRI with CSU Network Modules This section provides information about the following network modules for Cisco modular rou
1-Port and 2-Port Channelized T1/ISDN PRI with CSU Network Modules Figure 8-6 1-Port Channelized T1/ISDN PRI with CSU Network Module cT1 CSU RX MON EN CTRLR 0 Monitor and test ports (Bantam) CT1/PRI CSU port (RJ-48) CARRIER DETECT LOOPBACK 2-Port Channelized T1/ISDN PRI with CSU Network Module LOCAL ALARM cT1 CSU REMOTE ALARM Figure 8-7 H7465 TX IN CARRIER DETECT LOOPBACK LOCAL ALARM REMOTE ALARM RX OUT CTRLR 1 RX MON EN CTRLR 0 Monitor and test ports (Bantam) H7464 TX IN CARRIER D
CT1/PRI CSU Module LEDs Figure 8-8 Connecting a CT1/PRI CSU Module to an RJ-48C Jack FE–PRI FDX COLL LINK CTRLR 0 100Mbps 10/100BaseT CARRIER DETECT REMOTE ALARM LOCAL ALARM LOOP BACK 1FE-1CT1-CSU EN H7469 CT1/PRI CSU port (RJ-48C) RJ-48C jack CT1/PRI CSU Module LEDs Figure 8-9 and Figure 8-10 show CT1/PRI CSU module LEDs.
1-Port and 2-Port Channelized T1/ISDN PRI with CSU Network Modules Figure 8-10 2-Port CT1/PRI CSU Network Module LEDs CARRIER DETECT LOOPBACK LOCAL ALARM cT1 CSU REMOTE ALARM CT1/PRI CSU LEDs CTRLR 1 RX MON EN CTRLR 0 H7466 TX IN CARRIER DETECT LOOPBACK LOCAL ALARM REMOTE ALARM RX OUT CT1/PRI CSU LEDs All network modules have an enable (EN) LED. This LED indicates that the module has passed its self-tests and is available to the router.
1-Port and 2-Port Channelized E1/ISDN PRI Balanced (120-ohm) Network Modules 1-Port and 2-Port Channelized E1/ISDN PRI Balanced (120-ohm) Network Modules This section provides information about the following network modules for Cisco modular routers: • 1-port channelized E1/ISDN PRI balanced (120-ohm) network module—(Cisco product number NM-1CE1B or CPANM-1CE1B). (See Figure 8-11.) This module is also referred to as the 1-port CE1/PRI-B network module.
1-Port and 2-Port Channelized E1/ISDN PRI Balanced (120-ohm) Network Modules The CE1/PRI modules are available with one or two E1 ports and with balanced or unbalanced interfaces. CE1/PRI modules receive and transmit data bidirectionally at the E1 rate of 2.048 Mbps and provide up to 30 virtual channels per E1 port. Each of the virtual channels is presented to the system as a serial interface that can be configured individually. The E1 interface is the physical media that supports ISDN PRI.
Connecting CE1/PRI-B Modules to the Network Figure 8-13 Connecting a 120-ohm CE1/PRI-B Module to an E1 CSU (DB-15-to-DB-15 Connectors) FE-PRI COLL LINK FDX 10/100BaseT CTRLR 0 100Mbps CARRIER DETECT EN CE1/PRI-B (DB-15) E1 cable for 120-ohm balanced connections with a DB-15 connector at the network end H7470 REMOTE ALARM LOCAL ALARM LOOP BACK 1FE-1CE1-B/U E1 CSU DB-15 connector Connecting ISDN PRI Network Modules to a Network 8-11
1-Port and 2-Port Channelized E1/ISDN PRI Balanced (120-ohm) Network Modules Figure 8-14 Connecting a 120-ohm CE1/PRI-B Module to an E1 CSU (DB-15-to-Twinax Connectors) FE-PRI COLL LINK FDX 10/100BaseT CTRLR 0 100Mbps CARRIER DETECT REMOTE ALARM LOCAL ALARM LOOP BACK 1FE-1CE1-B/U EN H7473 CE1/PRI port (DB-15) E1 cable for 75-ohm balanced connections with twinax connectors at the network end E1 CSU Twinax connectors Figure 8-15 Connecting a 120-ohm CE1/PRI-B Module to an E1 CSU (DB-15-t
CE1/PRI Module LEDs CE1/PRI Module LEDs Figure 8-16 and Figure 8-17 show CE1/PRI module LEDs.
1-Port and 2-Port Channelized E1/ISDN PRI Unbalanced (75-ohm) Network Modules Table 8-4 ISDN PRI Network Module LEDs LED Meaning REMOTE ALARM Local alarm at remote end of connection LOCAL ALARM Loss of signal, loss of frame, or unavailability because of excessive errors LOOPBACK Controller local loopback CARRIER DETECT Carrier received on telco link 1-Port and 2-Port Channelized E1/ISDN PRI Unbalanced (75-ohm) Network Modules This section provides information about the following network modules
Connecting CE1/PRI-U Modules to the Network CARRIER DETECT LOOPBACK REMOTE ALARM cE1-U PRI 2-Port Channelized E1/ISDN PRI Network Module (Unbalanced) LOCAL ALARM Figure 8-19 CARRIER DETECT EN H8500 LOOPBACK LOCAL ALARM REMOTE ALARM CTRLR 1 CTRLR 0 CE1/PRI-U ports Connecting CE1/PRI-U Modules to the Network To connect a CE1/PRI-U (75-ohm) module to the network, use the appropriate cable to connect the CE1/PRI-U port to an E1 CSU. (See Figure 8-20.
1-Port and 2-Port Channelized E1/ISDN PRI Unbalanced (75-ohm) Network Modules CE1/PRI Module LEDs Figure 8-21 and Figure 8-22 show CE1/PRI module LEDs.
CE1/PRI Module LEDs Table 8-5 ISDN PRI Network Module LEDs LED Meaning REMOTE ALARM Local alarm at remote end of connection LOCAL ALARM Loss of signal, loss of frame, or unavailability because of excessive errors LOOPBACK Controller local loopback CARRIER DETECT Carrier received on telco link CE1/PRI Module Jumper Settings Jumpers on the CE1/PRI modules can be used to connect or disconnect receive shield to ground. (See Table 8-6.
1-Port and 2-Port Channelized E1/ISDN PRI Unbalanced (75-ohm) Network Modules 8-18 Cisco Network Modules Hardware Installation Guide
C H A PT E R 9 Connecting Voice Network Modules to a Network Voice network modules convert telephone voice signals into a form that can be transmitted over an IP network. Voice interface cards provide the connection to the telephone equipment or network.
2-Channel and 4-Channel Voice Network Modules Figure 9-1 2-Channel Voice Network Module VOICE 2V V0 H10834 V1 EN Enable LED Figure 9-2 4-Channel Voice Network Module Module screw VOICE 2V V0 EN Module screw H10833 V1 Enable LED Voice network modules convert telephone voice signals into a form that can be transmitted over an IP network, and have no connectors.
Voice Network Module LEDs Voice Network Module LEDs All network modules have an enable (EN) LED. This LED indicates that the module has passed its self-tests and is available to the router. (See Figure 9-3.
Voice Network Module LEDs 9-4 Cisco Network Modules Hardware Installation Guide
C H A PT E R 1 0 Connecting Digital Modem Network Modules to a Network Note Digital modem network modules are supported in Cisco 3600 series routers only.
Figure 10-1 Digital Modem Network Module DIGITAL MODEMS MICA BANK 1 MICA BANK 2 MICA BANK 3 MICA BANK 4 EN H10823 MICA BANK 0 Digital modem network modules do not provide network interfaces of their own, but instead handle analog calls passing through other router interfaces. In addition to the digital modem module, the router must contain a PRI or BRI network module to connect to the ISDN channel, and another module, such as Ethernet, to provide connectivity to the LAN.
Hardware Requirements Hardware Requirements In addition to the digital modem module, the router must contain a PRI or BRI network module to connect to the ISDN channel, and another module, such as Ethernet, to provide connectivity to the LAN. Note The PRI module (Cisco product number NM-1CT1, NM-2CT1, NM-1CT1-CSU, NM-2CT1-CSU, NM-1CE1B, NM-2CE1B, NM-1CE1U, or NM-2CE1U) must be revision level -03.
Interface Numbering Interface Numbering Individual digital modem ports are not physically distinct, but Cisco IOS software identifies each modem uniquely through its slot number and a port number. In Cisco 3600 series routers, slot numbers begin at 0 at the bottom right of the chassis, as viewed from the rear. In Cisco 3640 routers, the bottom row of slots is numbered 0 and 1 and the top row is numbered 2 and 3, as shown in Figure 10-2.
Interface Numbering Table 10-1 MICA Module Port Numbers MICA Bank Port Numbers 0 (left) 0–5 1 6–11 2 12–17 3 18–23 4 (right) 24–29 This relation can be expressed as: port-number = (6 x bank-number) + modem-number For example, the third modem (modem 2) in the second MICA module from the left (bank 1) is assigned port number (6 x 1) + 2 = 8.
Adding 6-Port MICA Modules to a Digital Modem Network Module Table 10-2 Digital Modem Network Module Interface Numbering Slot Number Interface Numbers 0 1–30 1 33–62 2 65–94 3 97–126 Adding 6-Port MICA Modules to a Digital Modem Network Module You can add modems to a digital modem network module, in groups of six, by installing additional 6-port MICA modules, up to a maximum of five MICA modules (30 modems).
Adding 6-Port MICA Modules to a Digital Modem Network Module Figure 10-3 6-Port MICA Module Polarization notch Alignment holes H10826 Connector edge Polarization notch Caution To avoid damaging electrostatic discharge (ESD)-sensitive components, observe all ESD precautions when handling MICA modules. To avoid damaging the network module or the MICA module, avoid excessive force when you remove or replace MICA modules.
Adding 6-Port MICA Modules to a Digital Modem Network Module Removing the Digital Modem Network Module Caution Network modules do not support online insertion and removal (hot swap). To avoid damaging the module, before you remove a network module from a chassis slot, you must turn OFF electrical power and disconnect network cables. Follow this procedure to remove a digital modem network module: Step 1 Turn OFF electrical power to the router.
Removing 6-Port MICA Modules Figure 10-4 Removing a Digital Modem Network Module from a Router cT1 PRI CARRIER DETECT 3 2 1 MICA BANK 2 MICA BANK 3 MICA BANK 4 EN SERIAL 0 LINK 1 MICA BANK 1 ETH 0 ACT STP EN ETHERNET 1 AUI EN ETHERNET 0 INPUT 100-240VAC 50/60HZ 3.0-1.
Adding 6-Port MICA Modules to a Digital Modem Network Module Releasing the Mounting Clips H10844 Figure 10-5 10-10 Cisco Network Modules Hardware Installation Guide
Removing 6-Port MICA Modules Tilting a 6-Port MICA Module Free of the Mounting Clips H10869 Figure 10-6 Connecting Digital Modem Network Modules to a Network 10-11
Adding 6-Port MICA Modules to a Digital Modem Network Module Lifting a 6-Port MICA Module Out of the Socket H10870 Figure 10-7 Installing 6-Port MICA Modules Follow these steps to install new or replacement MICA modules: Step 1 Orient the digital modem network module so that the faceplate is on the right. Caution Handle MICA modules by the card edges only. MICA modules are ESD-sensitive components and can be damaged by mishandling.
Installing 6-Port MICA Modules Step 2 Hold the MICA module with the connector edge at the bottom and the polarization notch at the right. Step 3 Tilting the MICA module toward you at about a 45-degree angle, insert it into a socket, beginning with the empty socket closest to you. (See Figure 10-8.) Rock it downward, using the minimum amount of force required. (See Figure 10-9.
Adding 6-Port MICA Modules to a Digital Modem Network Module Inserting a 6-Port MICA Module into a Socket H10872 Figure 10-8 10-14 Cisco Network Modules Hardware Installation Guide
Installing 6-Port MICA Modules Rocking a 6-Port MICA Module Downward H10873 Figure 10-9 Connecting Digital Modem Network Modules to a Network 10-15
Digital Modem Module LEDs Reinstalling the Digital Modem Network Module When you finish installing MICA modules, replace the digital modem network module in the router chassis, following the procedure in Chapter 3, “Installing Network Modules in Cisco Modular Routers.” Digital Modem Module LEDs All network modules have an enable (EN) LED. (See Figure 10-10.) This LED indicates that the module has passed its self-tests and is available to the router.
C H A PT E R 1 1 Connecting Analog Modem Network Modules to a Network This chapter contains the following sections: • • • • • 8-Port and 16-Port Analog Modem Network Modules on page 11-1 Supported Network Protocols on page 11-3 Interface Numbering on page 11-3 Connecting the Modules to the Telephone Network on page 11-6 Analog Modem Network Module LEDs on page 11-7 8-Port and 16-Port Analog Modem Network Modules The 8-port analog modem network module, Cisco product number NM-8AM= (see Figure 11-1), and
8-Port and 16-Port Analog Modem Network Modules Figure 11-1 8-Port Analog Modem Network Module MODEMS 8AM 7 6 5 4 3 2 1 0 EN H11603 IN USE Figure 11-2 16-Port Analog Modem Network Module MODEMS 16AM 14 7 13 6 12 5 11 4 10 3 9 2 8 1 IN USE 0 EN H11602 IN USE 15 The following statement applies in Australia: Warning This equipment will be inoperable when mains power fails.
Supported Network Protocols Supported Network Protocols The analog modems described in this chapter support the following protocols: • • • • • All standard data rates from 300 bps to 33.6 kbps (V.34 bis) V.42 bis and MNP 5 data compression V.42, LAPM, and MNP 2 to 4 error correction MNP 10 for high performance under all line conditions MNP 10EC for high performance in analog cellular environments Interface Numbering Cisco IOS software identifies each modem uniquely by its slot number and a port number.
Interface Numbering Cisco 3620 Slot Numbers H7238 Figure 11-3 2W DO NOT INSTALL WAN INTERFACE CARDS WITH POWER APPLIED ACT AUI EN ETHERNET 0 ACT LNK ETHERNET 1 ETHERNET ETH 1 1 AUI EN 0 ETHERNET 0 Slot 1 Figure 11-4 LNK SERIAL ACT LNK ACT 1 WO 2E W1 SERIAL INSTALLATION ACT BRI NT1 B2 SEE MANUAL BEFORE LNK B1 ACT NT1 2E W1 2W Slot 0 Cisco 3640 Slot Numbers Slot 2 Slot 3 2 BRI NT1 WO 2E W1 DO NOT INSTALL WAN INTERFACE CARDS WITH POWER APPLIED 2W SERIAL ETHERNET 1 E
Interface Numbering Figure 11-5 Cisco 2600 Slot Numbers SERIAL 1 Cisco 2612 SERIAL 1 SERIAL 0 CONN WIC CONN 2A/S SEE MANUAL BEFORE INSTALLATION W1 SERIAL 0 CONN CONN 100-240V– 1A 50/60 Hz 47 W WIC 2T SEE MANUAL BEFORE INSTALLATION W0 Network module slot LINK ETHERNET 0 ACT CONSOLE AUX WAN interface card slot W1 WAN interface card slot W0 10344 LINK TOKEN RING 1 ACT Ports in the 8-port and 16-port analog modem network modules are numbered in the same pattern as slot numbers, beginning a
Connecting the Modules to the Telephone Network Table 11-1 16-Port and 32-Port Analog Module Interface Numbering Slot Number Interface Numbers (8-Port Module) Interface Numbers (16-Port Module) 0 1 to 8 1 to 16 1 33 to 40 33 to 48 2 65 to 72 65 to 80 3 97 to 104 97 to 112 Connecting the Modules to the Telephone Network Each analog modem network module provides 8 or 16 RJ-11 jacks for standard modular cables. These ports are color-coded pink. Cables are not provided with the network module.
Analog Modem Network Module LEDs Analog Modem Network Module LEDs All network modules have an enable (EN) LED. This LED indicates that the module has passed its self-tests and is available to the router. Each modem in the module has an in use (IN USE) LED that lights when remote carrier is detected. (See Figure 11-7 and Figure 11-8.
Analog Modem Network Module LEDs 11-8 Cisco Network Modules Hardware Installation Guide
C H A PT E R 1 2 Connecting ATM Network Modules to a Network This chapter describes how to connect the 1-port Asynchronous Transfer Mode (ATM-25) network module (Cisco product number NM-1ATM-25) for Cisco modular access routers.
Connecting ATM-25 Ports to the Network Figure 12-1 ATM-25 Network Module ATM 25Mbps ATM-25 ATM 0 RX EN ATM traffic LEDs 11705 TX Enable LED RJ-45 port Connecting ATM-25 Ports to the Network The ATM-25 port is color-coded light green. The port is a standard RJ-45 jack. Use a straight-through modular RJ-45 UTP Category 3, 4, or 5 cable or STP Category 1, 1A, 9, or 9A cable to connect the port to an external ADSL modem. (See Figure 12-2.
Connecting ATM-25 Ports to the Network Figure 12-2 Connecting the ATM-25 Module to an ADSL Modem ATM-25 port (RJ-45) ATM 25MbPS ATM 0 TX RX EN ADSL modem 11707 Straight-through RJ-45-to-RJ-45 cable Connecting ATM Network Modules to a Network 12-3
ATM-25 Network Module LEDs ATM-25 Network Module LEDs Figure 12-3 shows ATM-25 network module LEDs. Figure 12-3 ATM-25 Network Module LEDs ATM 25Mbps ATM-25 ATM 0 RX ATM traffic LEDs EN 11708 TX Enable LED All network modules have an enable (EN) LED. The enable LED indicates that the module has passed its self-tests and is available to the router. The ATM-25 network module has the additional LEDs shown in Table 12-1.
C H A PT E R 1 3 Connecting HSSI Network Modules to a Network Note High-Speed Serial Interface (HSSI) network modules are supported in Cisco 3600 series routers only. This chapter describes how to connect the 1-port High-Speed Serial Interface (HSSI) network module (Cisco product number NM-1HSSI) for Cisco modular access routers.
Connecting HSSI Modules to the Network Figure 13-1 HSSI Network Module HIGH SPEED SERIAL 1HSSI EN 11709 TD TC RD RC LB/CN HSSI 0 HSSI port LEDs HSSI port Enable LED Connecting HSSI Modules to the Network The HSSI module contains a 50-pin receptacle, color-coded blue. You can connect this port to a network in one of two ways: 13-2 • To an external data service unit (DSU), using a HSSI data terminal equipment (DTE) cable for operation in DTE mode. (See Figure 13-2.
Connecting HSSI Modules to the Network Figure 13-2 Connecting the 1-Port HSSI Module to an External DSU TD RD TC HSSI 0 RC LB/CN HIGH SPEED SERIAL 1HSSI EN HSSI DTE cable 11710 HSSI port External DSU Connecting HSSI Network Modules to a Network 13-3
HSSI Network Module LEDs Figure 13-3 Connecting Two Routers Back to Back TD TC RD HSSI 0 RC LB/CN HIGH SPEED SERIAL 1HSSI EN Null modem cable HSSI port 2 B1 ACT 2E W1 2W NT1 3 BRI NT1 B2 WO FAST ETHERNET 1FE SERIAL SEE MANUAL BEFORE INSTALLATION COL LINK 100 MBPS FULL DPLX LNK ACT AUI EN EN ETHERNET 0 INPUT 100-240VAC 50/60HZ 3.0-1.5 AMPS HSSI network module Router HSSI Network Module LEDs Figure 13-4 shows HSSI network module LEDs.
HSSI Network Module LEDs Figure 13-4 HSSI Network Module LEDs HIGH SPEED SERIAL 1HSSI EN 11712 TD TC RD RC LB/CN HSSI 0 HSSI port LEDs Enable LED All network modules have an enable (EN) LED. The enable LED indicates that the module has passed its self-tests and is available to the router. The HSSI network module has the additional LEDs shown in Table 13-1. Table 13-1 HSSI Network Module LEDs LED Meaning LB/C (Loopback/Connect) Green indicates normal operation.
HSSI Network Module LEDs 13-6 Cisco Network Modules Hardware Installation Guide
C H A PT E R 1 4 Connecting Compression Network Modules to a Network Note Compression network modules are supported in Cisco 3600 series routers only.
Supported Interfaces Figure 14-1 Compression Network Module EN H10480 ACTIVE ERROR COMPRESSION Supported Interfaces The compression network module supports the following interfaces: 14-2 • Channelized T1 Integrated Services Digital Network (ISDN) Primary Rate Interface (PRI) • • • • Channelized E1 ISDN PRI ISDN Basic Rate Interface (BRI) Synchronous serial Switched 56-kbps data service unit/channel service unit (DSU/CSU) Cisco Network Modules Hardware Installation Guide
Compression Network Module LEDs Compression Network Module LEDs Figure 14-2 shows the compression network module LEDs. Figure 14-2 Compression Network Module LEDs Error LED EN H10482 ACTIVE ERROR COMPRESSION Enable LED Active LED Table 14-1 Compression Network Module LEDs LED Meaning EN (Enable) Green indicates that the module has passed its self-tests and is available to the router.
Compression Network Module LEDs 14-4 Cisco Network Modules Hardware Installation Guide
A P PEN D I X A FCC Class B Compliance The equipment described in this document generates and may radiate radio-frequency energy. If it is not installed in accordance with Cisco’s installation instructions, it may cause interference with radio and television reception. This equipment has been tested and found to comply with the limits for a Class B digital device in accordance with the specifications in part 15 of the FCC rules.
A-2 Cisco Network Modules Hardware Installation Guide