
User guide


B-8 Cisco 2500 Series Access Server User Guide
Installing Primary-Memory DRAM SIMMs
Tools and Equipment Required
The following lists the tools required to remove and replace the DRAM SIMMs on the
access server:
• Medium-size flat-blade screwdriver (1/4 inch [0.625 cm])
• ESD-preventive wrist strap
• The appropriate DRAM SIMM for your access server model
Primary Memory Configurations
You can upgrade to 4- or 16-MB DRAM; the 4-MB upgrade kit includes one 1 MB x 36
DRAM SIMM, and the 16 MB kit includes one 4 MB x 36 DRAM SIMM. As primary
memory is expanded to 4- or 16-MB SIMMs, the 2 MB of permanent memory is allocated
as shared memory.
DRAM SIMM Installation
Following is the procedure for installing DRAM SIMMs:
Step 1 Turn OFF power but, to channel ESD voltages to ground, do not unplug the power
cord.
Step 2 Attach an ESD-preventive wrist strap.
Step 3 Open the cover according to the procedure in the section “Opening the Chassis”
earlier in this appendix.
Step 4 Turn the chassis so the system card is opposite the position shown in Figure B-2,
with the primary-memory DRAM SIMM socket toward you.
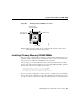
Step 5 Remove the existing DRAM SIMM by pulling outward on the connectors to
unlatch them, as shown in Figure B-5. Be careful not to break the holders on the
SIMM connector.
Caution To prevent damage, do not press on the center of the SIMMs. Handle each SIMM
carefully.