
Technical data
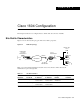


Cisco 1604 Configuration 3-3
Overview of Tasks
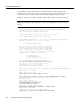
--- System Configuration Dialog ---
Would you like to enter the initial configuration dialog? [yes/no]: no
Would you like to terminate autoinstall? [yes]: yes
Press RETURN to get started!
00:00:17: %QUICC_ETHER-1-LOSTCARR: Unit 0, lost carrier. Transceiver problem?
00:00:17: %LINK-3-UPDOWN: Interface Ethernet0, changed state to up
00:00:17: %LINK-3-UPDOWN: Interface Serial0, changed state to down
00:00:17: %LINEPROTO-5-UPDOWN: Line protocol on Interface BRI0, changed state todown
00:00:17: %LINEPROTO-5-UPDOWN: Line protocol on Interface BRI0:1, changed state to down
00:00:17: %LINEPROTO-5-UPDOWN: Line protocol on Interface BRI0:2, changed state to down
00:00:17: %LINEPROTO-5-UPDOWN: Line protocol on Interface Ethernet0, changed state to
down
00:00:17: %LINEPROTO-5-UPDOWN: Line protocol on Interface Serial0, changed stat to down
00:00:44: %LINK-5-CHANGED: Interface BRI0, changed state to administratively down
00:00:46: %LINK-5-CHANGED: Interface Serial0, changed state to administratively down
00:00:46: %LINK-5-CHANGED: Interface Ethernet0, changed state to administratively down
00:00:47: %IP-5-WEBINST_KILL: Terminating DNS process
Router>
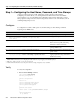
Overview of Tasks
Perform the following steps to configure the router:
• “Step 1—Configuring the Host Name, Password, and Time Stamps” on page 4
• “Step 2—Configuring Local AAA Security” on page 5
• “Step 3—Configuring the Ethernet Interface” on page 7
• “Step 4—Configuring BRI” on page 9
• “Step 5—Configuring DDR” on page 11
• “Step 6—Testing Connections to the Cisco AS5300” on page 14
• “Step 7—Confirming the Final Running Configuration” on page 21
• “Step 8—Saving the Configuration” on page 21
Note Before you perform the configuration tasks in this chapter, be sure you understand the overall
dial case action plan. See the chapter “Dial Case Study Overview.”