
Installation guide


3-39
Cisco ONS 15530 Hardware Installation Guide
OL-7706-01
Chapter 3 Connecting the Cisco ONS 15530
Cable Management
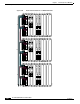
Step 5 In addition to the cables already connected to the first OADM module in slot 0 of shelf C, make the
following connections:
a. Connect the OSC IN port of the OADM to the TX port of the OSC module.
b. Connect the OSC OUT port of the OADM to the RX port of the OSC module.
c. Connect the MID_IN port of the first OADM on shelf C to the MID_OUT of the second OADM on
the shelf C.
d. Connect the MID_OUT port of the first OADM on shelf C to the MID_IN of the second OADM on
the shelf C.
Step 6 In addition to the cables already connected to the second OADM module in slot 0 of shelf C, make the
following connections:
a. Connect the OSC IN port of the OADM to the TX port of the OSC module.
b. Connect the OSC OUT port of the OADM to the RX port of the OSC module.
c. Connect the TRUNK_IN port and the TRUNK_OUT port of the first OADM on shelf C to the east
side trunk.
Note The IN ports on the OADM module (slot 0) are on the left, the OUT ports are on the right. (See
Figure 1-16 on page 1-21).
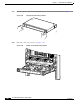
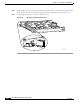
Cable Management
Due to the flexibility and complexity of configurations available with the Cisco ONS 15530, managing
the placement and storage of the fiber optic cables is a must. To avoid confusion and ensure the integrity
of the fiber optic cables used with the Cisco ONS 15530, we recommend that both ends of all fiber optic
cables be labelled. Labels for this purpose are shipped with the system.
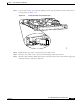
Note The cable storage drawer can accommodate attenuators that are available from optical component
distributors.
The cable storage drawer provides the management system for the cabling. The following procedures
describe how to connect the cables on your system.