
Router Installation Guide


3-5
Cisco XR 12406 Router Installation Guide
OL-13831-01
Chapter 3 Installing the Cisco XR 12406 Router
Installing a Router
Installing Center-Mounting Brackets (optional)
To install the Cisco XR 12406 router in the center-mounting position, you must
first install the upper and lower center-mounting brackets on the equipment rack
rails, then secure the chassis to the center-mounting brackets. If you do not plan
to use the optional center-mounting brackets, proceed directly to the “Installing
the Chassis in a Rack” section on page 3-7.
The optional center-mounting bracket installation kit ships in an accessories box
included in the router shipping container.
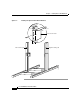
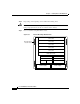
Refer to Figure 3-2 and use the following procedure to install the optional
center-mounting brackets.
Step 1 Measure and mark the hole at the same height on both the left and right posts.
Caution When installing the right side lower center-mounting bracket, ensure that the
bracket does not impede airflow through the air filter, which could cause
overheating in the router.
Step 2 Mount the lower right bracket:
a. Hold the lower right bracket against the right rack rail and align the bottom
screw hole in the lower bracket with the marked screw hole.
b. Pick a bottom bracket hole that aligns with a hole in the rack rail, then insert
a screw in the hole and finger tighten the screw.
c. Insert a second screw in the top hole in the bracket and finger tighten that
screw.
Step 3 Repeat Step 2a through Step 2c to mount the lower left center-mounting bracket
so that it is at the same height as the lower right bracket.
Step 4 Use a level to verify that the tops of the two brackets are level, or use a measuring
tape to verify that both brackets are the same distance from the tops of both rack
rails.
Step 5 Use a screwdriver to tighten all the screws.
Step 6 Repeat Step 1 through Step 5 for both upper center-mounting brackets.