
Network Router User Manual


Table Of Contents
- User Guide
- دليل المستخدم
- Guide de L’utilisateur
- Benutzerhandbuch
- Guía del usuario
- Guide de l’utilisateur
- Guida per l’utente
- Gebruikershandleiding
- Podręcznik użytkownika
- Användarhandbok
- คู่มือผู้ใช้
- Product Overview
- Installation
- How to use Cisco Connect
- Advanced Configuration
- Troubleshooting
- Specifications
- نظرة عامة على المنتج
- التثبيت
- كيفية استخدام Cisco Connect
- التكوين المتقدّم
- استكشاف الأخطاء وإصلاحها
- المواصفات
- Vue d'ensemble du produit
- Installation
- Comment utiliser Cisco Connect
- Configuration avancée
- Dépannage
- Spécifications
- Produktübersicht
- Installation
- Verwendung von Cisco Connect
- Erweiterte Konfiguration
- Fehlerbehebung
- Spezifikationen
- Descripción del producto
- Instalación
- Cómo utilizar Cisco Connect
- Configuración avanzada
- Cómo acceder a la utilidad basada en explorador
- Cómo utilizar la utilidad basada en explorador
- Setup > Basic Setup (Configuración > Configuración básica)
- Wireless > Basic Wireless Settings (Inalámbrico > Parámetros inalámbricos básicos)
- Wireless > Wireless Security (Inalámbrico > Seguridad inalámbrica)
- Wireless > Guest Access (Inalámbrico > Acceso de invitado)
- Resolución de problemas
- Especificaciones
- Présentation du produit
- Installation
- Comment utiliser Cisco Connect
- Configuration avancée
- Dépannage
- Spécifications
- Panoramica del prodotto
- Installazione
- Utilizzo di Cisco Connect
- Configurazione avanzata
- Risoluzione dei problemi
- Specifiche ambientali
- Productoverzicht
- Installatie
- Cisco Connect gebruiken
- Geavanceerde configuratie
- Probleemoplossing
- Specificaties
- Opis produktu
- Instalacja
- Jak używać programu Cisco Connect
- Konfiguracja zaawansowana
- Dostęp do narzędzia WWW
- Używanie narzędzia WWW
- Setup > Basic Setup (Konfiguracja > Konfiguracja podstawowa)
- Wireless > Basic Wireless Settings (Połączenie bezprzewodowe > Podstawowe ustawienia bezprzewodowe)
- Wireless > Wireless Security (Połączenie bezprzewodowe > Zabezpieczenia sieci bezprzewodowej)
- Wireless > Guest Access (Sieć bezprzewodowa > Dostęp gościa)
- Rozwiązywanie problemów
- Dane techniczne
- Produktöversikt
- Installation
- Använda Cisco Connect
- Avancerad konfiguration
- Så här ansluter du till det webbaserade verktyget
- Så här använder du det webbaserade verktyget
- Setup > Basic Setup (konfiguration > grundläggande inställningar)
- Wireless > Basic Wireless Settings (trådlöst > grundläggande trådlösa inställningar)
- Wireless > Wireless Security (trådlöst > trådlös säkerhet)
- Trådlöst > Gäståtkomst
- Felsökning
- Specifikationer
- ภาพรวมผลิตภัณฑ์
- การติดตั้ง
- วิธีการใช้งาน Cisco Connect
- การตั้งค่าขั้นสูง
- การแก้ไขปัญหา
- คุณสมบัติเฉพาะ
5
Product Overview
Linksys X2000/X3000
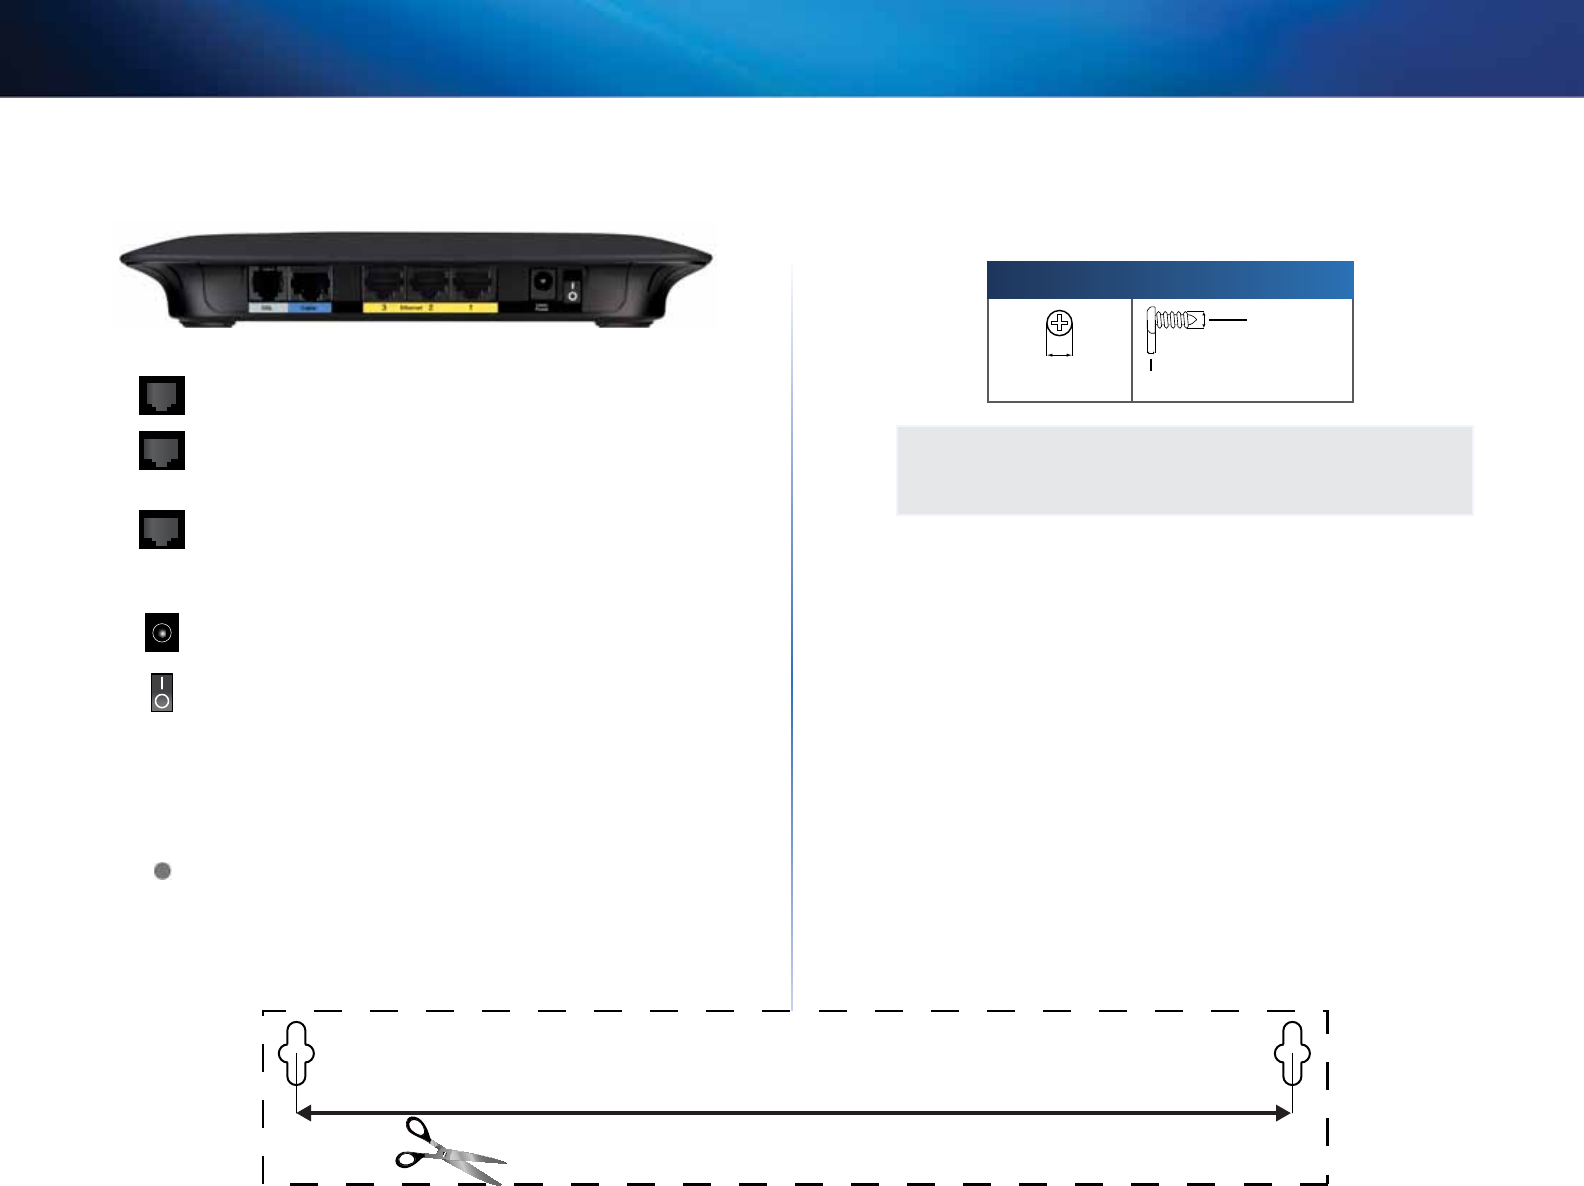
Back
DSL—Connects to the ADSL line.
Cable—To use the modem router as only a router, use a
network cable to connect this port to a separate modem’s
LAN/Ethernet port.
Ethernet—Using Ethernet cables (also called network
cables), these Ethernet ports connect the modem router
to computers and other Ethernet network devices on your
wired network.
Power—The Power port connects to the included power
adapter.
Power button—Press | (on) to turn on the modem router.
(Button not available on North American models.)
Bottom
Reset—This button allows you to reset the router to
its factory defaults. Press and hold the Reset button for
approximately five seconds.
Wall-mounting placement
The router has two wall-mount slots on its bottom panel. The distance between
the slots is 175.56 mm. Two screws are needed to mount the router.
Suggested Mounting Hardware
2.5-3.0 mm
4-5 mm 1-1.5 mm
NOTE
Cisco is not responsible for damages incurred by unsecured wall-
mounting hardware.
Follow these instructions:
1. Determine where you want to mount the router. Make sure that the wall
you use is smooth, flat, dry, and sturdy. Also make sure the location is
within reach of an electrical outlet.
2. Drill two holes into the wall. Make sure the holes are 175 mm apart.
3. Insert a screw into each hole and leave 3 mm of its head exposed.
4. Position the router so the wall-mount slots line up with the two screws.
5. Place the wall-mount slots over the screws and slide the router down
until the screws fit snugly into the wall-mount slots.
175 mm
Wall-mounting template
Print this page at 100% size.
Cut along the dotted line, and place on the wall to drill precise spacing.