USER GUIDE Wireless-N Gigabit Router Model: WRT310N
About This Guide About This Guide Icon Descriptions While reading through the User Guide you may see various icons that call attention to specific items. Below is a description of these icons: NOTE: This check mark indicates that there is a note of interest and is something that you should pay special attention to while using the product. WARNING: This exclamation point indicates that there is a caution or warning and it is something that could damage your property or product.
Table of Contents Chapter 1: Product Overview 4 Front Panel . . . . . . . . . . . . . . . . . . . . . . . . . . . . . . . . . . . . . . . . . . . . . . . . . . 4 Back Panel . . . . . . . . . . . . . . . . . . . . . . . . . . . . . . . . . . . . . . . . . . . . . . . . . . . 4 Placement Positions . . . . . . . . . . . . . . . . . . . . . . . . . . . . . . . . . . . . . .
Table of Contents Appendix A: Troubleshooting 29 Appendix B: Specifications 30 Appendix C: Warranty Information 31 Limited Warranty . . . . . . . . . . . . . . . . . . . . . . . . . . . . . . . . . . . . . . . . . . . . . 31 Appendix D: Regulatory Information 33 FCC Statement . . . . . . . . . . . . . . . . . . . . . . . . . . . . . . . . . . . . . . . . . . . . . . . 33 FCC Radiation Exposure Statement . .
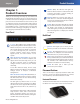
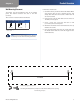
Product Overview Chapter 1 Chapter 1: Product Overview Thank you for choosing the Linksys by Cisco Wireless-N Gigabit Router. The Router lets you access the Internet via a wireless connection or through one of its four switched ports. You can also use the Router to share resources, such as computers. A variety of security features help to protect your data and your privacy while online. Security features include WPA2 security, a Stateful Packet Inspection (SPI) firewall and NAT technology.
Product Overview Chapter 1 Wall-Mounting Placement Follow these instructions: The Router has two wall-mount slots on its bottom panel. The distance between the slots is 152 mm (6 inches). 1. Determine where you want to mount the Router. Make sure that the wall you use is smooth, flat, dry, and sturdy. Also make sure the location is within reach of an electrical outlet. Two screws are needed to mount the Router. 2. Drill two holes into the wall. Make sure the holes are 152 mm (6 inches) apart.
Wireless Security Checklist Chapter 2 Chapter 2: Wireless Security Checklist Wireless networks are convenient and easy to install, so homes with high-speed Internet access are adopting them at a rapid pace. Because wireless networking operates by sending information over radio waves, it can be more vulnerable to intruders than a traditional wired network. Like signals from your cellular or cordless phones, signals from your wireless network can also be intercepted.
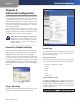
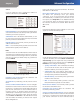
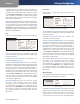
Advanced Configuration Chapter 3 Chapter 3: Advanced Configuration After setting up the Router with the Setup Wizard (located on the CD-ROM), the Router will be ready for use. However, if you’d like to change its advanced settings, use the Router’s web-based utility. This chapter describes each web page of the utility and each page’s key functions. You can access the utility via a web browser on a computer connected to the Router.
Advanced Configuration Chapter 3 Static IP If you are required to use a permanent IP address to connect to the Internet, select Static IP. before your Internet connection terminates. The default Max Idle Time is 15 minutes. Keep Alive: Redial Period If you select this option, the Router will periodically check your Internet connection. If you are disconnected, then the Router will automatically re-establish your connection. To use this option, select Keep Alive.
Advanced Configuration Chapter 3 inactivity, Connect on Demand enables the Router to automatically re-establish your connection as soon as you attempt to access the Internet again. To use this option, select Connect on Demand. In the Max Idle Time field, enter the number of minutes you want to have elapsed before your Internet connection terminates. The default Max Idle Time is 15 minutes. Keep Alive: Redial Period If you select this option, the Router will periodically check your Internet connection.
Advanced Configuration Chapter 3 host and domain name. In most cases, leaving these fields blank will work. DHCP Reservation Click this button if you want to assign a fixed local IP address to a MAC address. MTU MTU is the Maximum Transmission Unit. It specifies the largest packet size permitted for Internet transmission. Select Manual if you want to manually enter the largest packet size that is transmitted.
Advanced Configuration Chapter 3 Client Lease Time The Client Lease Time is the amount of time a network user will be allowed connection to the Router with their current dynamic IP address. Enter the amount of time, in minutes, that the user will be “leased” this dynamic IP address. After the time is up, the user will be automatically assigned a new dynamic IP address. The default is 0 minutes, which means one day. DynDNS.
Advanced Configuration Chapter 3 Clone My PC’s MAC Click this button to clone the MAC address of the computer you are using. TZO.com Click Save Settings to apply your changes, or click Cancel Changes to cancel your changes. Setup > Advanced Routing This screen is used to set up the Router’s advanced functions. Operating Mode allows you to select the type(s) of advanced functions you use. Dynamic Routing automatically adjusts how packets travel on your network.
Advanced Configuration Chapter 3 Route Entries To set up a static route between the Router and another network, select a number from the dropdown list. Click Delete This Entry to delete a static route. Enter Route Name Enter a name for the Route here, using a maximum of 25 alphanumeric characters. Wi-Fi Protected Setup. Proceed to the “Wi-Fi Protected Setup” section.
Advanced Configuration Chapter 3 Wi-Fi Protected Setup There are three methods available. Use the method that applies to the client device you are configuring. 2. After the client device has been configured, click OK. Then refer back to your client device or its documentation for further instructions. The Wi-Fi Protected Setup Status, Network Name (SSID), Security, Encryption, and Passphrase are displayed at the bottom of the screen.
Advanced Configuration Chapter 3 Key Renewal Enter a Key Renewal period, which instructs the Router how often it should change the encryption keys. The default Group Key Renewal period is 3600 seconds. WPA2 Personal WPA2 Enterprise This option features WPA2 used in coordination with a RADIUS server. (This should only be used when a RADIUS server is connected to the Router.) Security Mode > WPA2 Personal Encryption WPA2 supports two encryption methods, TKIP and AES, with dynamic encryption keys.
Advanced Configuration Chapter 3 IMPORTANT: If you are using WEP encryption, always remember that each device in your wireless network MUST use the same WEP encryption method and encryption key, or else your wireless network will not function properly. RADIUS Server Enter the IP Address of the RADIUS server. RADIUS Port Enter the port number of the RADIUS server. The default value is 1812. Shared Secret Enter the key shared between the Router and the server.
Advanced Configuration Chapter 3 Wireless Client List This screen shows computers and other devices on the wireless network. The list can be sorted by Client Name, Interface, IP Address, MAC Address, and Status. Select Save to MAC Address Filter List for any device you want to add to the MAC Address Filter List. Then click Add. To retrieve the most up-to-date information, click Refresh. To exit this screen and return to the Wireless MAC Filter screen, click Close.
Advanced Configuration Chapter 3 hear the beacons and awaken to receive the broadcast and multicast messages. The default value is 1. Deselect the feature to allow anonymous Internet requests. Fragmentation Threshold This value specifies the maximum size for a packet before data is fragmented into multiple packets. If you experience a high packet error rate, you may slightly increase the Fragmentation Threshold. Setting the Fragmentation Threshold too low may result in poor network performance.
Advanced Configuration Chapter 3 Security > VPN Passthrough VPN Passthrough IPSec Passthrough Internet Protocol Security (IPSec) is a suite of protocols used to implement secure exchange of packets at the IP layer. To allow IPSec tunnels to pass through the Router, keep the default, Enabled. PPTP Passthrough Point-to-Point Tunneling Protocol (PPTP) allows the Point-to-Point Protocol (PPP) to be tunneled through an IP network. To allow PPTP tunnels to pass through the Router, keep the default, Enabled.
Advanced Configuration Chapter 3 Status Policies are disabled by default. To enable a policy, select the policy number from the drop-down menu, and select Enabled. To create a policy, follow steps 1-11. Repeat these steps to create additional policies, one at a time. 1. Select a number from the Access Policy drop-down menu. 2. Enter a Policy Name in the field provided. 3. To enable this policy, select Enabled. 4. Click Edit List to select which PCs will be affected by the policy.
Chapter 3 External Port Enter the external port number used by the server or Internet application. Check with the Internet application documentation for more information. Internal Port Enter the internal port number used by the server or Internet application. Check with the Internet application documentation for more information. Protocol Select the protocol used for this application, either TCP or UDP, or Both.
Advanced Configuration Chapter 3 Triggered Range For each application, enter the starting and ending port numbers of the triggered port number range. Check with the Internet application documentation for the port number(s) needed. address in the field provided. To retrieve this information, click DHCP Client Table. Forwarded Range For each application, enter the starting and ending port numbers of the forwarded port number range.
Advanced Configuration Chapter 3 WMM Support If you have other devices that support WiFi Multimedia (WMM) on your network, keep the default, Enabled. Otherwise, select Disabled. No Acknowledgement If you want to disable the Router’s Acknowledgement feature, so the Router will not re-send data if an error occurs, then select Enabled. Otherwise, keep the default, Disabled. Internet Access Priority can range from 1 to 65535. Check your application’s documentation for details on the service ports used.
Advanced Configuration Chapter 3 Voice Device QoS > Voice Device Enter a Name Enter a name for your voice device. MAC Address Enter the MAC address of your voice device. Priority Select the appropriate priority: (Recommend), Medium, Normal, or Low. High Click Add to save your changes. Your new entry will appear in the Summary list. Administration > Management Summary This lists the QoS entries you have created for your applications and devices.
Advanced Configuration Chapter 3 Remote Upgrade If you want to be able to upgrade the Router remotely, from outside the local network, select Enabled. (You must have the Remote Management feature enabled as well.) Otherwise, keep the default, Disabled. Administration > Log The Router can keep logs of all traffic for your Internet connection. Allowed Remote IP Address If you want to be able to access the Router from any external IP address, select Any IP Address.
Advanced Configuration Chapter 3 Administration > Diagnostics Traceroute Test The diagnostic tests (Ping and Traceroute) allow you to check the connections of your network devices, including connection to the Internet. This screen also allows you to reset the router. The Traceroute test tests the performance of a connection. IP or URL Address Enter the address of the PC whose connection you wish to test. Start to Traceroute To run the test, click this button.
Advanced Configuration Chapter 3 Administration > Firmware Upgrade The Firmware Upgrade screen allows you to upgrade the Router’s firmware. Do not upgrade the firmware unless you are experiencing problems with the Router or the new firmware has a feature you want to use. Status > Router Administration > Firmware Upgrade NOTE: The Router may lose the settings you have customized. Before you upgrade its firmware, write down all of your custom settings.
Advanced Configuration Chapter 3 date information, click Refresh. To exit this screen and return to the Local Network screen, click Close. Status > Wireless Network The Wireless Network screen displays information about your wireless network. Status > Local Network Local Network Local MAC Address The MAC address of the Router’s local, wired interface is displayed here. Router IP Address This shows the Router’s IP address, as it appears on your local network.
Troubleshooting Appendix A Appendix A: Troubleshooting Your computer cannot connect to the Internet. Follow these instructions until your computer can connect to the Internet: •• Make sure that the Router is powered on. The Power LED should be green and not flashing. •• If the Power LED is flashing, then power off all of your network devices, including the modem, Router, and computers. Then power on each device in the following order: •• 1. Cable or DSL modem 2. Router 3.
Specifications Appendix B Appendix B: Specifications Model WRT310N Standards Draft 802.11n, 802.11g, 802.11b, 802.3, 802.3u, 802.3ab Ports Power, Internet, and Ethernet Buttons Reset, Wi-Fi Protected Setup LEDs Ethernet (1-4), Wi-Fi Protected Setup, Wireless, Internet, Power Cabling Type CAT 5e Number of Antennas 3 Max. Rated RF Power 17.5 ± 1.5 dBm Antenna Gain in dBi Main Antenna*: 1.5 dBi Third Antenna: 2.
Appendix C Appendix C: Warranty Information Limited Warranty Linksys warrants this Linksys hardware product against defects in materials and workmanship under normal use for the Warranty Period, which begins on the date of purchase by the original end-user purchaser and lasts for the period specified below: •• One (1) year for new product •• Ninety (90) days for refurbished product Your exclusive remedy and Linksys’ entire liability under this limited warranty will be for Linksys, at its option, to (a) re
Appendix C Warranty Information DATED PROOF OF ORIGINAL PURCHASE IS REQUIRED TO PROCESS WARRANTY CLAIMS. If you are requested to return your product, you will be given a Return Materials Authorization (RMA) number. You are responsible for properly packaging and shipping your product to Linksys at your cost and risk. You must include the RMA number and a copy of your dated proof of original purchase when returning your product.
Regulatory Information Appendix D Appendix D: Regulatory Information FCC Statement This device complies with Part 15 of the FCC Rules. Operation is subject to the following two conditions: (1) This device may not cause harmful interference, and (2) this device must accept any interference received, including interference that may cause undesired operation. This product has been tested and complies with the specifications for a Class B digital device, pursuant to Part 15 of the FCC Rules.
Appendix D Regulatory Information Industry Canada Statement Wireless Disclaimer This Class B digital apparatus complies with Canadian ICES-003 and RSS210. The maximum performance for wireless is derived from IEEE Standard 802.11 specifications. Actual performance can vary, including lower wireless network capacity, data throughput rate, range and coverage.
Appendix D User Information for Consumer Products Covered by EU Directive 2002/96/EC on Waste Electric and Electronic Equipment (WEEE) This document contains important information for users with regards to the proper disposal and recycling of Linksys products.
Appendix D Regulatory Information Eesti (Estonian) - Keskkonnaalane informatsioon Euroopa Liidus asuvatele klientidele Français (French) - Informations environnementales pour les clients de l’Union européenne Euroopa Liidu direktiivi 2002/96/EÜ nõuete kohaselt on seadmeid, millel on tootel või pakendil käesolev sümbol , keelatud kõrvaldada koos sorteerimata olmejäätmetega. See sümbol näitab, et toode tuleks kõrvaldada eraldi tavalistest olmejäätmevoogudest.
Appendix D Regulatory Information Lietuvškai (Lithuanian) - Aplinkosaugos informacija, skirta Europos Sąjungos vartotojams Nederlands (Dutch) - Milieu-informatie voor klanten in de Europese Unie Europos direktyva 2002/96/EC numato, kad įrangos, kuri ir kurios pakuotė yra pažymėta šiuo simboliu (įveskite simbolį), negalima šalinti kartu su nerūšiuotomis komunalinėmis atliekomis. Šis simbolis rodo, kad gaminį reikia šalinti atskirai nuo bendro buitinių atliekų srauto.
Appendix D Regulatory Information Português (Portuguese) - Informação ambiental para clientes da União Europeia Slovenščina (Slovene) - Okoljske informacije za stranke v Evropski uniji A Directiva Europeia 2002/96/CE exige que o equipamento que exibe este símbolo no produto e/ou na sua embalagem não seja eliminado junto com os resíduos municipais não separados. O símbolo indica que este produto deve ser eliminado separadamente dos resíduos domésticos regulares.
Appendix E Appendix E: Software End User License Agreement Cisco Products This product from Cisco Systems, Inc. or its subsidiary licensing the Software instead of Cisco Systems, Inc. (“Cisco”) contains software (including firmware) originating from Cisco and its suppliers and may also contain software from the open source community. Any software originating from Cisco and its suppliers is licensed under the Cisco Software License Agreement contained at Schedule 1 below.
Appendix E License Restrictions.
Appendix E Software can enable any other computer (on the same primary network) to generate reports. When a computer is enabled, that computer shows a notification that it is being monitored. As long as that computer is enabled, each time the Software is started the user of that particular computer will see a notification that it is being monitored by the reports feature. Any computer on the network with the Software installed can enable or disable any other computer from the reports feature.
Appendix E Software End User License Agreement Disclaimer of Liabilities.
Appendix E send you Service related email messages as long as you are a subscriber to the Service. If you wish to opt-out of receiving Service related email messages, you may cancel the Service by providing written notice via www. networkmagic.com/support to Cisco of such cancellation and uninstalling the Software and discontinuing your use of the Service.
Appendix E 1. You may copy and distribute verbatim copies of the Program’s source code as you receive it, in any medium, provided that you conspicuously and appropriately publish on each copy an appropriate copyright notice and disclaimer of warranty; keep intact all the notices that refer to this License and to the absence of any warranty; and give any other recipients of the Program a copy of this License along with the Program.
Appendix E 4. You may not copy, modify, sublicense, or distribute the Program except as expressly provided under this License. Any attempt otherwise to copy, modify, sublicense or distribute the Program is void, and will automatically terminate your rights under this License. However, parties who have received copies, or rights, from you under this License will not have their licenses terminated so long as such parties remain in full compliance. 5.
Appendix E 12.
Appendix E Public License permits more lax criteria for linking other code with the library. We call this license the “Lesser” General Public License because it does Less to protect the user’s freedom than the ordinary General Public License. It also provides other free software developers Less of an advantage over competing non-free programs. These disadvantages are the reason we use the ordinary General Public License for many libraries.
Appendix E Software End User License Agreement (For example, a function in a library to compute square roots has a purpose that is entirely well-defined independent of the application. Therefore, Subsection 2d requires that any application-supplied function or table used by this function must be optional: if the application does not supply it, the square root function must still compute square roots.
Appendix E a) Accompany the work with the complete corresponding machine-readable source code for the Library including whatever changes were used in the work (which must be distributed under Sections 1 and 2 above); and, if the work is an executable linked with the Library, with the complete machine-readable “work that uses the Library”, as object code and/or source code, so that the user can modify the Library and then relink to produce a modified executable containing the modified Library.
Appendix E 11. If, as a consequence of a court judgment or allegation of patent infringement or for any other reason (not limited to patent issues), conditions are imposed on you (whether by court order, agreement or otherwise) that contradict the conditions of this License, they do not excuse you from the conditions of this License.
Appendix E Schedule 3-C OPENSSL LICENSE If this Cisco product contains open source software licensed under the OpenSSL license: This product includes software developed by the OpenSSL Project for use in the OpenSSL Toolkit. (http://www.openssl.org/). This product includes cryptographic software written by Eric Young (eay@cryptsoft.com). This product includes software written by Tim Hudson (tjh@cryptsoft.com).
Appendix E Software End User License Agreement 2. Redistributions in binary form must reproduce the above copyright notice, this list of conditions and the following disclaimer in the documentation and/or other materials provided with the distribution. 3. All advertising materials mentioning features or use of this software must display the following acknowledgement: “This product includes cryptographic software written by Eric Young (eay@cryptsoft.