USER GUIDE RangePlus Wireless Router Model: WRT110
About This Guide About This Guide Icon Descriptions While reading through the User Guide you may encounter various icons designed to call attention to a specific item. Below is a description of these icons: NOTE: This check mark indicates that there is a note of interest and is something that you should pay special attention to while using the product. WARNING: This exclamation point indicates that there is a caution or warning and it is something that could damage your property or product.
Table of Contents About This Guide i Icon Descriptions . . . . . . . . . . . . . . . . . . . . . . . . . . . . . . . . . . . . . . . . . . . . . . i Online Resources . . . . . . . . . . . . . . . . . . . . . . . . . . . . . . . . . . . . . . . . . . . . . . i Copyright and Trademarks . . . . . . . . . . . . . . . . . . . . . . . . . . . . . . . . . . . . . . . .
Table of Contents Appendix D: Regulatory Information 35 FCC Statement . . . . . . . . . . . . . . . . . . . . . . . . . . . . . . . . . . . . . . . . . . . . . . . 35 FCC Radiation Exposure Statement . . . . . . . . . . . . . . . . . . . . . . . . . . . . . . . . . . 35 Safety Notices . . . . . . . . . . . . . . . . . . . . . . . . . . . . . . . . . . . . . . . . . . . . . . .
Product Overview Chapter 1 Chapter 1: Product Overview Thank you for choosing the Linksys RangePlus Wireless Router. The Router lets you access the Internet via a wireless connection or through one of its four switched ports. You can also use the Router to share resources such as computers, printers and files. A variety of security features help to protect your data and your privacy while online. Security features include WPA2 security, a Stateful Packet Inspection (SPI) firewall and NAT technology.
Product Overview Chapter 1 Follow these instructions: Wall-Mounting Placement The Router has two wall-mount slots on its bottom panel. The distance between the slots is 152 mm (6 inches). Two screws are needed to mount the Router. 2. Drill two holes into the wall. Make sure the holes are 152 mm (6 inches) apart. Suggested Mounting Hardware 1-1.5 mm 3. Insert a screw into each hole and leave 3 mm (0.12 inches) of its head exposed. 2.5-3.0 mm 4-5 mm 1. Determine where you want to mount the Router.
Wireless Security Checklist Chapter 2 Chapter 2: Wireless Security Checklist Wireless networks are convenient and easy to install, so homes with high-speed Internet access are adopting them at a rapid pace. Because wireless networking operates by sending information over radio waves, it can be more vulnerable to intruders than a traditional wired network. Like signals from your cellular or cordless phones, signals from your wireless network can also be intercepted.
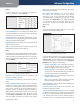
Advanced Configuration Chapter 3 Chapter 3: Advanced Configuration Setup > Basic Setup The first screen that appears is the Basic Setup screen. This allows you to change the Router’s general settings. After setting up the Router with the Setup Wizard (located on the CD-ROM), the Router will be ready for use. However, if you’d like to change its advanced settings, use the Router’s web-based utility. This chapter describes each web page of the utility and each page’s key functions.
Advanced Configuration Chapter 3 Static IP If you are required to use a permanent IP address to connect to the Internet, select Static IP. before your Internet connection terminates. The default Max Idle Time is 5 minutes. Keep Alive: Redial Period If you select this option, the Router will periodically check your Internet connection. If you are disconnected, then the Router will automatically re-establish your connection. To use this option, select Keep Alive.
Advanced Configuration Chapter 3 automatically re-establish your connection as soon as you attempt to access the Internet again. To use this option, select Connect on Demand. In the Max Idle Time field, enter the number of minutes you want to have elapsed before your Internet connection terminates. The default Max Idle Time is 5 minutes. Keep Alive: Redial Period If you select this option, the Router will periodically check your Internet connection.
Advanced Configuration Chapter 3 the best MTU for your Internet connection, keep the default setting, Auto. Size When Manual is selected in the MTU field, this option is enabled. Leave this value in the 1200 to 1500 range. The default size depends on the Internet Connection Type: •• DHCP, Static IP, or Telstra: 1500 •• PPPoE: 1492 •• PPTP or L2TP: 1460 Network Setup The Network Setup section changes the settings on the network connected to the Router’s Ethernet ports.
Advanced Configuration Chapter 3 be automatically assigned a new dynamic IP address. The default is 0 minutes, which means one day. DynDNS.org Static DNS 1-3 The Domain Name System (DNS) is how the Internet translates domain or website names into Internet addresses or URLs. Your ISP will provide you with at least one DNS Server IP Address. If you wish to use another, enter that IP Address in one of these fields. You can enter up to three DNS Server IP Addresses here.
Advanced Configuration Chapter 3 E-mail Address, TZO Key, and Domain Name Enter the settings of the account you set up with TZO. Internet IP Address The Router’s Internet IP address is displayed here. Because it is dynamic, it will change. Status The status of the DDNS service connection is displayed here. Update To manually trigger an update, click this button. Click Save Settings to apply your changes, or click Cancel Changes to cancel your changes.
Advanced Configuration Chapter 3 Gateway This is the IP address of the gateway device that allows for contact between the Router and the remote network or host. Interface This interface tells you whether the Destination IP Address is on the LAN & Wireless (Ethernet and wireless networks) or the WAN (Internet). Click Show Routing Table to view the static routes you have already set up.
Advanced Configuration Chapter 3 for Wireless-N. If you are not sure which channel to select, keep the default, Auto. SSID Broadcast When wireless clients survey the local area for wireless networks to associate with, they will detect the SSID broadcast by the Router. To broadcast the Router’s SSID, keep the default setting, Enabled. If you do not want to broadcast the Router’s SSID, then select Disabled. Click Save Settings to apply your changes, or click Cancel Changes to cancel your changes.
Advanced Configuration Chapter 3 WPA Personal WPA Enterprise NOTE: If you are using WPA, always remember that each device in your wireless network MUST use the same WPA method and shared key, or else the network will not function properly. This option features WPA used in coordination with a RADIUS server. (This should only be used when a RADIUS server is connected to the Router.
Advanced Configuration Chapter 3 type of algorithm, AES or AES or TKIP. The default is AES or TKIP. RADIUS Server Enter the IP address of the RADIUS server. RADIUS This option features WEP used in coordination with a RADIUS server. (This should only be used when a RADIUS server is connected to the Router.) RADIUS Port Enter the port number of the RADIUS server. The default value is 1812. Shared Secret Enter the key shared between the Router and the server.
Advanced Configuration Chapter 3 WEP WEP is a basic encryption method, which is not as secure as WPA/WPA2. Wireless > Wireless MAC Filter Wireless access can be filtered by using the MAC addresses of the wireless devices transmitting within your network’s radius. Security Mode > WEP Encryption Select a level of WEP encryption, 40/64 bits (10 hex digits) or 104/128 bits (26 hex digits). The default is 40/64 bits (10 hex digits). Passphrase Enter a Passphrase to automatically generate WEP keys.
Advanced Configuration Chapter 3 Advanced Wireless AP Isolation This isolates all wireless clients and wireless devices on your network from each other. Wireless devices will be able to communicate with the Router but not with each other. To use this function, select Enabled. AP Isolation is disabled by default. Wireless Client List Wireless Client List This screen shows computers and other devices on the wireless network.
Advanced Configuration Chapter 3 N and Wireless-G transmissions but will severely decrease performance. The default is Auto. Beacon Interval Enter a value between 20 and 999 milliseconds. The Beacon Interval value indicates the frequency interval of the beacon. A beacon is a packet broadcast by the Router to synchronize the wireless network. The default value is 100.
Advanced Configuration Chapter 3 sites created using this programming language. Select this feature to enable Java filtering. Deselect the feature to allow Java usage. ActiveX ActiveX is a programming language for websites. If you deny ActiveX, you run the risk of not having access to Internet sites created using this programming language. Select this feature to enable ActiveX filtering. Deselect the feature to allow ActiveX usage.
Advanced Configuration Chapter 3 6. Decide which days and what times you want this policy to be enforced. Select the individual days during which the policy will be in effect, or select Everyday. Then enter a range of hours and minutes during which the policy will be in effect, or select 24 Hours. 7. You can block websites with specific URL addresses. Enter each URL in a separate Website Blocking by URL Address field. 8. You can also block websites using specific keywords.
Chapter 3 Advanced Configuration Applications and Gaming > Port Range Forwarding The Port Range Forwarding screen allows you to set up public services on your network, such as web servers, ftp servers, e-mail servers, or other specialized Internet applications. (Specialized Internet applications are any applications that use Internet access to perform functions such as videoconferencing or online gaming. Some Internet applications may not require any forwarding.
Advanced Configuration Chapter 3 Enabled Select Enabled to enable port forwarding for the applications you have defined. Click Save Settings to apply your changes, or click Cancel Changes to cancel your changes. one PC. The Port Range Forwarding feature is more secure because it only opens the ports you want to have opened, while DMZ hosting opens all the ports of one computer, exposing the computer to the Internet.
Advanced Configuration Chapter 3 much time is left for the current IP address). To remove a DHCP client, click Delete. To retrieve the most up-todate information, click Refresh. To exit this screen and return to the DMZ screen, click Close. Click Save Settings to apply your changes, or click Cancel Changes to cancel your changes.
Advanced Configuration Chapter 3 Enter a Name Enter a name for your voice device. Online Games MAC Address Enter the MAC address of your voice device. Priority Select the appropriate priority: (Recommend), Medium, Normal, or Low. QoS > Online Games High Click Add to save your changes. Your new entry will appear in the Summary list. Games Select the appropriate game. Summary Priority Select the appropriate priority: High, Medium (Recommend), Normal, or Low.
Advanced Configuration Chapter 3 Management NOTE: When you are in a remote location and wish to manage the Router, enter http://:port or https://:port, depending on whether you use HTTP or HTTPS. Enter the Router’s specific Internet IP address in place of , and enter the Remote Management Port number in place of the word port.
Advanced Configuration Chapter 3 Log Administration > Diagnostics Log To disable the Log function, keep the default setting, Disabled. To monitor traffic between the network and the Internet, select Enabled. With logging enabled, you can choose to view temporary logs. The diagnostic tests (Ping and Traceroute) allow you to check the connections of your network devices, including connection to the Internet. View Log To view the logs, click View Log.
Advanced Configuration Chapter 3 Start to Traceroute To run the test, click this button. The Traceroute Test screen will show if the test was successful. Click Close to return to the Diagnostics screen. Administration > Firmware Upgrade The Firmware Upgrade screen allows you to upgrade the Router’s firmware. Do not upgrade the firmware unless you are experiencing problems with the Router or the new firmware has a feature you want to use.
Advanced Configuration Chapter 3 Status > Router Status > Local Network The Router screen displays information about the Router and its current settings. The Local Network screen displays information about the local, wired network. Status > Local Network Local Network Status > Router Router Information Firmware Version This is the version number of the Router’s current firmware. Current Time This shows the time set on the Router.
Advanced Configuration Chapter 3 DHCP Client Table The DHCP Client Table lists computers and other devices that have been assigned IP addresses by the Router. The list can be sorted by Client Name, Interface, IP Address, MAC Address, and Expired Time (how much time is left for the current IP address). To remove a DHCP client, click Delete. To retrieve the most up-todate information, click Refresh. To exit this screen and return to the Local Network screen, click Close.
Troubleshooting Appendix A Appendix A: Troubleshooting Your computer cannot connect to the Internet. When you double-click the web browser, you are prompted for a username and password. If you want to get rid of the prompt, follow these instructions. Launch the web browser and perform the following steps (these steps are specific to Internet Explorer but are similar for other browsers): Follow these instructions until your computer can connect to the Internet: 1. Select Tools > Internet Options.
Specifications Appendix B Appendix B: Specifications Model WRT110 Standards IEEE 802.11g, IEEE 802.11b, IEEE 802.3, IEEE 802.3u Ports Internet: One 10/100 RJ-45 Port Ethernet: Four 10/100 RJ-45 Ports One Power Port Buttons One Reset Button LEDs Power, Ethernet (1-4), Internet, Wireless, Security Cabling Type CAT 5e Number of Antennas 2 Detachable No RF Pwr (EIRP) in dBm 16.5 dBm Antenna Gain in dBi 1.
Appendix C Appendix C: Warranty Information Limited Warranty Linksys warrants this Linksys hardware product against defects in materials and workmanship under normal use for the Warranty Period, which begins on the date of purchase by the original end-user purchaser and lasts for the period specified below: •• One (1) year for new product •• Ninety (90) days for refurbished product This limited warranty is non-transferable and extends only to the original end-user purchaser.
Appendix C Warranty Information rejected. Do not include any other items with the product you are returning to Linksys. Defective product covered by this limited warranty will be repaired or replaced and returned to you without charge. Customers outside of the United States of America and Canada are responsible for all shipping and handling charges, custom duties, VAT and other associated taxes and charges.
Regulatory Information Appendix D Appendix D: Regulatory Information Safety Notices FCC Statement •• Do not use this product near water, for example, in a This device complies with Part 15 of the FCC Rules. Operation is subject to the following two conditions: (1) This device may not cause harmful interference, and (2) this device must accept any interference received, including interference that may cause undesired operation. •• Avoid using this product during an electrical storm.
Appendix D Avis d’Industrie Canada Cet appareil est conforme aux normes NMB003 et RSS210 d’Industrie Canada. L’utilisation de ce dispositif est autorisée seulement aux conditions suivantes : 1. il ne doit pas produire de brouillage et 2. il doit accepter tout brouillage radioélectrique reçu, même si ce brouillage est susceptible de compromettre le fonctionnement du dispositif. Le dispositif a été conçu pour fonctionner avec une antenne ayant un gain maximum de 2 dBi.
Appendix D User Information for Consumer Products Covered by EU Directive 2002/96/EC on Waste Electric and Electronic Equipment (WEEE) This document contains important information for users with regards to the proper disposal and recycling of Linksys products.
Appendix D Regulatory Information Eesti (Estonian) - Keskkonnaalane informatsioon Euroopa Liidus asuvatele klientidele Français (French) - Informations environnementales pour les clients de l’Union européenne Euroopa Liidu direktiivi 2002/96/EÜ nõuete kohaselt on seadmeid, millel on tootel või pakendil käesolev sümbol , keelatud kõrvaldada koos sorteerimata olmejäätmetega. See sümbol näitab, et toode tuleks kõrvaldada eraldi tavalistest olmejäätmevoogudest.
Appendix D Regulatory Information Lietuvškai (Lithuanian) - Aplinkosaugos informacija, skirta Europos Sąjungos vartotojams Nederlands (Dutch) - Milieu-informatie voor klanten in de Europese Unie Europos direktyva 2002/96/EC numato, kad įrangos, kuri ir kurios pakuotė yra pažymėta šiuo simboliu (įveskite simbolį), negalima šalinti kartu su nerūšiuotomis komunalinėmis atliekomis. Šis simbolis rodo, kad gaminį reikia šalinti atskirai nuo bendro buitinių atliekų srauto.
Appendix D Regulatory Information Português (Portuguese) - Informação ambiental para clientes da União Europeia Slovenčina (Slovene) - Okoljske informacije za stranke v Evropski uniji A Directiva Europeia 2002/96/CE exige que o equipamento que exibe este símbolo no produto e/ou na sua embalagem não seja eliminado junto com os resíduos municipais não separados. O símbolo indica que este produto deve ser eliminado separadamente dos resíduos domésticos regulares.
Appendix E Appendix E: Software License Agreement Software in Linksys Products This product from Cisco-Linksys LLC or from one of its affiliates Cisco Systems-Linksys (Asia) Pte Ltd. or CiscoLinksys K.K. (“Linksys”) contains software (including firmware) originating from Linksys and its suppliers and may also contain software from the open source community. Any software originating from Linksys and its suppliers is licensed under the Linksys Software License Agreement contained at Schedule 1 below.
Software License Agreement Appendix E used in accordance with the terms of this Agreement; (iii) to provide improvements to the way Linksys delivers technology to you and to other Linksys customers; (iv) to enable Linksys to comply with the terms of any agreements it has with any third parties regarding your Linksys product and/or Software and/or (v) to enable Linksys to comply with all applicable laws and/or regulations, or the requirements of any regulatory authority or government agency.
Appendix E freedom to share and change free software–to make sure the software is free for all its users. This General Public License applies to most of the Free Software Foundation’s software and to any other program whose authors commit to using it. (Some other Free Software Foundation software is covered by the GNU Lesser General Public License instead.) You can apply it to your programs, too. When we speak of free software, we are referring to freedom, not price.
Appendix E c. If the modified program normally reads commands interactively when run, you must cause it, when started running for such interactive use in the most ordinary way, to print or display an announcement including an appropriate copyright notice and a notice that there is no warranty (or else, saying that you provide a warranty) and that users may redistribute the program under these conditions, and telling the user how to view a copy of this License.
Software License Agreement Appendix E 7. If, as a consequence of a court judgment or allegation of patent infringement or for any other reason (not limited to patent issues), conditions are imposed on you (whether by court order, agreement or otherwise) that contradict the conditions of this License, they do not excuse you from the conditions of this License.
Appendix E This product includes software written by Tim Hudson (tjh@cryptsoft.com). In addition, if this Linksys product contains open source software licensed under the OpenSSL license then the license terms below in this Schedule 3 will apply to that open source software. The license terms below in this Schedule 3 are from the public web site at http://www.openssl.org/source/license.html. The OpenSSL toolkit stays under a dual license, i.e.
Appendix E Software License Agreement The word ‘cryptographic’ can be left out if the routines from the library being used are not cryptographic related. 4. If you include any Windows specific code (or a derivative thereof ) from the apps directory (application code) you must include an acknowledgement: “This product includes software written by Tim Hudson (tjh@ cryptsoft.