
Universal Broadband Router Hardware Installation Guide


B-7
Cisco uBR10012 Universal Broadband Router Hardware Installation Guide
OL-18259-01
Appendix B Cable Specifications
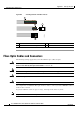
Connecting a Cable to an RJ-45 Connector
Connecting a Cable to an RJ-45 Connector
Use the following information to build your own cables with RJ45 connectors.
Tools
• Category 3cable or Category 5 cable
• RJ45 connectors
• Wire stripping tool
• Crimping tool—for the RJ45 connector
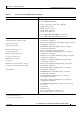
Step 1 Use the wire stripper to cut the outer jacket of the wire about 1 inch to 1.5 inches from the end of the
cable.
Caution When cutting the cable jacket, make sure that you do not damage the wires in the jacket.
Step 2 Arrange the wires in the order that you want to install them into the RJ45 connector.
Note The order of the wires is dependant on what type of connection you are making: crossover,
rollover, or straight-through.
Step 3 After arranging the wires in the correct order, cut them back so there is about 1/2 inch available to install
in the connector.
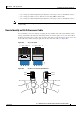
Step 4 Push the cable into the connector so that the jacket is past the plastic wedge at the rear of the connector
and the wires are at the end of the connector underneath the gold crimping pins. Make sure each wire
goes into the appropriate location.
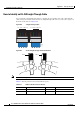
Step 5 Use your crimping tool to crimp the cable. Check your connection by tugging slightly on the cable.
Recrimp as necessary.
Note When you use the crimping tool, the plastic wedge is pressed into the cable jacket to hold the
cable in place and the crimping pins are pushed down into the wires in the connector channels.