
Universal Broadband Router Hardware Installation Guide


3-22
Cisco uBR10012 Universal Broadband Router Hardware Installation Guide
OL-18259-01
Chapter 3 Installing the Cisco uBR10012 Router
Mounting the Chassis in the Rack
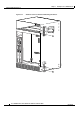
Step 2 Align the mounting holes on the far left and far right on the bracket first, so that the center mounting
hole will be aligned properly.
Step 3 Use the three screws that are provided in the accessory kit to attach the bracket to the chassis.
Step 4 Attach the bottom cabl- management bracket in a similar manner, making sure that the slot edge of the
bracket is pointing down. See
Figure 3-17.
Note Make sure that the slot edge on the bracket is pointed downward, otherwise the bracket interferes
with the insertion and removal of the cable interface line cards.
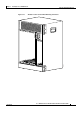
Step 5 Insert cable ties through the slots on the top and bottom of the brackets and use the cable ties as needed
to secure the cables for the line card interfaces along the top and bottom of the chassis.
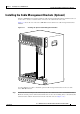
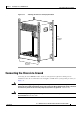
Mounting the Chassis in the Rack
With the fan assembly, PEMs, and line cards removed from the chassis and the mounting brackets
installed on the chassis, the Cisco
uBR10012 chassis is ready for installation in a 19-inch equipment rack
or telco rack. Use the following procedure to install the chassis.
Tip (Optional) Install a shelf in the rack to support the Cisco uBR10012 router chassis. This simplifies
installation and provides additional support for the chassis. If you are installing an equipment shelf, it
must be able to support the weight of a fully loaded chassis which is approximately 230 lbs (104.3 kg).
Tip If you are installing the chassis in an equipment rack, it is helpful to have a third person available to
maneuver the chassis into position and attach the brackets to the rack.
Warning
To prevent bodily injury when mounting or servicing this unit in a rack, you must take special
precautions to ensure that the system remains stable. The following guidelines are provided to
ensure your safety:
• This unit should be mounted at the bottom of the rack if it is the only unit in the rack.
• When mounting this unit in a partially filled rack, load the rack from the bottom to the top with the heaviest
component at the bottom of the rack.
• If the rack is provided with stabilizing devices, install the stabilizers before mounting or servicing the unit in
the rack.
Statement 1006