
User's Manual


attribute ID of 1.3.6.1.4.1.9.287247.1. For more information about altering the Active Directory schema, see
the article at http://technet.microsoft.com/en-us/library/bb727064.aspx.
The following steps are to be performed on the Active Directory server.
This example creates a custom attribute named CiscoAVPair, but you can also use an existing LDAP
attribute that is mapped to the CIMC user roles and locales.
Note
Procedure
Step 1
Ensure that the Active Directory schema snap-in is installed.
Step 2
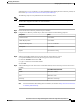
Using the Active Directory schema snap-in, add a new attribute with the following properties:
ValueProperties
CiscoAVPairCommon Name
CiscoAVPairLDAP Display Name
1.3.6.1.4.1.9.287247.1Unique X500 Object ID
CiscoAVPairDescription
Case Sensitive StringSyntax
Step 3
Add the CiscoAVPair attribute to the user class using the Active Directory snap-in:
a) Expand the Classes node in the left pane and type U to select the user class.
b) Click the Attributes tab and click Add.
c) Type C to select the CiscoAVPair attribute.
d) Click OK.
Step 4
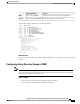
Add the following user role values to the CiscoAVPair attribute, for the users that you want to have access
to CIMC:
CiscoAVPair Attribute ValueRole
shell:roles="admin"admin
shell:roles="user"user
shell:roles="read-only"read-only
For more information about adding values to attributes, see the article at http://technet.microsoft.com/
en-us/library/bb727064.aspx.
Note
Cisco UCS C-Series Servers Integrated Management Controller CLI Configuration Guide, Release 1.5
OL-28893-01 67
Managing User Accounts
Configuring the Active Directory Server