Quick Start Guide Cisco Small Business RV215W Wireless-N VPN Firewall Package Contents • Wireless-N VPN Firewall • Ethernet Cable • Power Adapter • Quick Start Guide • Documentation and software on CD-ROM Version en français sur CD
Welcome Thank you for choosing the Cisco Small Business RV215W Wireless-N VPN Firewall. This guide describes how to physically install your Cisco RV215W and launch the web-based Device Manager. 1 Installing the Cisco RV215W Placement Tips To prevent the firewall from overheating or being damaged: • Ambient Temperature—Do not operate it in an area that exceeds an ambient temperature of 104°F (40°C). • Air Flow—Be sure that there is adequate air flow around the firewall.
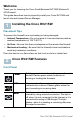
Wireless LAN (1-4) The light is off when the wireless radio is disabled (switched off). It flashes green when the wireless radio is transmitting or receiving data. The button, when held for 5 seconds or more, switches the wireless radio on or off. The button and the LED is lit green when the wireless radio is enabled (switched on). The numbered lights correspond to the LAN ports on the back panel. Lit green when the corresponding port is connected to a device.
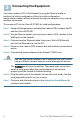
Connecting the Equipment 3 You must connect a PC to the firewall by using an Ethernet cable to perform the initial configuration. After the initial configuration, administrative tasks can be performed through the network or by using a wireless connection. To connect a PC to the Cisco RV215W for initial configuration: STEP 1 Power off all equipment, including the cable or DSL modem, the PC, and the Cisco RV215W.
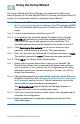
4 Using the Setup Wizard The Setup Wizard and Device Manager are supported on Microsoft Internet Explorer 6.0 or later, Mozilla Firefox 3.0 or later, and Apple Safari 3.0 or later. To configure the firewall by using the Setup Wizard: STEP 1 Power on the PC that you connected to the LAN1 port in Step 3 of the Connecting the Equipment section. Your PC becomes a DHCP client of the firewall and receives an IP address in the 192.168.1.xxx range. STEP 2 Launch a web browser window on your PC.
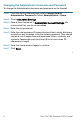
Changing the Administrator Username and Password To change the Administrator username and password on the firewall: STEP 1 From the Getting Started page, select Change Default Administrator Password or select Administration > Users. STEP 2 Check Edit Admin Settings. STEP 3 Enter a New Username in Administrator Account Settings. We recommend that you do not use cisco. STEP 4 Enter the old password. STEP 5 Enter the new password.
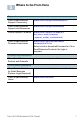
5 Where to Go From Here Support Cisco Small Business Support Community www.cisco.com/go/smallbizsupport Cisco Small Business Support and Resources www.cisco.com/go/smallbizhelp Phone Support Contacts www.cisco.com/en/US/support/ tsd_cisco_small_business _support_center_contacts.html Cisco Small Business Firmware Downloads www.cisco.com/cisco/software/ navigator.html?i=!ch Select a link to download firmware for Cisco Small Business Products. No login is required.
Americas Headquarters Cisco Systems, Inc. 170 West Tasman Drive San Jose, CA 95134-1706 USA www.cisco.com Small Business Support, Global: www.cisco.com/go/sbsc 78-20778-01 Cisco and the Cisco logo are trademarks or registered trademarks of Cisco and/or its affiliates in the U.S. and other countries. To view a list of Cisco trademarks, go to this URL: www.cisco.com/go/trademarks. Third-party trademarks mentioned are the property of their respective owners.