
Router Getting Started Guide


4-9
Cisco IOS XR Getting Started Guide
OL-10957-02
Chapter 4 Configuring General Router Features
Connecting and Communicating with the Router
To establish a connection through a terminal server, perform the following procedure:
SUMMARY STEPS
1. Install and configure the terminal server.
2. Connect the terminal server to the Console port of the target RP or DRP.
3. Power on the router.
4. Identify the target RP or DRP.
5. telnet access-server-address port
6. Press Enter.
7. Log in to the router.
DETAILED STEPS
Command or Action Purpose
Step 1
Install and configure the terminal server. Prepares the terminal server for communications with the
router and with Telnet clients.
• This step is usually preformed once.
• For router access, users need the Telnet server IP
address and port number for each RP they access.
• For additional information on configuring terminal
services, including terminal servers and templates, see
the Cisco IOS XR System Management Configuration
Guide.
Step 2
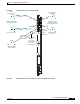
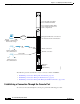
Connect the terminal server to the Console port of the
target RP or DRP.
Establishes a communications path between the terminal
server and the router.
• During the initial router setup, you can communicate
with the router only through the Console port of the
primary RP.
• The router Console port is designed for a serial cable
connection to a terminal or terminal server.
• The terminal settings are:
–
Bits per second: 9600/9600
–
Data bits: 8
–
Parity: None
–
Stop bit: 2
–
Flow control: None
• For information on the cable requirements for the
Console port, see the hardware documentation listed in
the “Related Documents” section on page x.
• To enable terminal server connections to the Console
ports on multiple RPs and DRPs, install a cable
between each Console port and the terminal server.