Cisco IOS XR Getting Started Guide Cisco IOS XR Software Release 3.4 Americas Headquarters Cisco Systems, Inc. 170 West Tasman Drive San Jose, CA 95134-1706 USA http://www.cisco.
THE SPECIFICATIONS AND INFORMATION REGARDING THE PRODUCTS IN THIS MANUAL ARE SUBJECT TO CHANGE WITHOUT NOTICE. ALL STATEMENTS, INFORMATION, AND RECOMMENDATIONS IN THIS MANUAL ARE BELIEVED TO BE ACCURATE BUT ARE PRESENTED WITHOUT WARRANTY OF ANY KIND, EXPRESS OR IMPLIED. USERS MUST TAKE FULL RESPONSIBILITY FOR THEIR APPLICATION OF ANY PRODUCTS.
CONTENTS Preface ix Changes to This Document ix About This Document ix Intended Audience x Organization of the Document Related Documents x Conventions xi x Obtaining Documentation xi Cisco.
Contents Connecting to the Router Through the Console Port Where to Go Next CHAPTER 2 1-14 Bringing Up the Cisco IOS XR Software on a Standalone Router Contents Bringing Up and Configuring a Standalone Router Verifying the System After Initial Bring-Up Where to Go Next 3 2-2 2-2 2-4 2-8 Bringing Up the Cisco IOS XR Software on a Multishelf System Contents 2-1 2-1 Prerequisites 2-1 Software Requirements 2-1 Hardware Prerequisites and Documentation CHAPTER 1-9 3-1 3-1 Prerequisites 3-1 Softw
Contents Verifying the Spanning Tree 3-39 Verifying Fabric Cabling Connections Where to Go Next CHAPTER 4 3-47 Configuring General Router Features Contents 3-43 4-1 4-1 Secure Domain Routers 4-1 Connecting and Communicating with the Router 4-2 Establishing a Connection Through the Console Port 4-6 Establishing a Connection Through a Terminal Server 4-8 Establishing a Connection Through the Management Ethernet Interface Logging In to a Router or an SDR CLI Prompt 4-10 4-11 4-12 User Access P
Contents Configuring the Management Ethernet Interface 4-39 Specifying the Management Ethernet Interface Name in CLI Commands Displaying the Available Management Ethernet Interfaces 4-40 Configuring the Management Ethernet Interface 4-41 Manually Setting the Router Clock Where to Go Next CHAPTER 5 4-44 4-46 Configuring Additional Router Features Contents 4-39 5-1 5-1 Configuring the Domain Name and Domain Name Server Configuring Telnet, HTTP, and XML Host Services Prerequisites 5-2 5-1 5-2 Mana
Contents CHAPTER 6 CLI Tips, Techniques, and Shortcuts Contents 6-1 6-1 CLI Tips and Shortcuts 6-1 Entering Abbreviated Commands 6-2 Using the Question Mark (?) to Display On-Screen Command Help Completing a Partial Command with the Tab Key 6-4 Identifying Command Syntax Errors 6-4 Using the no Form of a Command 6-5 Editing Command Lines that Wrap 6-5 Displaying System Information with show Commands 6-5 Common show Commands 6-6 Browsing Display Output when the --More-- Prompt Appears Halting the Displ
Contents Using the ping Command 7-3 Using the traceroute Command Using debug Commands 7-5 7-4 Configuration Error Messages 7-7 Configuration Failures During a Commit Operation Configuration Errors at Startup 7-8 7-8 Memory Warnings in Configuration Sessions 7-9 Understanding Low-Memory Warnings in Configuration Sessions 7-9 Displaying System Memory Information 7-10 Removing Configurations to Resolve Low-Memory Warnings 7-11 Contacting TAC for Additional Assistance 7-13 Interfaces Not Coming Up 7-13 Ver
Preface This guide describes how to create the initial configuration for a router using the Cisco IOS XR software. This guide also describes how to complete additional administration, maintenance, and troubleshooting tasks that may be required after initial configuration.
Preface About This Document • Intended Audience, page x • Organization of the Document, page x • Related Documents, page x • Conventions, page xi Intended Audience This document is intended for the following people: • Experienced service provider administrators • Cisco telecommunications management engineers • Third-party field service technicians who have completed the Cisco IOS XR software training sessions • Customers who daily use and manage routers running Cisco IOS XR software Organiz
Preface Obtaining Documentation Note Cisco IOS XR software runs only on the Cisco XR 12000 Series Routers listed in the “Supported Standalone System Configurations” section on page 1 in Chapter 1, “Introduction to Cisco IOS XR Software.
Preface Documentation Feedback You can access the Cisco website at this URL: http://www.cisco.com You can access international Cisco websites at this URL: http://www.cisco.com/public/countries_languages.shtml Product Documentation DVD The Product Documentation DVD is a library of technical product documentation on a portable medium. The DVD enables you to access installation, configuration, and command guides for Cisco hardware and software products.
Preface Product Alerts and Field Notices A current list of security advisories, security notices, and security responses for Cisco products is available at this URL: http://www.cisco.com/go/psirt To see security advisories, security notices, and security responses as they are updated in real time, you can subscribe to the Product Security Incident Response Team Really Simple Syndication (PSIRT RSS) feed. Information about how to subscribe to the PSIRT RSS feed is found at this URL: http://www.cisco.
Preface Obtaining Technical Assistance To access the Product Alert Tool, you must be a registered Cisco.com user. (To register as a Cisco.com user, go to this URL: http://tools.cisco.com/RPF/register/register.do) Registered users can access the tool at this URL: http://tools.cisco.com/Support/PAT/do/ViewMyProfiles.do?local=en Obtaining Technical Assistance Cisco Technical Support provides 24-hour-a-day award-winning technical assistance. The Cisco Technical Support & Documentation website on Cisco.
Preface Obtaining Additional Publications and Information Submitting a Service Request Using the online TAC Service Request Tool is the fastest way to open S3 and S4 service requests. (S3 and S4 service requests are those in which your network is minimally impaired or for which you require product information.) After you describe your situation, the TAC Service Request Tool provides recommended solutions.
Preface Obtaining Additional Publications and Information • Cisco Marketplace provides a variety of Cisco books, reference guides, documentation, and logo merchandise. Visit Cisco Marketplace, the company store, at this URL: http://www.cisco.com/go/marketplace/ • Cisco Press publishes a wide range of general networking, training, and certification titles. Both new and experienced users will benefit from these publications.
CH A P T E R 1 Introduction to Cisco IOS XR Software This chapter introduces the routers that support Cisco IOS XR software and the user interfaces you can use to manage routers that run Cisco IOS XR software.
Chapter 1 Introduction to Cisco IOS XR Software Cisco CRS-1 Multishelf System Overview Note Many cards operate in both Cisco XR 12000 Series routers and in Cisco 12000 Series routers. For the latest information on which cards are supported by the Cisco IOS XR software in Cisco XR 12000 Series routers and Cisco 12000 Series routers, see Release Notes for Cisco IOS XR Software Release 3.4. The Cisco IOS XR software also runs on Cisco CRS-1 Multishelf Systems, which are described in the following section.
Chapter 1 Introduction to Cisco IOS XR Software Cisco CRS-1 Multishelf System Overview Figure 1-1 Single-FCC Multishelf System 3 2 1 Cisco CRS-1 16-Slot Line Card Chassis (two 3 required) 2 Cisco CRS-1 Fabric Card Chassis (one required) FAN OK OUTPUT FAIL INPUT OK FAN OK OUTPUT FAIL INPUT OK FAN OK OUTPUT FAIL INPUT OK FAN OK OUTPUT FAIL 1 129492 1 INPUT OK 3 Cisco Catalyst 6509 Switch (two suggested) Cisco IOS XR Getting Started Guide OL-10957-02 1-3
Chapter 1 Introduction to Cisco IOS XR Software Cisco CRS-1 Multishelf System Overview Figure 1-2 Two-FCC Multishelf System 3 2 1 Cisco CRS-1 16-Slot Line Card Chassis (two 3 required) 2 Cisco CRS-1 Fabric Card Chassis (two required) 1 FAN OK OUTPUT FAIL INPUT OK FAN OK OUTPUT FAIL INPUT OK FAN OK OUTPUT FAIL INPUT OK FAN OK OUTPUT FAIL 3 158260 1 INPUT OK Cisco Catalyst 6509 Switch (two suggested) Cisco IOS XR Getting Started Guide 1-4 OL-10957-02
Chapter 1 Introduction to Cisco IOS XR Software Cisco CRS-1 Multishelf System Overview Figure 1-3 Four-FCC Multishelf System 3 2 1 Cisco CRS-1 16-Slot Line Card Chassis (two 3 required) 2 Cisco CRS-1 Fabric Card Chassis (four required) FAN OK OUTPUT FAIL INPUT OK FAN OK OUTPUT FAIL INPUT OK FAN OK OUTPUT FAIL INPUT OK FAN OK OUTPUT FAIL 1 149632 1 INPUT OK 3 Cisco Catalyst 6509 Switch (two suggested) For more information on multishelf systems, see Chapter 3, “Bringing Up the Cisco
Chapter 1 Introduction to Cisco IOS XR Software Router Management Interfaces Router Management Interfaces Because new routers are not yet configured for your environment, you must start configuration using the command-line interface (CLI). This guide provides instructions on using the CLI to configure basic router features.
Chapter 1 Introduction to Cisco IOS XR Software Selecting and Identifying the Designated Shelf Controller sends the response to the client in the form of encoded XML API tags. The XML API supports readily available transport layers, including Telnet, Secure Shell (SSH), and Common Object Request Broker Architecture (CORBA). The Secure Socket Layer (SSL) transport is also supported by the XML API.
Chapter 1 Introduction to Cisco IOS XR Software Selecting and Identifying the Designated Shelf Controller • Selecting and Identifying the DSC on Cisco CRS-1 Routers, page 1-8 • Selecting and Identifying the DSC on Cisco CRS-1 Multishelf Systems, page 1-8 • Selecting and Identifying the DSC on Cisco XR 12000 and 12000 Series Routers, page 1-9 Selecting and Identifying the DSC on Cisco CRS-1 Routers A Cisco CRS-1 router supports up to two RPs.
Chapter 1 Introduction to Cisco IOS XR Software Connecting to the Router Through the Console Port Note Any LCC can host the DSC. The FCC cannot host the DSC function. Selecting and Identifying the DSC on Cisco XR 12000 and 12000 Series Routers A Cisco XR 12000 or 12000 Series router supports multiple PRPs. When the router is started for the first time, the PRP in the lowest-numbered slot becomes the active PRP and is identified by the alphanumeric display: ACTV RP. The active PRP serves as the DSC.
Chapter 1 Introduction to Cisco IOS XR Software Connecting to the Router Through the Console Port Figure 1-4 Communication Ports on the RP for a Cisco CRS-1 16-Slot LCC RP RJ-45 cable Local terminal or terminal server for CLI communication Console AUX RJ-45 cable HDD Remote terminal for CLI communication PC Card (disk1:) CNTL ETH 0 Network Management Ethernet connection for out-of-band network communciation CNTL ETH 1 Optical Gigabit Ethernet for control plane: (not user configurable) MGMT E
Chapter 1 Introduction to Cisco IOS XR Software Connecting to the Router Through the Console Port Figure 1-5 Communication Ports on the RP for Cisco CRS-1 4-slot and 8-Slot LCCs RJ-45 cable Local terminal or terminal server for CLI communication Console Terminal connection AUX Modem connection RJ-45 cable ALARM PID/VID Remote terminal for CLI communication CRITICAL MAJOR MINOR Network Remote CLI, CWI, XML, or SNMP communication.
Chapter 1 Introduction to Cisco IOS XR Software Connecting to the Router Through the Console Port Figure 1-6 Communication Ports on the PRP-2 for a Cisco XR 12000 Series Router User-removable flash disk1 stores installation PIE files A second internal flash disk0 stores installed software and active configurations -1 OT SL 0 OT SL K LIN Ethernet cable ETH 0 Network TA DA K LIN ETH 1 TA DA Remote CLI, CWI, XML, or SNMP communication.
Chapter 1 Introduction to Cisco IOS XR Software Connecting to the Router Through the Console Port 6. Log in to the router. DETAILED STEPS Command or Action Step 1 Purpose Power on the standalone router, or power on Rack 0 in Starts the router or Rack 0. a multishelf system. • This step is required only if the power is not on. • Step 2 Identify the DSC. Identifies the RP to which you must connect in the next step. • Step 3 Connect a terminal to the Console port of the DSC.
Chapter 1 Introduction to Cisco IOS XR Software Where to Go Next Step 5 Step 6 Command or Action Purpose Press Enter. Initiates communication with the router. Log in to the router. • If no text or router prompt appears when you connect to the console port, press Enter to initiate communications. • If no text appears when you press Enter, give the router more time to complete the initial boot procedure, then press Enter. • If the prompt gets lost among display messages, press Enter again.
CH A P T E R 2 Bringing Up the Cisco IOS XR Software on a Standalone Router This chapter provides instructions for bringing up the Cisco IOS XR software on a standalone router for the first time. This section applies to standalone routers that are delivered with Cisco IOS XR software installed.
Chapter 2 Bringing Up the Cisco IOS XR Software on a Standalone Router Bringing Up and Configuring a Standalone Router Caution The ROM Monitor software must be upgraded to version 1.42 or a later version on all RPs before a Cisco CRS-1 system is upgraded to Cisco IOS XR Software Release 3.4.0 or a later release. If the router is brought up with an incompatible version of the ROM Monitor software, then the standby RP may fail to boot.
Chapter 2 Bringing Up the Cisco IOS XR Software on a Standalone Router Bringing Up and Configuring a Standalone Router DETAILED STEPS Step 1 Command or Action Purpose Establish a connection to the DSC Console port. Initiates communication with the router. • For instructions on connecting to the Console port, see the “Connecting to the Router Through the Console Port” section on page 1-9.
Chapter 2 Bringing Up the Cisco IOS XR Software on a Standalone Router Verifying the System After Initial Bring-Up User Access Verification Username: cisco Password: RP/0/0/CPU0:ios# The secret line in the configuration command script shows that the password is encrypted. When you enter the password during configuration and login, the password is hidden. Verifying the System After Initial Bring-Up To verify the status of the router, perform the following procedure: SUMMARY STEPS 1. show version 2.
Chapter 2 Bringing Up the Cisco IOS XR Software on a Standalone Router Verifying the System After Initial Bring-Up Step 3 Command or Action Purpose show redundancy Displays the state of the primary (active) and standby (inactive) RPs, including the ability of the standby to take control of the system.
Chapter 2 Bringing Up the Cisco IOS XR Software on a Standalone Router Verifying the System After Initial Bring-Up hfr-base, V 3.3.0[2I], Cisco Systems, at disk0:hfr-base-3.3.0 Built on Mon Mar 13 11:43:22 UTC 2006 By iox8.cisco.com in /auto/ioxws48/production/3.3.0.2I/hfr/workspace for c8 hfr-os-mbi, V 3.3.0[2I], Cisco Systems, at disk0:hfr-os-mbi-3.3.0 Built on Mon Mar 13 11:27:02 UTC 2006 By iox8.cisco.com in /auto/ioxws48/production/3.3.0.
Chapter 2 Bringing Up the Cisco IOS XR Software on a Standalone Router Verifying the System After Initial Bring-Up 0/1/*: Module (host) LED status says: OK 0/1/*: Module (jacket) LED status says: OK 0/1/*: Module (spa0) LED status says: OK 0/1/*: Module (spa5) LED status says: OK 0/6/*: Module (host) LED status says: OK 0/6/*: Module (jacket) LED status says: OK 0/6/*: Module (spa0) LED status says: OK 0/6/*: Module (spa4) LED status says: OK 0/6/*: Module (spa5) LED status says: OK 0/RP0/*: Module (host)
Chapter 2 Bringing Up the Cisco IOS XR Software on a Standalone Router Where to Go Next 0/SM2/SP 0/SM3/SP FC/S(SP) FC/S(SP) N/A N/A IOS XR RUN IOS XR RUN PWR,NSHUT,MON PWR,NSHUT,MON RP/0/RP0/CPU0:router# end Note Line cards in Cisco CRS-1 routers are called modular services cards (MSCs). The show platform command output is different for Cisco CRS-1 routers and Cisco XR 12000 Series Routers.
CH A P T E R 3 Bringing Up the Cisco IOS XR Software on a Multishelf System This chapter describes how to bring up the Cisco IOS XR software on a Cisco CRS-1 Carrier Routing System Multishelf System for the first time.
Chapter 3 Bringing Up the Cisco IOS XR Software on a Multishelf System Restrictions • Caution ROMMON 1.40 or higher on each RP in the system The ROM Monitor software must be upgraded to version 1.42 or a later version on all RPs before a Cisco CRS-1 system is upgraded to Cisco IOS XR Software Release 3.4.0 or a later release. If the router is brought up with an incompatible version of the ROM Monitor software, then the standby RP may fail to boot.
Chapter 3 Bringing Up the Cisco IOS XR Software on a Multishelf System Information About Bringing Up a Multishelf System Information About Bringing Up a Multishelf System The following sections provide information that is good to know before you bring up a multishelf system: • Bringup Overview, page 3-3 • Preparing a Rack Number Plan, page 3-3 Bringup Overview The bringup procedure for a multishelf system starts after the hardware installation is complete.
Chapter 3 Bringing Up the Cisco IOS XR Software on a Multishelf System Information About Bringing Up a Multishelf System Figure 3-1 DSC in a CRS-1/M-F1 Multishelf System Note OIM-LED 1 OIM23 OIM22 OIM21 SM0 SM1 SM2 SM3 OIM16 OIM15 OIM14 OIM13 OIM12 INPUT OK FAN OK OUTPUT FAIL INPUT OK FAN OK OUTPUT FAIL INPUT OK FAN OK OUTPUT FAIL INPUT OK FAN OK OUTPUT FAIL Catalyst 6509 Switches DSC 138118 Fabric Card Chassis Rack F0 OIM-LED 1 OIM23 OIM22 OIM21 SM4 RP (SC) RP (SC) SM7 OIM16 OIM15 OI
Chapter 3 Bringing Up the Cisco IOS XR Software on a Multishelf System Information About Bringing Up a Multishelf System Table 3-2 Chassis Sample Rack Number Plan for a Two-FCC Multishelf System Serial ID Rack Number LCC containing the active DSC 0 Non-DSC LCC 1 Fabric chassis 0 F0 Fabric chassis 1 F1 Table 3-3 shows a sample rack number plan for a four-FCC system.
Chapter 3 Bringing Up the Cisco IOS XR Software on a Multishelf System Information About Bringing Up a Multishelf System Figure 3-2 Location of the Serial Number on a Fabric Card Chassis SN: XXXNNNNXXXX 9 5 1 10 6 2 11 7 3 12 8 4 9 5 1 10 6 2 11 7 3 12 8 4 9 5 1 10 6 2 11 7 3 12 8 4 9 5 1 10 6 2 11 7 3 12 8 4 9 5 1 10 6 2 11 7 3 12 8 4 9 5 1 10 6 2 11 7 3 12 8 4 9 5 1 10 6 2 11 7 3 12 8 4 9 5 1 10 6 2 11 7 3 12 8 4 9 5 1 10 6 2 11 7 3 12 8 4 9 5 1 10 6 2 11 7 3 12 8 4 9 5 1 10 6 2 11 7 3 12
Chapter 3 Bringing Up the Cisco IOS XR Software on a Multishelf System Information About Bringing Up a Multishelf System Figure 3-3 Location of the Serial Number on a Line Card Chassis PWR OK FLT AC FAIL CB TRIP PWR OK FLT I LIM AC FAIL OT CB TRIP PWR OK FLT I LIM AC FAIL OT CB TRIP I LIM OT PWR OK FLT AC FAIL CB TRIP PWR OK FLT I LIM AC FAIL OT CB TRIP PWR OK FLT I LIM AC FAIL OT CB TRIP I LIM OT 116535 SN: AAANNNNXXXX Caution Always assign a rack number to each chassis in the
Chapter 3 Bringing Up the Cisco IOS XR Software on a Multishelf System Configuring the External Cisco Catalyst 6509 Switches • To display the configured chassis serial numbers in administration EXEC mode, see Cisco IOS XR System Management Configuration Guide, Release 3.4. • To display the chassis serial numbers in ROM Monitor, see Cisco IOS XR ROM Monitor Guide.
Chapter 3 Bringing Up the Cisco IOS XR Software on a Multishelf System Configuring the External Cisco Catalyst 6509 Switches Figure 3-4 Control Ethernet Network Connections in a Single-FCC System RP Catalyst Ethernet Switch RP Line Card Chassis SCGE SCGE Fabric Card Chassis Catalyst Ethernet Switch RP Line Card Chassis 138147 RP Prerequisites The following sections describe the software and hardware requirements for bringing up Catalyst 6509 switches in a multishelf system.
Chapter 3 Bringing Up the Cisco IOS XR Software on a Multishelf System Configuring the External Cisco Catalyst 6509 Switches • The recommended hardware configuration for an AC-powered Cisco Catalyst 6509 system is shown in the following table: Quantity Description Part 1 Catalyst 6509 Chassis, 9slot, 15RU, No Pow Supply, No Fan WS-C6509 Tray 1 Cisco CAT6000-SUP720 IOS IP (see Software Requirements for complete details).
Chapter 3 Bringing Up the Cisco IOS XR Software on a Multishelf System Configuring the External Cisco Catalyst 6509 Switches Information About the Catalyst Switch Configuration The configuration described in the following sections places all Catalyst ports in VLAN 1. The configuration on the Catalyst switches is the same as the configuration on the Cisco CRS-1 router internal Broadcom switches—they all participate in a Multiple Spanning Tree (MST) region with one MST instance.
Chapter 3 Bringing Up the Cisco IOS XR Software on a Multishelf System Configuring the External Cisco Catalyst 6509 Switches 19. switchport access vlan 1 20. end 21. Repeat Step 16 through Step 20 for all interfaces. 22. Repeat all steps for the second switch. DETAILED STEPS Step 1 Command or Action Purpose configure Places the switch in global configuration mode. Example: router# configure Step 2 spanning-tree portfast default Enables PortFast by default on all access ports.
Chapter 3 Bringing Up the Cisco IOS XR Software on a Multishelf System Configuring the External Cisco Catalyst 6509 Switches Step 10 Command or Action Purpose spanning-tree mst forward-time seconds Sets the forward-delay timer for all MST instances on the switch. Example: • We recommend 6 seconds. router(config)# spanning-tree mst forward-time 6 Step 11 spanning-tree mst max-age seconds Example: Sets the maximum-age timer for all MST instances on the switch. • We recommend 8 seconds.
Chapter 3 Bringing Up the Cisco IOS XR Software on a Multishelf System Configuring the External Cisco Catalyst 6509 Switches Step 19 Command or Action Purpose switchport access vlan 1 (Optional) Assigns ports to VLAN 1, which is the default selection. Example: router(config-if)# switchport access vlan 1 Step 20 Exits interface configuration mode and returns to global configuration mode. end Example: router(config-if)# end Step 21 Repeat Step 16 through Step 20 for all interfaces.
Chapter 3 Bringing Up the Cisco IOS XR Software on a Multishelf System Configuring the External Cisco Catalyst 6509 Switches CAT6k-2(config-mst)# revision 1 CAT6k-2(config-mst)# instance 1 vlan 1 CAT6k-2(config-mst)# end CAT6k-2(config)# spanning-tree mst hello-time 1 CAT6k-2(config)# spanning-tree mst forward-time 6 CAT6k-2(config)# spanning-tree mst max-age 8 CAT6k-2(config)# spanning-tree mst max-hops 4 CAT6k-2(config)# spanning-tree mst 0-1 priority 28672 CAT6k-2(config)# udld aggressive CAT6k-2(confi
Chapter 3 Bringing Up the Cisco IOS XR Software on a Multishelf System Configuring the External Cisco Catalyst 6509 Switches instance 1 vlan 1 ! spanning-tree mst hello-time 1 spanning-tree mst forward-time 6 spanning-tree mst max-age 8 spanning-tree mst 0-1 priority 28672 diagnostic cns publish cisco.cns.device.diag_results diagnostic cns subscribe cisco.cns.device.
Chapter 3 Bringing Up the Cisco IOS XR Software on a Multishelf System Configuring the External Cisco Catalyst 6509 Switches switchport mode access spanning-tree portfast ! interface GigabitEthernet1/9 no ip address switchport switchport mode access spanning-tree portfast ! interface GigabitEthernet1/10 no ip address switchport switchport mode access spanning-tree portfast ! interface GigabitEthernet1/11 no ip address switchport switchport mode access spanning-tree portfast ! interface GigabitEthernet1/12
Chapter 3 Bringing Up the Cisco IOS XR Software on a Multishelf System Configuring the External Cisco Catalyst 6509 Switches no ip http server ! ! ! ! ! line con 0 line vty 0 4 login ! End Verifying the Catalyst Switch As each rack in the multishelf system is brought up, verify that the Catalyst switch links are operating correctly by completing the tasks in the following sections: • Verify the Interface Status, page 3-18 • Verify Communication Between the Catalyst Switch and an LCC or FCC, page 3-18
Chapter 3 Bringing Up the Cisco IOS XR Software on a Multishelf System Configuring the External Cisco Catalyst 6509 Switches The listed interfaces should include the port to which you have connected. If the port is not listed, contact Cisco Technical Support. For contact information, see the “Obtaining Technical Assistance” section on page xiv. CAT6k-1# show spanning-tree MST00 Spanning tree enabled protocol mstp Root ID Priority 0 Address 0013.1a4f.
Chapter 3 Bringing Up the Cisco IOS XR Software on a Multishelf System Integrated Switch System Router# The output of this command should display “connected.” If it does not, then the connector may have a partial fiber cut or a bad optic. You may need to jiggle the GBIC wire to ensure that it is firmly inserted. Re-enter the command show interface until the port displays a status of “connected” or “disabled” for every port that displays a connector type.
Chapter 3 Bringing Up the Cisco IOS XR Software on a Multishelf System Integrated Switch System • Requires Cisco IOS XR Software Release 3.4.1 to support 22-port SCGE cards. Hardware Requirements Route processors (RPs) should be revision 8 or higher. SMF cables are required and LX optics is recommended. Restrictions for an Integrated Switch System A mixture of 22-port SCGE and Cisco Catalyst 6K is not a supported configutation (except during migration procedures).
Chapter 3 Bringing Up the Cisco IOS XR Software on a Multishelf System Integrated Switch System Table 3-4 Differences Between Intra-Rack and Inter-Rack Rack Type Description Intra-Rack Switch Provides connectivity inside the rack through FE ports. These switches are similar to the RPs. Note Inter-Rack Switch The GE1 link on intra-rack switches on the 22-port SCGE card is not connected. Provides connectivity between the racks.
Chapter 3 Bringing Up the Cisco IOS XR Software on a Multishelf System Integrated Switch System • Test the FE links to all the rack hardware periodically. • Keep the local state information synchronized to the rack master. • Rearbitrate the shelf ownership if the primary router releases ownership. Integrated Switch Control Network Topology Once the 22-port SCGE cards are installed, the control network topology ceases to be a simple hub-and-spoke set of connections.
Chapter 3 Bringing Up the Cisco IOS XR Software on a Multishelf System Integrated Switch System Table 3-6 lists the ROMMON switch configuration. Table 3-6 ROMMON Switch Configuration Type Description Switch connections The BCM5618s create the intra-rack control network. The BCM5690s create the inter-rack control network. There are two BCM5690 switches that are connected through a 10 Gbps stacking link. Port 11 on BCM5690-sw1 is connected to BCM5618-sw0-GE, which is also referred to as BCM5618-GE0.
Chapter 3 Bringing Up the Cisco IOS XR Software on a Multishelf System Integrated Switch System SUMMARY STEPS 1. admin 2. clear controller switch errdisable {port {FE | GE} {0 | 1}} {location node-id}} 3. clear controller switch inter-rack {errdisable {ports {number | all} | statistics {all | ports number}} {location node-id} DETAILED STEPS Step 1 Command or Action Purpose admin Places the router in administration EXEC mode.
Chapter 3 Bringing Up the Cisco IOS XR Software on a Multishelf System Integrated Switch System FE FE FE FE FE FE FE FE FE FE FE FE FE FE GE GE Port Port Port Port Port Port Port Port Port Port Port Port Port Port Port Port 2 3 4 5 6 7 8 9 10 11 12 13 14 15 0 1 : : : : : : : : : : : : : : : : Down (Connects Down (Connects Down (Connects Down (Connects Down (Connects Down (Connects Down (Connects Down (Connects Down (Connects Down (Connects Down (Connects Down (Connects Down (Connects Down (Connects U
Chapter 3 Bringing Up the Cisco IOS XR Software on a Multishelf System Integrated Switch System Verifying Bidirectionality To verify the bidirection for the integrated switch, you can use the Unidirectional Link Detection (UDLD) protocol to detect unidirectional links on Ethernet ports. UDLD is a Layer 2 protocol. UDLD is useful at linkup time. If the link is detected to be unidirectional, the port is shut down.
Chapter 3 Bringing Up the Cisco IOS XR Software on a Multishelf System Bringing Up and Configuring Rack 0 Interface ---------------FE_Port_1 GE_Port_0 Role Sts Cost Prio.Nbr ---- --- --------- -------Desg FWD 200000 128. 2 Root FWD 20000 128.
Chapter 3 Bringing Up the Cisco IOS XR Software on a Multishelf System Bringing Up and Configuring Rack 0 11. controllers fabric plane planeNumber oim count 1 oim instance 0 location Frack/slot/FM 12. commit 13. end DETAILED STEPS Step 1 Command or Action Purpose Power down all LCCs and FCCs. Prepares the LCCs and FCCs for startup in the proper sequence. • Step 2 Step 3 Apply power to the LCC that contains the DSC. Connect to the DSC console port and log in.
Chapter 3 Bringing Up the Cisco IOS XR Software on a Multishelf System Bringing Up and Configuring Rack 0 Step 7 Command or Action Purpose dsc serial serial ID rack rackNumber Defines the rack number for the second LCC. Example: • See the “Preparing a Rack Number Plan” section on page 3-3 for information on locating the serial numbers and selecting rack numbers. • Replace serial ID with the serial number of the second LCC. • Replace rackNumber with a number in the range of 1 to 255.
Chapter 3 Bringing Up the Cisco IOS XR Software on a Multishelf System Bringing Up and Configuring Rack 0 Step 11 Command or Action Purpose controllers fabric plane planeNumber oim count 1 oim instance 0 location Frack/SMslot/FM Configures a plane to operate in an FCC slot.
Chapter 3 Bringing Up the Cisco IOS XR Software on a Multishelf System Bringing Up and Configuring Rack 0 Building configuration...
Chapter 3 Bringing Up the Cisco IOS XR Software on a Multishelf System Bringing Up and Configuring Rack 0 oim count 1 oim instance 0 location F0/SM0/FM ! controllers fabric plane oim count 1 oim instance 0 location ! controllers fabric plane oim count 1 oim instance 0 location ! controllers fabric plane oim count 1 oim instance 0 location ! controllers fabric plane oim count 1 oim instance 0 location ! controllers fabric plane oim count 1 oim instance 0 location ! controllers fabric plane oim count 1 oim
Chapter 3 Bringing Up the Cisco IOS XR Software on a Multishelf System Bringing Up and Verifying FCCs oim count 1 oim instance 0 location F1/SM9/FM ! controllers fabric plane oim count 1 oim instance 0 location ! controllers fabric plane oim count 1 oim instance 0 location ! controllers fabric plane oim count 1 oim instance 0 location ! controllers fabric plane oim count 1 oim instance 0 location ! end 4 F2/SM0/FM 5 F2/SM9/FM 6 F3/SM0/FM 7 F3/SM9/FM Bringing Up and Verifying FCCs When Rack 0 is up and
Chapter 3 Bringing Up the Cisco IOS XR Software on a Multishelf System Bringing Up and Verifying FCCs DETAILED STEPS Step 1 Step 2 Command or Action Purpose Apply power to all FCCs. Starts the FCCs. show controllers fabric rack all detail • Allow each FCC to fully boot. • Verify that “IOS XR RUN” appears on the SC faceplates. • Verify that the indicator LED on the OIM LED panel is green for each fabric cable connected to Rack 0.
Chapter 3 Bringing Up the Cisco IOS XR Software on a Multishelf System Bringing Up and Verifying FCCs Step 4 Command or Action Purpose show controllers fabric connectivity all detail Displays the LCC cards that can communicate with all eight fabric planes. • Example: RP/0/RP0/CPU0:router(admin)# show controllers fabric connectivity all detail Step 5 On the external Catalyst switches, verify that the links are not unidirectional.
Chapter 3 Bringing Up the Cisco IOS XR Software on a Multishelf System Bringing Up and Verifying the Non-DSC LCC Flags: P C L A B I N o f m - plane admin down, p card admin down, c link port admin down, l asic admin down, a bundle port admin Down, b bundle admin down, i node admin down, n other end of link down d failed component downstream plane multicast down plane oper down card oper down linkport oper down asic oper down bundle port oper down bundle oper down node down data down Plane Admin Oper D
Chapter 3 Bringing Up the Cisco IOS XR Software on a Multishelf System Bringing Up and Verifying the Non-DSC LCC SUMMARY STEPS 1. Apply power to the second LCC. 2. show controllers fabric rack all detail 3. show controllers fabric plane all detail 4. show controllers fabric connectivity all detail 5. On the external Catalyst switches, verify that the links are not unidirectional. 6. exit DETAILED STEPS Step 1 Step 2 Command or Action Purpose Apply power to the second LCC.
Chapter 3 Bringing Up the Cisco IOS XR Software on a Multishelf System Verifying the Spanning Tree Command or Action Step 5 Step 6 Purpose On the external Catalyst switches, verify that the links Verifies that the links from the chassis to the external are not unidirectional. Catalyst switches are operating correctly. • If a unidirectional link is present, a loop may occur. • For instructions to verify the Catalyst links, see the “Verifying the Catalyst Switch” section on page 3-18.
Chapter 3 Bringing Up the Cisco IOS XR Software on a Multishelf System Verifying the Spanning Tree Step 2 Command or Action Purpose show platform Displays the status of all hardware components. • The state for all modules should be IOS XR RUN or OK. • It can take a few minutes for all LCC modules to start up. Note To view the status of all cards and modules, the show platform command must be executed in administration EXEC mode.
Chapter 3 Bringing Up the Cisco IOS XR Software on a Multishelf System Verifying the Spanning Tree 0/FC1/SP 0/AM0/SP 0/AM1/SP 0/SM0/SP 0/SM1/SP 0/SM2/SP 0/SM3/SP 0/SM4/SP 0/SM5/SP 0/SM6/SP 0/SM7/SP 1/3/SP 1/3/CPU0 1/RP0/CPU0 1/FC0/SP 1/FC1/SP 1/AM0/SP 1/AM1/SP 1/SM0/SP 1/SM1/SP 1/SM2/SP 1/SM3/SP 1/SM4/SP 1/SM5/SP 1/SM6/SP 1/SM7/SP F0/SM0/SP F0/SM3/SP F0/SM6/SP F0/SM9/SP F0/SM12/SP F0/SM15/SP F0/SM18/SP F0/SM21/SP F0/SC0/CPU0 F0/SC1/CPU0 F0/AM1/SP LCC-FAN-CT(SP) ALARM(SP) ALARM(SP) FC/M(SP) FC/M(SP) FC/M(
Chapter 3 Bringing Up the Cisco IOS XR Software on a Multishelf System Verifying the Spanning Tree Bridge ID MAC ADDR Bridge ID Priority Bridge Max Age 8 sec 00-05-9a-3e-89-4f 32769 (32768 + 1) Hello Time 1 sec Forward Delay 6 sec Max Hops 4 Switched Interface State Role Cost Prio Type -------------------- ----- ---- --------- ---- -------------------------------FE_Port_1 BLK altn 200000 128 P2P GE_Port_0 FWD root 20000 128 P2P GE_Port_1 BLK altn 20000 128 P2P RP/0/RP0/CPU0:router(admin)# show span
Chapter 3 Bringing Up the Cisco IOS XR Software on a Multishelf System Verifying Fabric Cabling Connections Bridge ID Priority Bridge Max Age 8 sec 32769 (32768 + 1) Hello Time 1 sec Forward Delay 6 sec Max Hops 4 Switched Interface State Role Cost Prio Type -------------------- ----- ---- --------- ---- -------------------------------FE_Port_0 BLK altn 200000 128 P2P GE_Port_0 FWD root 20000 128 P2P GE_Port_1 BLK altn 20000 128 P2P RP/0/RP0/CPU0:router(admin)# show spantree mst 1 detail location F0
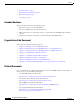
Chapter 3 Bringing Up the Cisco IOS XR Software on a Multishelf System Verifying Fabric Cabling Connections Figure 3-5 shows the faceplate of the CRS-FCC- LED panel. The CRS-FCC-LED is also called an optical interface module (OIM) LED panel. This panel goes into slot LM0 or LM1 in a fabric card chassis.The OIM LED panel provides connectivity information on how the fabric chassis cards are functioning in the multishelf system.
Chapter 3 Bringing Up the Cisco IOS XR Software on a Multishelf System Verifying Fabric Cabling Connections Figure 3-5 0 4 8 1 5 9 2 6 10 3 7 11 Optical Interface Module LED Panel (Part CRS-FCC-LED) J0 0 4 8 3 7 J1 1 5 9 3 7 2 6 10 2 6 11 1 5 9 0 4 8 10 0 4 2 6 11 8 1 5 9 10 J2 3 7 J3 0 4 8 1 5 9 2 6 10 3 7 11 3 J0 2 6 10 7 1 5 11 11 0 4 8 9 J4 0 4 8 1 5 9 2 6 10 3 7 11 J5 0 4 8 1 5 9 2 6 10 3 7 11 J6 0
Chapter 3 Bringing Up the Cisco IOS XR Software on a Multishelf System Verifying Fabric Cabling Connections The following description helps explain the states of LEDs on the OIM LED panel. In Figure 3-6, fabric cables should connect an LCC S13 card to the FCC S2 card as follows: A0 to J0, A1 to J1, and A2 to J2. Instead, A1 is incorrectly connected to J2. This incorrect connection causes the LED corresponding to J2 to blink red, indicating that the cable connection is incorrect.
Chapter 3 Bringing Up the Cisco IOS XR Software on a Multishelf System Where to Go Next Where to Go Next For information on configuring basic router features, see Chapter 4, “Configuring General Router Features.
Chapter 3 Bringing Up the Cisco IOS XR Software on a Multishelf System Where to Go Next Cisco IOS XR Getting Started Guide 3-48 OL-10957-02
CH A P T E R 4 Configuring General Router Features This chapter describes how to communicate with the router using the command-line interface (CLI), and it describes basic Cisco IOS XR software configuration management.
Chapter 4 Configuring General Router Features Connecting and Communicating with the Router SDRs perform routing functions in the same manner as a physical router, but share some chassis resources with the rest of the system. For example, the applications, configurations, protocols, and routing tables assigned to an SDR belong to that SDR only, but other functions, such as chassis control, switch fabric, and partitioning, are shared with the rest of the system.
Chapter 4 Configuring General Router Features Connecting and Communicating with the Router Figure 4-1 Communication Ports on the RP for a Cisco CRS-1 16-Slot Line Card Chassis RP RJ-45 cable Local terminal or terminal server for CLI communication Console AUX RJ-45 cable HDD Remote terminal for CLI communication PC Card (disk1:) CNTL ETH 0 Network Management Ethernet connection for out-of-band network communciation CNTL ETH 1 Optical Gigabit Ethernet for control plane: (not user configurable)
Chapter 4 Configuring General Router Features Connecting and Communicating with the Router Figure 4-2 Communication Ports on the RP for a Cisco CRS-1 4-Slot and 8-Slot LCCs RJ-45 cable Local terminal or terminal server for CLI communication Console Terminal connection AUX Modem connection RJ-45 cable ALARM PID/VID Remote terminal for CLI communication CRITICAL MAJOR MINOR Network Remote CLI, CWI, XML, or SNMP communication.
Chapter 4 Configuring General Router Features Connecting and Communicating with the Router Figure 4-3 Communication Ports on the DRP PLIM CPU0 AUX connection RJ-45 cable B1 RJ-45 cable CPU0 Console connection AUX 0 Local terminal or terminal server for CLI communication AUX 1 Remote terminal for CLI communication CLEAN CLASS 1 LASER PRODUCT LASERPRODUKT DER KLASSE 1 PRODUIT LASER DE CLASSE 1 1 PRODUCTO LASER CLASE 1 RJ-45 cable PIDVID MGMT ETH 0 MGMT ETH 1 RJ-45 cable CONNECTOR WITH ALCOHOL
Chapter 4 Configuring General Router Features Connecting and Communicating with the Router User-removable flash disk1 stores installation PIE files A second internal flash disk0 stores installed software and active configurations -1 OT SL 0 OT SL K LIN Ethernet cable ETH 0 Network TA DA K LIN ETH 1 TA DA Remote CLI, CWI, XML, or SNMP communication.
Chapter 4 Configuring General Router Features Connecting and Communicating with the Router SUMMARY STEPS 1. Identify the active RP or DRP. 2. Connect a terminal to the Console port of the active RP or DRP. 3. Start the terminal emulation program. 4. Press Enter. 5. Log in to the router. DETAILED STEPS Step 1 Step 2 Command or Action Purpose Identify the active RP or DRP. Identifies the RP or DRP to which you must connect in the next step.
Chapter 4 Configuring General Router Features Connecting and Communicating with the Router Step 3 Step 4 Step 5 Command or Action Purpose Start the terminal emulation program. (Optional) Prepares a computer for router communications. Press Enter. • The step is not required if you are connecting through a terminal. • Terminals send keystrokes to and receive characters from another device.
Chapter 4 Configuring General Router Features Connecting and Communicating with the Router To establish a connection through a terminal server, perform the following procedure: SUMMARY STEPS 1. Install and configure the terminal server. 2. Connect the terminal server to the Console port of the target RP or DRP. 3. Power on the router. 4. Identify the target RP or DRP. 5. telnet access-server-address port 6. Press Enter. 7. Log in to the router.
Chapter 4 Configuring General Router Features Connecting and Communicating with the Router Step 3 Step 4 Step 5 Command or Action Purpose Power on the router. Starts the router. Identify the target RP or DRP. telnet access-server-address port • This step is required only if the router power is not on. • For information on power installation and controls, see the hardware documentation listed in the “Related Documents” section on page x.
Chapter 4 Configuring General Router Features Logging In to a Router or an SDR • Telnet clients can connect to a Telnet server in the router. The Telnet server is disabled by default and can be enabled with the telnet ipv4 server or telnet ipv6 server command in global configuration mode. • Secure Shell (SSH) clients can connect to an SSH server in the router. The SSH server is disabled by default and can be enabled with the ssh server command in global configuration mode.
Chapter 4 Configuring General Router Features CLI Prompt Note Passwords are case sensitive. If you want to log in to an SDR using a root-system username from the owner SDR, enter the username in the following format: username@admin. To support admin login, local database authentication must be enabled with the aaa authentication login remote local command. For more information, see Cisco IOS XR System Security Configuration Guide.
Chapter 4 Configuring General Router Features User Access Privileges User Access Privileges When you log in to the router, your username and password are used to determine if you are authorized to access the router. After you successfully log in, your username is used to determine which commands you are allowed to use.
Chapter 4 Configuring General Router Features User Access Privileges ouni fabric bundle network transport ppp hdlc --More-- Note Only the root-system users, root-lr users, or users associated with the WRITE:AAA task ID can configure task groups. (The root-lr user has the highest level of privileges in an SDR. In previous releases, SDRs were called logical routers (LRs).
Chapter 4 Configuring General Router Features User Access Privileges Table 4-3 Options to Display Information About Your Account (continued) Command Description show user tasks Displays the task IDs assigned to your account. show user all Displays all user groups and task ID information for your account. show aaa usergroup group-name Displays the task IDs assigned to a user group.
Chapter 4 Configuring General Router Features User Access Privileges Task: Task: Task: Task: Task: Task: Task: Task: Task: Task: Task: Task: Task: Task: Task: Task: Task: Task: Task: Task: Task: Task: Task: Task: Task: Task: Task: multicast netflow network ospf ouni pkg-mgmt pos-dpt ppp qos rib rip root-lr root-system route-map route-policy sbc snmp sonet-sdh static sysmgr system transport tty-access tunnel universal vlan vrrp : : : : : : : : : : : : : : : : : : : : : : : : : : : READ READ READ READ R
Chapter 4 Configuring General Router Features Navigating the Cisco IOS XR Command Modes Task: Task: Task: Task: Task: Task: Task: Task: Task: Task: Task: Task: Task: Task: Task: Task: Task: Task: Task: Task: Task: Task: Task: Task: Task: Task: Task: Task: Task: Task: Task: Task: Task: Task: Task: Task: Task: Task: Task: Task: Task: Task: Task: Task: Task: Task: Task: fabric fault-mgr filesystem firewall fr hdlc host-services hsrp interface inventory ip-services ipv4 ipv6 isis logging lpts monitor mpls-ld
Chapter 4 Configuring General Router Features Navigating the Cisco IOS XR Command Modes • Command Mode Navigation Example, page 4-22 Figure 4-5 illustrates the basic command mode navigation for the CLI. Only a small sample of the possible configuration submodes is shown.
Chapter 4 Configuring General Router Features Navigating the Cisco IOS XR Command Modes Summary of Common Command Modes Table 4-4 summarizes the most common command modes of the Cisco IOS XR software and the associated CLI prompts. Table 4-4 Common Command Modes and CLI prompts Command Mode Description EXEC Logging in to an SDR running the Cisco IOS XR software automatically places the router in EXEC mode.
Chapter 4 Configuring General Router Features Navigating the Cisco IOS XR Command Modes Table 4-4 Common Command Modes and CLI prompts (continued) Command Mode Description Global configuration Global configuration mode is the starting point for SDR configuration. Commands entered in this mode affect the SDR as a whole, rather than just one protocol or interface. Global configuration mode is also used for entering configuration submodes to configure specific elements, such as interfaces or protocols.
Chapter 4 Configuring General Router Features Navigating the Cisco IOS XR Command Modes Table 4-4 Common Command Modes and CLI prompts (continued) Command Mode Description Router submode configuration Router configuration submodes are accessed from router configuration mode.
Chapter 4 Configuring General Router Features Navigating the Cisco IOS XR Command Modes Command Mode Navigation Example The following steps provide an example of command mode navigation: Step 1 Start a session by logging in to the router and entering EXEC mode, as shown in the following example: router con0_RP0_CPU0 is now available Press RETURN to get started.
Chapter 4 Configuring General Router Features Managing Configuration Sessions In the following example, the router enters interface configuration mode and the user selects a POS interface for configuration. The command syntax is interface type rack/slot/module/port. RP/0/RP0/CPU0:router(config)# interface POS 0/2/0/4 RP/0/RP0/CPU0:router(config-if)# The command mode prompt changes from “(config)” to configuration commands for the specified interface.
Chapter 4 Configuring General Router Features Managing Configuration Sessions • Loading an Alternative Configuration at System Startup, page 4-33 • Clearing All Changes to a Target Configuration, page 4-34 • Committing Changes to the Running Configuration, page 4-34 • Reloading a Failed Configuration, page 4-36 • Exiting a Configuration Submode, page 4-37 • Returning Directly to Configuration Mode from a Submode, page 4-37 • Ending a Configuration Session, page 4-37 • Aborting a Configurat
Chapter 4 Configuring General Router Features Managing Configuration Sessions Starting a Configuration Session When you place the router in global configuration mode or administration configuration mode using the configure command, a new target configuration session is created. The target configuration allows you to enter, review, and verify configuration changes without impacting the running configuration.
Chapter 4 Configuring General Router Features Managing Configuration Sessions Starting an Exclusive Configuration Session An exclusive configuration session allows you to configure the administration configuration or an SDR and lock out all users from committing configuration changes until you are done. Other users can still create and modify a target configuration, but they cannot commit those changes to the running configuration until you exit your exclusive configuration session.
Chapter 4 Configuring General Router Features Managing Configuration Sessions In EXEC and global configuration mode, you can view the SDR configuration for the SDR to which you are connected. When you are connected to the DSC and operating in administration EXEC and administration configuration mode, you can view the administration configuration, which includes hardware assignments for SDRs and multishelf systems.
Chapter 4 Configuring General Router Features Managing Configuration Sessions interface POS0/0/0/2 shutdown ! interface POS0/0/0/3 shutdown ! interface POS0/3/0/0 shutdown ! interface POS0/3/0/1 shutdown ! interface POS0/3/0/2 shutdown ! interface POS0/3/0/3 shutdown ! interface preconfigure MgmtEth0/RP0/CPU0/0 shutdown ! router static address-family ipv4 unicast 0.0.0.
Chapter 4 Configuring General Router Features Managing Configuration Sessions RP/0/RP1/CPU0:router(config)# show running-config sanitized Building configuration...
Chapter 4 Configuring General Router Features Managing Configuration Sessions shutdown ! interface POS0/3/0/2 shutdown ! interface POS0/3/0/3 shutdown ! interface preconfigure MgmtEth0/RP0/CPU0/0 shutdown ! router static address-family ipv4 unicast 0.0.0.
Chapter 4 Configuring General Router Features Managing Configuration Sessions ! end Displaying a Combined Target and Running Configuration Although the target and running configurations remain separate until the target configuration is committed, you can preview the combined target and running configuration without committing the changes. The combined configuration shows what the new running configuration will look like after the changes from the target configuration are committed.
Chapter 4 Configuring General Router Features Managing Configuration Sessions Displaying Configuration Error Messages and Descriptions Configuration changes are automatically verified during the commit operation, and a message is displayed if one or more configuration entries fail. To display an error message and description for a failed configuration, enter the show configuration failed command. Note You can view configuration errors only during the current configuration session.
Chapter 4 Configuring General Router Features Managing Configuration Sessions Saving the Target Configuration to a File Target configurations can be saved to a separate file without committing them to the running configuration. Target configuration files can then be loaded at a later time and further modified or committed. To save the configuration changes in the target configuration to a file, enter the save configuration device: command.
Chapter 4 Configuring General Router Features Managing Configuration Sessions Clearing All Changes to a Target Configuration To clear changes made to the target configuration without terminating the configuration session, enter the clear command in global configuration mode or administration configuration mode. This command deletes any configuration changes that have not been committed. In the following example, the user configures an interface but does not commit it.
Chapter 4 Configuring General Router Features Managing Configuration Sessions To commit target configuration changes to the running configuration, enter the commit command by itself or with one or more of the options described in Table 4-5. Table 4-5 Commit Command Options Command Description commit (Default) Merges the target configuration with the running configuration and commits changes only if all changes in the target configuration pass the semantic verification process.
Chapter 4 Configuring General Router Features Managing Configuration Sessions Examples In the following example, the default commit command is entered in global configuration mode: RP/0/RP0/CPU0:router# configure RP/0/RP0/CPU0:router(config)# interface POS 0/0/0/2 RP/0/RP0/CPU0:router(config-if)# description faq RP/0/RP0/CPU0:router(config-if)# ipv4 address 10.1.1.1 255.0.0.0 RP/0/RP0/CPU0:router(config-if)# commit RP/0/0/0:Aug 6 09:26:17.781 : %LIBTARCFG-6-COMMIT Configuration committed by user ‘cisco'.
Chapter 4 Configuring General Router Features Managing Configuration Sessions In the preceding example, the show configuration command displays the target configuration, which includes the failed configuration. Note The failed configuration is discarded if you exit global configuration mode or administration configuration mode without recovering the configuration. After recovery, correct and commit the configuration or save it to a file to avoid losing it.
Chapter 4 Configuring General Router Features Configuring the SDR Hostname If you end a configuration session without committing the configuration changes, the router prompts you to save changes, discard changes, or cancel the action, as shown in the following example: RP/0/RP0/CPU0:router(config-if)# end Uncommitted changes found, commit them before exiting(yes/no/cancel)? [cancel]: Respond to the prompt by entering one of the following options: Note • yes, commit the configuration changes and exit
Chapter 4 Configuring General Router Features Configuring the Management Ethernet Interface Note No blanks or spaces are permitted as part of a name. Do not expect case to be preserved. Upper- and lowercase characters look the same to many Internet software applications. It may seem appropriate to capitalize a name the same way you might if you were writing, but conventions dictate that computer names appear all lowercase. For more information, see RFC 1178, Choosing a Name for Your Computer.
Chapter 4 Configuring General Router Features Configuring the Management Ethernet Interface Table 4-6 provides examples of Management Ethernet interface names for a single-shelf system.
Chapter 4 Configuring General Router Features Configuring the Management Ethernet Interface Configuring the Management Ethernet Interface To use the Management Ethernet interface for system management and remote communication, you must configure an IP address and a subnet mask for the interface. If you want the interface to communicate with devices on other networks (such as remote management stations or TFTP servers), you need to configure a default route for the router.
Chapter 4 Configuring General Router Features Configuring the Management Ethernet Interface DETAILED STEPS Step 1 Command or Action Purpose configure Enters global configuration mode. Example: RP/0/RP0/CPU0:router# configure Step 2 interface MgmtEthrack/slot/CPU0/port Example: Enters interface configuration mode and specifies the Management Ethernet interface of the primary RP.
Chapter 4 Configuring General Router Features Configuring the Management Ethernet Interface Step 8 Command or Action Purpose end Ends the configuration session and returns to EXEC mode. Example: RP/0/RP0/CPU0:router(config)# end Step 9 show interfaces MgmtEthrack/slot/CPU0/port Displays the interface details to verify the settings.
Chapter 4 Configuring General Router Features Manually Setting the Router Clock Related Documents Related Topic Document Title Additional information on configuring management interfaces Cisco IOS XR Interface and Hardware Component Configuration Guide Manually Setting the Router Clock Generally, if the system is synchronized by a valid outside timing mechanism, such as a Network Time Protocol (NTP) or VINES clock source, you need not set the software clock.
Chapter 4 Configuring General Router Features Manually Setting the Router Clock DETAILED STEPS Step 1 Command or Action Purpose configure Enters global configuration mode. Example: RP/0/RP0/CPU0:router# configure Step 2 clock timezone zone hours-offset Sets the time zone for the router clock. • Example: RP/0/RP0/CPU0:router(config)# clock timezone pst -8 Note The clock timezone command should be entered before the clock is set because it defines the difference between the system time and UTC.
Chapter 4 Configuring General Router Features Where to Go Next Examples In the following example, the manual system clock is configured: RP/0/RP0/CPU0:router# configure RP/0/RP0/CPU0:router(config)# clock timezone pst -8 RP/0/RP0/CPU0:router(config)# commit RP/0/RP0/CPU0:router(config)# end RP/0/RP0/CPU0:router# clock set 14:12:00 10 feb 2004 14:12:00.090 PST Tue Feb 10 2004 RP/0/RP0/CPU0:router# clock update-calendar RP/0/RP0/CPU0:router# show clock 14:12:00.
CH A P T E R 5 Configuring Additional Router Features This chapter contains instructions and information for entering basic configurations using the command-line interface (CLI).
Chapter 5 Configuring Additional Router Features Configuring Telnet, HTTP, and XML Host Services 2. domain name domain-name-of-organization 3. domain name-server ipv4-address 4. commit 5. end 6. show hosts Examples In the following example, the domain name and DNS are configured: RP/0/RP0/CPU0:router# configure RP/0/RP0/CPU0:router(config)# domain name cisco.com RP/0/RP0/CPU0:router(config)# domain name-server 10.1.1.
Chapter 5 Configuring Additional Router Features Managing Configuration History and Rollback SUMMARY STEPS 1. configure 2. telnet ipv4 server max-servers 5 3. telnet ipv6 server max-servers 5 4. http server 5. xml agent corba 6.
Chapter 5 Configuring Additional Router Features Managing Configuration History and Rollback The Cisco IOS XR software automatically saves up to 100 of the most recent commitIDs.
Chapter 5 Configuring Additional Router Features Managing Configuration History and Rollback 2000000021 2000000022 Commit ID Commit ID RP/0/RP1/CPU0:router(admin)# show configuration commit changes 2000000020 Building configuration... username cisco secret 5 $1$MgUH$xzUEW6jLfyAYLKJE.
Chapter 5 Configuring Additional Router Features Managing Configuration History and Rollback Rolling Back the Configuration to a Specific Rollback Point When you roll back the configuration to a specific rollback point, you undo all configuration changes made during the session identified by the commit ID for that rollback point, and you undo all configuration changes made after that point. The rollback process rolls back the configuration and commits the rolled-back configuration.
Chapter 5 Configuring Additional Router Features Managing Configuration History and Rollback Loading CommitID Configuration Changes to the Target Configuration If the changes saved for a specific commitID are close to what you want, but a rollback is not appropriate, you can load the configuration changes for a commitID into the target configuration, modify the target configuration, and then commit the new configuration.
Chapter 5 Configuring Additional Router Features Managing Configuration History and Rollback Loading Rollback Configuration Changes to the Target Configuration If the changes for a specific rollback point are close to what you want, but a rollback is not appropriate, you can load the rollback configuration changes into the target configuration, modify the target configuration, and then commit the new configuration. Unlike the rollback process, the loaded changes are not applied until you commit them.
Chapter 5 Configuring Additional Router Features Configuring Logging and Logging Correlation RP/0/0/CPU0:router# clear configuration commit oldest 5 Deleting 5 rollback points '1000000005' to '1000000009' 80 KB of disk space will be freed. Continue with deletion?[confirm] Configuring Logging and Logging Correlation System messages generated by the Cisco IOS XR software can be logged to a variety of locations based on the severity level of the messages.
Chapter 5 Configuring Additional Router Features Configuring Logging and Logging Correlation Alarm Logging Correlation Alarm logging correlation is used to group and filter similar messages to reduce the amount of redundant logs and isolate the root causes of the messages. For example, the original message describing a card online insertion and removal (OIR) and system state being up or down can be reported, and all subsequent messages reiterating the same event can be correlated.
Chapter 5 Configuring Additional Router Features Configuring Logging and Logging Correlation DETAILED STEPS Step 1 Command or Action Purpose configure Enters global configuration mode. Example: RP/0/RP0/CPU0:router# configure Step 2 logging {ip-address | hostname} Specifies a syslog server host to use for system logging. Example: RP/0/RP0/CPU0:router(config)# logging 10.1.1.1 Step 3 Limits the logging of messages sent to syslog servers to only those messages at the specified level.
Chapter 5 Configuring Additional Router Features Configuring Logging and Logging Correlation In the following example, basic message logging is configured: RP/0/RP0/CPU0:router# configure RP/0/RP0/CPU0:router(config)# logging RP/0/RP0/CPU0:router(config)# logging RP/0/RP0/CPU0:router(config)# logging RP/0/RP0/CPU0:router(config)# logging RP/0/RP0/CPU0:router(config)# commit RP/0/RP0/CPU0:router(config)# end RP/0/RP0/CPU0:router# show logging 10.1.1.
Chapter 5 Configuring Additional Router Features Creating and Modifying User Accounts and User Groups Creating and Modifying User Accounts and User Groups In the Cisco IOS XR software, users are assigned individual usernames and passwords. Each username is assigned to one or more user groups, each of which defines display and configuration commands the user is authorized to execute.
Chapter 5 Configuring Additional Router Features Creating and Modifying User Accounts and User Groups Configuring User Accounts User accounts, user groups, and task groups are created by entering the appropriate commands in one of the “AAA” configuration submodes, as shown in Figure 5-1. This section describes the process to configure usernames. For instructions to configure user groups, task groups, and other AAA security features, see the Cisco IOS XR System Security Configuration Guide.
Chapter 5 Configuring Additional Router Features Creating and Modifying User Accounts and User Groups DETAILED STEPS Step 1 Command or Action Purpose configure Enters global configuration mode. Example: RP/0/RP0/CPU0:router# configure Step 2 Creates a name for a new user (or identifies a current user) and enters username configuration submode. username user-name • Example: RP/0/RP0/CPU0:router(config)# username user1 Step 3 Specifies a password for the user named in Step 2.
Chapter 5 Configuring Additional Router Features Configuration Limiting Configuration Limiting The Cisco IOS XR software places preset limits on the configurations you can apply to the running configuration of a router. These limits ensure that the router has sufficient system resources (such as RAM) for normal operations. Under most conditions, these preset limits are sufficient.
Chapter 5 Configuring Additional Router Features Configuration Limiting RP/0/RP1/CPU0:router(config-static)# show running-config router static router static maximum path ipv4 5000 address-family ipv4 unicast 0.0.0.0/0 172.29.52.1 ! ! IS-IS Configuration Limits Table 5-5 summarizes the maximum limits for IS-IS, including the commands used to display and change the limits.
Chapter 5 Configuring Additional Router Features Configuration Limiting Table 5-6 OSPFv2 and OSPFv3 Configuration Limits and Commands Default Maximum Limit Absolute Maximum Limit Configuration Command (Router Configuration Mode) Show Current Settings Command (EXEC Mode) Maximum number of interfaces that can be configured for an OSPF instance 255 1024 maximum interfaces n show ospf Maximum routes redistributed into OSPF 10,000 28,672 maximum redistributed-prefixes show ospf n Note The maximu
Chapter 5 Configuring Additional Router Features Configuration Limiting Minimum Maximum Minimum Maximum --More-- hold time for LSA throttle 5000 msecs wait time for LSA throttle 5000 msecs LSA interval 5 secs.
Chapter 5 Configuring Additional Router Features Configuration Limiting RP/0/RP1/CPU0:router(config-router)# end Uncommitted changes found, commit them? [yes]: y RP/0/RP1/CPU0:Mar 30 18:05:13 : config[65740]: %LIBTARCFG-6-COMMIT : Configurati on committed by user 'cisco'. Use 'show configuration commit changes 1000000542' to view the changes.
Chapter 5 Configuring Additional Router Features Configuration Limiting A cease-notification message is sent to the neighbor and the peering with the neighbor is terminated when the number of prefixes received from the peer for a given address family exceeds the maximum limit (either set by default or configured by the user) for that address family.
Chapter 5 Configuring Additional Router Features Configuration Limiting Examples In the following example, the show rpl maximum command is used in EXEC mode to display the current setting for RPL limits and number of each limit currently in use. A summary of the memory used by all of the defined policies is also shown below the limit settings.
Chapter 5 Configuring Additional Router Features Configuration Limiting Multicast Configuration Limits Table 5-9 summarizes the maximum limits for multicast configuration, including the commands used to display and change the limits.
Chapter 5 Configuring Additional Router Features Configuration Limiting Table 5-10 MPLS Configuration Limits and Commands Limit Description Maximum traffic engineer (TE) tunnels head Default Maximum Limit Absolute Maximum Limit Show Current Settings Configuration Command Command (Global Configuration Mode) (EXEC Mode) 2500 65536 mpls traffic-eng maximum show mpls traffic-eng tunnels n maximum tunnels Other Configuration Limits Table 5-11 summarizes the maximum limits for additional configuration
CH A P T E R 6 CLI Tips, Techniques, and Shortcuts This chapter describes techniques for using the command-line interface (CLI) of the Cisco IOS XR software. Contents The chapter contains the following sections: Note • CLI Tips and Shortcuts, page 6-1 • Displaying System Information with show Commands, page 6-5 • Wildcards, Templates, and Aliases, page 6-11 • Command History, page 6-16 • Key Combinations, page 6-18 Commands can be entered in uppercase, lowercase, or mixed case.
Chapter 6 CLI Tips, Techniques, and Shortcuts CLI Tips and Shortcuts Entering Abbreviated Commands You can abbreviate commands and keywords to the number of characters that allow a unique abbreviation. For example, the configure command can be abbreviated as config because the abbreviated form of the command is unique. The router accepts and executes the abbreviated command.
Chapter 6 CLI Tips, Techniques, and Shortcuts CLI Tips and Shortcuts Step 1 Enter the access-list command, followed by a space and a question mark, to list the available options for the command: RP/0/0/CPU0:router(config)# ipv4 access-list ? log-update maximum WORD Note Step 2 Control access lists log updates Out of resources configration Access list name - maximum 32 characters The number ranges (within the angle brackets) are inclusive ranges.
Chapter 6 CLI Tips, Techniques, and Shortcuts CLI Tips and Shortcuts The symbol by itself indicates that there are no more keywords or arguments. Step 5 Press Return to execute the command: RP/0/RP0/CPU0:router(config)# ipv4 access-list list1 deny 172.31.134.0 Note The configuration does not become active until you enter the commit command to add the target configuration to the running configuration.
Chapter 6 CLI Tips, Techniques, and Shortcuts Displaying System Information with show Commands exclusive terminal Configure exclusively from this terminal Configure from the terminal Using the no Form of a Command Almost every configuration command has a no form. Depending on the command, the no form may enable or disable a feature. For example, when configuring an interface, the no shutdown command brings up the interface, and the shutdown command shuts down the interface.
Chapter 6 CLI Tips, Techniques, and Shortcuts Displaying System Information with show Commands • Common show Commands, page 6-6 • Browsing Display Output when the --More-- Prompt Appears, page 6-7 • Halting the Display of Screen Output, page 6-7 • Redirecting Output to a File, page 6-8 • Narrowing Output from Large Configurations, page 6-8 • Filtering show Command Output, page 6-9 Common show Commands Some of the most common show commands are described in Table 6-2.
Chapter 6 CLI Tips, Techniques, and Shortcuts Displaying System Information with show Commands Browsing Display Output when the --More-- Prompt Appears When command output requires more than one screen, such as for the ?, show, or more command, the output is presented one screen at a time, and a --More-- prompt is displayed at the bottom of the screen. To display additional command output, do one of the following: • Press Return to display the next line.
Chapter 6 CLI Tips, Techniques, and Shortcuts Displaying System Information with show Commands Redirecting Output to a File By default, CLI command output is displayed on screen. CLI command output can be redirected to a user-specified file by entering a filename and location after the show command syntax.
Chapter 6 CLI Tips, Techniques, and Shortcuts Displaying System Information with show Commands Using Wildcards to Display All Instances of an Interface To display the configuration for all instances, enter the asterisk (*) wildcard character. Note See the “Using Wildcards to Identify Interfaces in show Commands” section on page 6-11 for more information.
Chapter 6 CLI Tips, Techniques, and Shortcuts Displaying System Information with show Commands Table 6-3 show Command Filter Options Command Description show command | begin regular-expression Begins unfiltered output of the show command with the first line that contains the regular expression. show command | exclude regular-expression Displays output lines that do not contain the regular expression.
Chapter 6 CLI Tips, Techniques, and Shortcuts Wildcards, Templates, and Aliases exec-timeout 120 120 ! logging trap --More-/ip filtering... ip route 0.0.0.0 255.255.0.0 pos0/2/0/0 interface pos0/2/0/0 ip address 172.19.73.215 255.255.0.0 end Tip On most systems, Ctrl-Z can be entered at any time to interrupt the output and return to EXEC mode. For more information, see Appendix A, “Understanding Regular Expressions, Special Characters, and Patterns.
Chapter 6 CLI Tips, Techniques, and Shortcuts Wildcards, Templates, and Aliases interface POS0/1/0/0 ipv4 address 10.2.3.4 pos crc 32 ! keepalive disable interface POS0/1/0/1 ipv4 address 10.2.3.5 pos crc 32 ! keepalive disable interface POS0/1/0/2 ipv4 address 10.2.3.6 pos crc 32 ! keepalive disable interface POS0/1/0/3 ipv4 address 10.2.3.7 pos crc 32 ! keepalive disable 255.255.255.0 255.255.255.0 255.255.255.0 255.255.255.
Chapter 6 CLI Tips, Techniques, and Shortcuts Wildcards, Templates, and Aliases The two primary steps in working with templates are creating templates and applying templates. The following procedure describes how to create a configuration template. SUMMARY STEPS 1. configure 2. template template-name [($parameter $parameter...)] [config-commands] 3. Enter the template commands. 4. end-template 5. commit 6.
Chapter 6 CLI Tips, Techniques, and Shortcuts Wildcards, Templates, and Aliases Step 5 Command or Action Purpose commit Applies the target configuration commands to the running configuration. Example: RP/0/RP0/CPU0:router(config-TPL)# commit Step 6 show running-config template template-name Displays the details of the template. Example: RP/0/RP0/CPU0:router# show running-config template tmplt_1 Examples In the following example, a simple template is defined.
Chapter 6 CLI Tips, Techniques, and Shortcuts Wildcards, Templates, and Aliases • After a template is applied, the show configuration command displays the target configuration changes. The target configuration must be committed (with the commit command) to become part of the running configuration. Examples In the following example, a simple template is defined.
Chapter 6 CLI Tips, Techniques, and Shortcuts Command History Multiple commands can be supported under a single command alias, and multiple variables can be supported for each command. If multiple commands are specified under a single alias, then each command is executed in the order in which it is listed in the alias command.
Chapter 6 CLI Tips, Techniques, and Shortcuts Command History sho config commit changes 1000000001 show history Recalling Previously Entered Commands The Cisco IOS XR software records the ten most recent commands issued from the command line in its history buffer. This feature is particularly useful for recalling long or complex commands or entries, including access lists. To recall commands from the history buffer, use one of the commands or key combinations listed in Table 6-6.
Chapter 6 CLI Tips, Techniques, and Shortcuts Key Combinations Key Combinations The following sections provide information on key combinations: • Key Combinations to Move the Cursor, page 6-18 • Keystrokes to Control Capitalization, page 6-18 • Keystrokes to Delete CLI Entries, page 6-19 Key Combinations to Move the Cursor Table 6-8 shows the key combinations or sequences you can use to move the cursor around on the command line to make corrections or changes.
Chapter 6 CLI Tips, Techniques, and Shortcuts Key Combinations Keystrokes Purpose Esc, L Changes the word at the cursor to lowercase. Esc, U Capitalizes letters from the cursor to the end of the word. Keystrokes to Delete CLI Entries Table 6-10 describes the keystrokes used to delete command line entries. Table 6-10 Keystrokes for Deleting Entries Keystrokes Deletes Delete or Backspace The character to the left of the cursor. Ctrl-D The character at the cursor.
Chapter 6 CLI Tips, Techniques, and Shortcuts Key Combinations Cisco IOS XR Getting Started Guide 6-20 OL-10957-02
CH A P T E R 7 Troubleshooting the Cisco IOS XR Software This chapter describes the tools and procedures used to identify the source of hardware and software problems. This chapter also provides instructions on gathering data for further analysis by Cisco customer support representatives.
Chapter 7 Troubleshooting the Cisco IOS XR Software Basic Troubleshooting Commands • Using the traceroute Command, page 7-4 • Using debug Commands, page 7-5 Using show Commands to Display System Status and Configuration Use show commands to check the status of various Cisco IOS XR software subsystems and services. Table 7-1 lists some of the common show commands. To display a complete list of the available show commands, enter the show ? command to access the on-screen help system.
Chapter 7 Troubleshooting the Cisco IOS XR Software Basic Troubleshooting Commands Table 7-1 Common show Commands in Cisco IOS XR Software (continued) Command Description show interfaces Displays interface status and configuration. (EXEC mode) show logging Displays the contents of logging buffers. (EXEC and administration EXEC modes) Displays memory statistics.
Chapter 7 Troubleshooting the Cisco IOS XR Software Basic Troubleshooting Commands Each exclamation point (!) indicates receipt of a reply. A period (.) indicates the network server timed out while waiting for a reply. Other characters may appear in the ping output display, depending on the protocol type. Examples In the following example, a successful ping attempt is shown: RP/0/RP0/CPU0:router# ping 10.233.233.233 Type escape sequence to abort. Sending 5, 100-byte ICMP Echos to 10.233.233.
Chapter 7 Troubleshooting the Cisco IOS XR Software Basic Troubleshooting Commands Examples In the following example, the route for an IP address is displayed: RP/0/RP0/CPU0:router# traceroute 10.233.233.233 Type escape sequence to abort. Tracing the route to 10.233.233.233 1 2 172.25.0.2 11 msec 2 msec 1 msec 192.255.254.254 1 msec * 2 msec Using debug Commands Debug commands are used to diagnose and resolve network problems.
Chapter 7 Troubleshooting the Cisco IOS XR Software Basic Troubleshooting Commands cctl cetftp cpuctrl describe diagnostic dsc dumper exit fabric fabricq fia gsp ingressq install inv invd invmgr ntp oird pair shelfmgr sysdb upgrade-fpd --More-- Chassis control driver process debug Control ethernet TFTP (CE-TFTP) server process debug Debug Cpuctrl Driver Describe a command without taking real actions Diagnostic debugging dsc debug: all, fsm, table, cfg, and api Admin Debug Dumper Exit from this submode F
Chapter 7 Troubleshooting the Cisco IOS XR Software Configuration Error Messages Enter the show debug conditions command to display the conditional debugging status. For example: RP/0/RP0/CPU0:router# show debug conditions #### debug conditions set from tty 'con0_RP1_CPU0' #### interface condition is ON for interface 'POS0/2/0/1' Disabling Debugging for a Service Use the no form of the debug command or the undebug command to turn off debugging for a service or subsystem.
Chapter 7 Troubleshooting the Cisco IOS XR Software Configuration Error Messages Configuration Failures During a Commit Operation A target configuration is added to the running configuration of a router when the commit command is entered. During this operation, the changes are automatically verified by the other components in the system. If successful, the configuration becomes part of the running configuration. If some configuration items fail, an error message is returned.
Chapter 7 Troubleshooting the Cisco IOS XR Software Memory Warnings in Configuration Sessions Memory Warnings in Configuration Sessions The Cisco IOS XR software automatically monitors and manages the system resources in a router. Under normal operating conditions, memory problems should not occur. When a low-memory issue does occur, it is often in the form of a low-memory warning during a configuration session.
Chapter 7 Troubleshooting the Cisco IOS XR Software Memory Warnings in Configuration Sessions “ERROR! MEMORY IS IN SEVERE (or CRITICAL) STATE” When the memory is in a severe or critical state, router operation and performance is likely to be affected. Regular users are not allowed to enter configuration mode. Only lr-root owners can enter configuration mode to free memory by removing configurations. In some situations, the commit command is not allowed.
Chapter 7 Troubleshooting the Cisco IOS XR Software Memory Warnings in Configuration Sessions Table 7-2 Heading Descriptions for show memory Command Output Heading Description Physical Memory Amount of physical memory installed on the device. Application Memory Memory available for the system to use (total memory minus image size, reserved, IOMem, and flashfsys). Image Size of the bootable image. Reserved Reserved for packet memory.
Chapter 7 Troubleshooting the Cisco IOS XR Software Memory Warnings in Configuration Sessions Step 1 Enter the show memory summary command in EXEC mode to display the overall system memory: RP/0/RP0/CPU0:router# show memory summary Physical Memory: 2048M total Application Memory : 1787M (1511M available) Image: 132M (bootram: 132M) Reserved: 128M, IOMem: 0, flashfsys: 0 Total shared window: 0 Step 2 Enter the show configuration commit list command in EXEC or administration EXEC mode to list the config
Chapter 7 Troubleshooting the Cisco IOS XR Software Interfaces Not Coming Up Contacting TAC for Additional Assistance If you remove configurations and the low-memory condition remains, you may need to contact TAC for additional assistance. See the “Additional Sources for Information” section on page 7-1. Interfaces Not Coming Up The router interfaces are directly used in processing network traffic, so their status information is crucial to understanding how the device is functioning.
Chapter 7 Troubleshooting the Cisco IOS XR Software Interfaces Not Coming Up Note Line cards in Cisco CRS-1 routers are called modular services cards (MSCs). The show platform command output is different for Cisco CRS-1 routers and Cisco XR 12000 Series Routers. When this command is entered in EXEC mode, the display shows only those nodes assigned to the SDR.
Chapter 7 Troubleshooting the Cisco IOS XR Software Interfaces Not Coming Up POS0/1/0/0 POS0/1/0/1 POS0/1/0/2 POS0/1/0/3 POS0/1/0/4 POS0/1/0/5 POS0/1/0/6 POS0/1/0/7 POS0/1/0/8 POS0/1/0/9 POS0/1/0/10 POS0/1/0/11 POS0/1/0/12 POS0/1/0/13 POS0/1/0/14 POS0/1/0/15 POS0/2/0/0 POS0/2/0/1 POS0/2/0/3 POS0/2/0/3 TenGigE0/3/0/0 TenGigE0/3/0/2 MgmtEth0/RP0/CPU0/0 Step 5 unassigned unassigned unassigned unassigned unassigned unassigned unassigned unassigned unassigned unassigned unassigned unassigned unassigned unass
Chapter 7 Troubleshooting the Cisco IOS XR Software Interfaces Not Coming Up POS0/1/0/5 POS0/1/0/6 POS0/1/0/7 POS0/1/0/8 POS0/1/0/9 POS0/1/0/10 POS0/1/0/11 POS0/1/0/12 POS0/1/0/13 POS0/1/0/14 POS0/1/0/15 POS0/2/0/0 POS0/2/0/1 POS0/2/0/2 POS0/2/0/3 TenGigE0/3/0/0 TenGigE0/3/0/2 MgmtEth0/RP0/CPU0/0 Step 8 unassigned unassigned unassigned unassigned unassigned unassigned unassigned unassigned unassigned unassigned unassigned 10.10.1.101 10.1.1.1 10.1.1.
A P P E N D I X A Understanding Regular Expressions, Special Characters, and Patterns This appendix describes the regular expressions, special or wildcard characters, and patterns that can be used with filters to search through command output. The filter commands are described in the “Filtering show Command Output” section on page 6-9.
Appendix A Understanding Regular Expressions, Special Characters, and Patterns Special Characters Special Characters Certain keyboard characters have special meaning when used in regular expressions. Table A-1 lists the keyboard characters that have special meaning. Table A-1 Characters with Special Meaning Character Special Meaning . Matches any single character, including white space. * Matches 0 or more sequences of the pattern. + Matches 1 or more sequences of the pattern.
Appendix A Understanding Regular Expressions, Special Characters, and Patterns Multiple-Character Patterns Multiple-Character Patterns Multiple-character regular expressions can be formed by joining letters, digits, and keyboard characters that do not have a special meaning. With multiple-character patterns, order is important. The regular expression a4% matches the character a followed by a 4 followed by a %. If the string does not have a4%, in that order, pattern matching fails.
Appendix A Understanding Regular Expressions, Special Characters, and Patterns Pattern Alternation The order for matches using multipliers (*, +, and ?) is to put the longest construct first. Nested constructs are matched from outside to inside. Concatenated constructs are matched beginning at the left side of the construct. Thus, the regular expression matches A9b3, but not 9Ab3 because the letters are specified before the numbers.
Appendix A Understanding Regular Expressions, Special Characters, and Patterns Parentheses Used for Pattern Recall To create a regular expression that recalls a previous pattern, use parentheses to indicate memory of a specific pattern and a backslash (\) followed by a digit to reuse the remembered pattern. The digit specifies the occurrence of a parenthesis in the regular expression pattern.
Appendix A Understanding Regular Expressions, Special Characters, and Patterns Parentheses Used for Pattern Recall Cisco IOS XR Getting Started Guide A-6 OL-10957-02
G L OS S A RY A AAA authentication, authorization, and accounting. A network security service that provides the primary framework to set up access control on a Cisco CRS-1 router or access server. AAA is an architectural framework and modular means of configuring three independent but closely related security functions in a consistent manner. ACL access control list.
Glossary C card type The type of the card inserted in a slot. CDP Cisco Discovery Protocol. CDP runs on all Cisco devices so that these devices can learn about neighboring devices and exchange information. CDP uses a well-known multicast MAC address. During system initialization, the application-specific integrated circuit (ASIC) is configured to forward these packets to the Cisco IOS XR software CPU, which processes the packets. Cisco.com The Cisco website CLI command-line interface.
Glossary DIMM dual in-line memory module. Small circuit boards carrying memory integrated circuits, with signal and power pins on both sides of the board, in contrast to single-in-line memory modules (SIMMs). disk0 Name of the flash disk on which the Cisco IOS XR software is stored. disk1 Name of the optional flash disk on which the Cisco IOS XR software can be stored in preparation for installation or upgrade. DNS Domain Name System.
Glossary forwarding Process of sending a frame toward its ultimate destination by way of an internetworking device. FRR fast reroute. Automatically reroutes traffic on a label switch path (LSP) if a node or link in an LSP fails. FRR reduces the loss of packets traveling over an LSP. FTP File Transfer Protocol. Application protocol, part of the TCP/IP protocol stack, used for transferring files between network nodes. FTP is defined in RFC 959. G GE Gigabit Ethernet.
Glossary I ICMP Internet Control Message Protocol. Network layer Internet (TCP/IP) protocol that reports errors and provides other information relevant to IP packet processing. IEP IP explicit path. List of IP addresses, each representing a node or link in the explicit path. IETF Internet Engineering Task Force. Task force consisting of over 80 working groups responsible for developing Internet standards. The IETF operates under the auspices of ISOC. IGMP Internet Group Management Protocol.
Glossary L Layer 2 Layer 2 refers to the data link layer of the commonly referenced multilayered communication model, Open Systems Interconnection (OSI). The data link layer contains the address inspected by a bridge or switch. Layer 2 processing is faster than layer 3 processing, because less analysis of the packet is required. Layer 3 Layer 3 refers to the network layer of the commonly referenced multilayered communication model, Open Systems Interconnection (OSI).
Glossary MPLS TE Multiprotocol Label Switching traffic engineering. A switching method that forwards IP traffic using a label. This label instructs the routers and switches in the network where to forward the packets based on pre-established IP routing information. MSC modular services card. Module in which the ingress and egress packet processing and queueing functions are carried out in the Cisco CRS-1 architecture.
Glossary OSI Open Systems Interconnection. International standardization program created by ISO and ITU-T to develop standards for data networking that facilitate multivendor equipment interoperability. OSPF Open Shortest Path First. Link-state, hierarchical Interior Gateway Protocol (IGP) routing algorithm proposed as a successor to Routing Information Protocol (RIP) in the Internet community. OSPF features include least-cost routing, multipath routing, and load balancing.
Glossary PPP Point-to-Point Protocol. Successor to SLIP that provides router-to-router and host-to-network connections over synchronous and asynchronous circuits. Whereas SLIP was designed to work with IP, PPP was designed to work with several network layer protocols, such as IP, IPX, and ARA. PPP also has built-in security mechanisms, such as CHAP and PAP. PPP relies on two protocols: LCP and NCP. primary RP The first route processor configured for DSC or logical router operation.
Glossary routing metric A routing algorithm determines that one route is better than another. This information is stored in routing tables. Metrics include bandwidth, communication cost, delay, hop count, load, MTU, path cost, and reliability. Sometimes referred to simply as a metric. See also algorithm. routing protocol Protocol that accomplishes routing through the implementation of a specific routing algorithm. Examples of routing protocols include BGP, OSPF, and IS-IS.
Glossary SNMP Simple Network Management Protocol. SNMP is the protocol governing network management and the monitoring of network devices and their functions. It is not necessarily limited to TCP/IP networks. SNMPv3 Simple Network Management Protocol Version 3. An interoperable standards-based protocol for network management. SNMPv3 provides secure access to devices by a combination of authenticating and encrypting packets over the network.
Glossary TACACS Terminal Access Controller Access Control System. Authentication protocol, developed by the DDN community, that provides remote access authentication and related services, such as event logging. User passwords are administered in a central database rather than in individual routers, providing an easily scalable network security solution. tar A tar file is a file produced by the UNIX tar program, which packages multiple files in a single file for distribution as a single unit.
Glossary V VCSEL vertical cavity surface emitting laser. vm A vm file is a Cisco IOS XR software file that can be installed from ROM Monitor mode. A vm file is typically used to install the Cisco IOS XR software when the software has not yet been installed or has been corrupted. VPN Virtual Private Network. Enables IP traffic to travel securely over a public TCP/IP network by encrypting all traffic from one network to another. A VPN uses “tunneling” to encrypt all information at the IP level.
Glossary Cisco IOS XR Getting Started Guide GL-14 OL-10957-02
I N D EX verification Symbols Catalyst switch ? command 6-2 3-18 fabric cabling FCC 3-43 3-34 non-DSC LCC A spanning tree abbreviated commands, entering abort command admin command standalone router 6-2 6-7 2-4 C 3-39 administration configuration mode administration EXEC mode alarm correlation, logging 4-19 capitalization, keyboard shortcuts 4-19 CRS-FCC-LED See OIM LED DRP PLIM correlation 5-10 illustration 5-9 aliases, introduction 3-45 LED interpretation 6-15 PRP-2, illustr
Index supported standalone systems cisco-support user group clear command filtering 1-1 6-8 halting 4-14 6-7 narrowing 4-34, 7-11 clear configuration commit command 5-8 clear configuration sessions command 7-12 CLI redirecting to a file recall deleted entries redisplaying identifying command mode introduction logging in prompt 4-18 wildcards clock set command 4-45 command mode displaying administration configuration administration EXEC 4-19 4-35 5-4 displaying changes 5-4 5-7 c
Index loading an alternate disabling for a service 4-33 mode, entering EXEC commands overview displaying features 4-21 displaying status 4-23 reloading a failed configuration submodes 4-20 target configuration 7-6 default SDR 4-1 7-5 7-6 designated shelf controller loading from a file saving to a file See DSC 4-33 domain name, configuration 4-33 templates domain name command applying 5-1 5-2 domain name server, configuration 6-14 creating domain name-server command 6-12 confi
Index IS-IS, configuration limits F 5-17 FCC serial number physical location K 3-6 file, redirecting output to 6-8 filters, command output keyboard shortcuts 6-8 capitalization flash disk configuration file storage 4-36 6-18 command history 6-17 cursor movement 6-18 deleting text 6-19 recalling deleted entries G transposing letters GBIC transceiver module 6-19 3-10 Gigabit Interface Converter (GBIC) transceiver module 3-10 global configuration mode group command 6-17 L 4-20 LC
Index administration EXEC M 4-19 configuration submodes Management Ethernet interface configuring displaying EXEC 4-39 4-5 ROM monitor establishing a connection through 4-10 maximum external-sa command DRP PLIM illustration 4-4 PRP-2 illustration 5-23 5-23 5-23 number displayed in prompt 5-23 More prompt maximum interfaces command 5-18 maximum path ipv4 command 5-16 maximum path ipv6 command 5-16 4-12 6-7 configuration limits 5-23 mpls traffic-eng maximum tunnels command multica
Index rollback O configuration oim count command 3-31 oim instance command loading changes to the target configuration 3-31 overview OIM LED card illustration procedure LED interpretation operator user group 3-46 4-14 5-17 4-1 package incompatibility 5-3 rollback configuration command 5-6 ROM monitor mode root command 4-21 4-37 root-lr user group P 4-14 root-system user group password command DRP PLIM illustration 5-15 PRP-2 illustration 1-12, 4-5 1-10, 4-3 RP for 4-slot and
Index show configuration sessions command S show context command save configuration command 4-33 7-2 show controller command SDR 7-2 show controllers command introduction logging in named 4-1 owner 4-1 4-1 7-2 show controllers fabric connectivity command 4-11 secret command show controllers fabric plane command show controllers fabric rack command show debug command 5-15 show environment command See SDR show exception command serial number show history LCC location 3-7 show igmp
Index show running-config router ospf command show running-config router static command show running-config sanitized command show task supported command show tech-support command show user command status LEDs 5-18 CRS-FCC-LED 5-16 show version command anchor characters Simple Network Management Protocol 1-7 slot number 6-4 pattern alternation A-4 sysadmin user group spanning tree, verification 3-39 A-4 4-14 T 4-11 tab key standalone router 6-4 target configuration 2-2 clearing cha
Index terminal server, establishing a connection through terminal settings, default values time, setting the router clock X 1-13, 4-7, 4-9 XML 4-44 time zone, setting the router clock traceroute command 4-8 API 4-44 1-6 host service configuration 7-4 5-2 troubleshooting basic commands 7-1 displaying system memory information errors at startup 7-10 7-8 failed commit operation low memory warnings 7-8 7-9 type, card type displayed in prompt 4-12 U undebug all command 7-7 underscore wil
Index Cisco IOS XR Getting Started Guide IN-10 OL-10957-02