
Router Quick Start Guide


5
Step 4 Insert and tighten the black screws on one side.
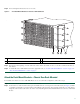
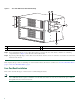
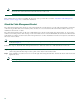
Figure 2 Front Rack-Mount Brackets for the Cisco ASR 1006 Router
Step 5 Repeat Step 1 through Step 4 on the other side of the chassis. Use black screws to secure the rack-mount brackets to
the chassis.
Step 6 To install the Cisco ASR 1006 Router in the equipment rack, see “Four-Post Rack Installation” section on page 6 or
“Two-Post Rack Installation” section on page 8.
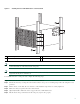
Attach the Rack-Mount Brackets—Chassis Rear Rack-Mounted
To install the rack-mount on a Cisco ASR 1006 Router for a rear rack-mount configuration, follow these steps:
Step 1 Locate the threaded holes in the rear sides of the chassis.
Step 2 Position the rear rack-mount bracket top hole with the chassis second top hole in from the back (See Figure 2). Make
certain that you hold the rear rack-mount bracket with the earholes facing outward and towards the rear of the chassis.
Align the rack-mount bracket to the side of the router.Attaching the Rear Rack-Mount Brackets to the Cisco ASR 1006
Router.
1
Front rack-mount bracket screws
3
Front rack-mount bracket ear holes
2
Front rack-mount bracket
4
Side vent location
2
1
0
R
1
R0
280035
0
1
2
C/
A
C
/
A
ST
AT
U
S
STAT
US
0
A
/L
A
/
L
C
/
A
C
/A
A
/L
A
/L
C
/
A
C
/
A
A
/L
A/
L
C
/
A
C
/
A
A
/L
A
/
L
1
2
3
3
S
P
A-
4
XOC3
-
PO
S
S
P
A-
4
XOC3
-
PO
S
0
1
2
C
/
A
C
/
A
S
T
A
T
U
S
STA
T
U
S
0
A/L
A
/
L
C
/
A
C
/A
A
/L
A
/L
C
/
A
C
/
A
A
/L
A
/
L
C
/
A
C
/
A
A
/L
A
/
L
1
2
3
3
S
P
A-4
XO
C3
-
PO
S
S
P
A-
4
XOC3-
PO
S
0
1
2
C
/
A
C
/
A
S
T
A
TUS
S
T
A
T
U
S
0
A
/L
A
/
L
C
/
A
C
/A
A
/L
A
/L
C
/
A
C
/
A
A
/L
A
/
L
C
/
A
C
/
A
A/L
A
/L
1
2
3
3
S
P
A-
4
XO
C3
-
PO
S
S
P
A-4
XO
C3
-
PO
S
0
1
2
C
/
A
C
/
A
S
T
A
T
U
S
S
TA
T
U
S
0
A
/L
A
/
L
C
/
A
C
/A
A
/L
A
/L
C
/
A
C
/
A
A
/L
A
/
L
C/A
C/A
A
/
L
A
/
L
1
2
3
3
S
P
A
-
4
X
O
C3
-
P
O
S
S
PA
-
4
X
O
C3-P
O
S
0
1
2
C/A
C
/
A
S
T
AT
U
S
S
T
A
T
U
S
0
A
/L
A
/
L
C
/
A
C
/A
A
/L
A
/L
C/A
C
/
A
A
/L
A
/
L
C
/
A
C
/
A
A
/
L
A
/
L
1
2
3
3
S
PA
-
4
X
O
C3-
P
O
S
S
P
A
-
4
X
O
C3
-
P
O
S
0
1
2
C
/
A
C
/
A
S
T
A
T
U
S
S
T
A
T
US
0
A
/L
A
/
L
C
/
A
C
/A
A
/
L
A
/L
C
/
A
C
/
A
A
/L
A
/
L
C
/
A
C
/
A
A
/
L
A
/
L
1
2
3
3
S
PA
-
4
X
O
C3
-
P
O
S
S
PA
-
4
X
O
C3-
P
O
S
ASR10
0
0
-SIP10
PWR
S
T
A
TU
S
ASR
1
0
0
0
-SIP10
PW
R
S
T
A
TU
S
ASR10
0
0
-SIP10
P
WR STATU
S
BIT
S
C
ON
A
UX
BIT
S
C
O
N
A
UX
C
A
R
R
I
ER
LINK
M
G
M
T E
THE
R
N
E
T
CARRIER
LINK
M
GM
T E
THE
R
N
E
T
R0
Cisc
o
ASR 1006
S
T
B
Y
A
CT
V
ST
A
T
A
SR
1
00
0-ES
P10
P
W
R
S
T
B
Y
A
CT
V
ST
A
T
A
SR
1
0
00
-ESP10
P
WR
0
1
DI
SK
B
F
U
S
B
H
D
M
I
N
A
C
O
M
A
J
ST
B
Y
AC
TV
S
T
A
T
A
S
R
1
000-RP1
P
WR
C
R
I
T
0
1
DI
S
K
B
F
U
S
B
H
D
M
I
N
A
C
O
M
A
J
ST
BY
ACTV
ST
A
T
AS
R1
000
-
R
P
1
P
WR
C
R
I
T
2
1
0
R
1
R0
F
1
F
0
1
2
0
F
1
R
1
F0
3 2 14