
Router Quick Start Guide

28
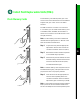
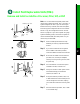
Step 8 If you have a VIP4 and are using HSA with an RSP2 as the slave processor, wait 20-30 seconds, and
then reinsert the RSP2.
Install Field Replaceable Units (FRUs)
Step 9 Repeat Step 2 through Step 8 to remove
anyadditionalinterfaceprocessors,fillers,
VIPs, or RSPs.
Step 10 Perform the steps in the “Install Interface
Processors, Fillers, VIPs, or RSPs” section
on page 9 toinstall aninterface processor,
filler, VIP, or RSP.
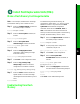
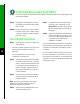
Check the RSP Installation
Step 1 Check the RSP connections to make sure
they are secure:
• The RSP is inserted all the way into its slot, and
both the captive installation screws are
tightened.
• The console terminal is turned on and is
connected to the console port.
Step 2 Observe the RSP LEDs. While the system
initializes, the CPU halt LED on the RSP
stayson. It goesoff whenthe bootprocess
is complete. As the RSP initializes each
interface processor, the status LEDs on
each interface processor go on and off in
irregular sequence.
Step 3 Verify that the console terminal displays
the system banner and startup screen as
the system restarts.
Note Boot time is approximately 1 minute for
systems with one RSP and approximately 1.5
minutes for systems with two RSPs.
Step 4 Verify that all the enabled LEDs (on the
interface processors) are on.
Step 5 In systems with a second RSP installed
(and HSA or HA configured), use the
show version command to verify that the
slave (or standby) RSP is recognized by
the system.
Step 6 When you have verified all the conditions
in Step 1 through Step 4 (or Step 5 if you
have a second RSP installed and want to
use the HSA or HA features), the
installation is complete.
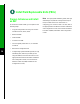
IfyoureplacedtheRSPandsavedyour configuration
fileto a remote serverbefore doingso, proceed tothe
“Retrieve the Configuration File for RSPs” section
on page 33.
An error condition exists if no LEDs go on at power
up or after initialization, or if the boot error or CPU
halt LEDs go on and remain on. If this happens, see
AppendixA in the Cisco 7500 Series Installationand
Configuration Guide.